Client credentials authentication
Overview
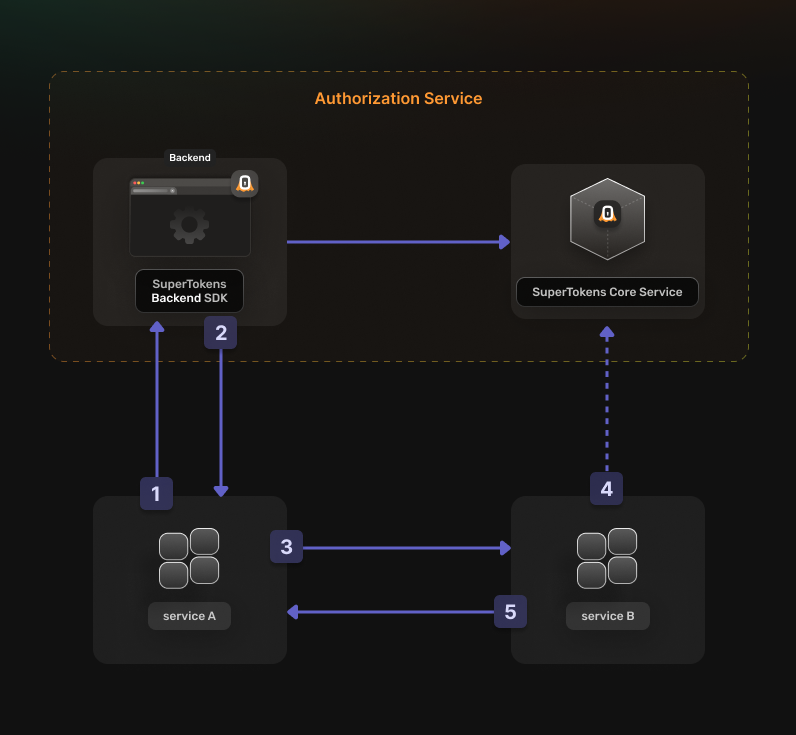
In the Client Credentials Flow the authentication sequence works in the following way:
Before going into the actual instructions, start by imagining a real life example that you can reference along the way. This makes it easier to understand what is happening.
We are going to configure authentication for the following setup:
- A Calendar Service that exposes these actions: event.view, event.create, event.update and event.delete
- A File Service that exposes these actions: file.view, file.create, file.update and file.delete
- A Task Service that interacts with the Calendar Service and the File Service in the process of scheduling a task
The aim is to allow the Task Service to perform an authenticated action on the Calendar Service. Proceed to the actual steps.
Before you start
This feature is only available to paid users.
These instructions assume that you already have gone through the main quickstart guide. If you have skipped that page, please follow the tutorial and return here once you're done.
Steps
1. Enable the OAuth2 features from the Dashboard
You first have to enable the OAuth2 features from the SuperTokens.com Dashboard.
- Open the SuperTokens.com Dashboard
- Click on the Enabled Paid Features button
- Click on Managed Service
- Check the Unified Login / M2M option
- Click Save
You should be able to use the OAuth2 recipes in your applications.
2. Create the OAuth2 Clients
For each of your microservices you need to create a separate OAuth2 client. This can occur by directly calling the SuperTokens Core API.
curl --location --request POST '<CORE_API_ENDPOINT>/recipe/oauth/clients' \
     --header 'api-key: <YOUR_API_KEY>' \
     --header 'Content-Type: application/json; charset=utf-8' \
     --data '
    {
      "clientName": "<YOUR_CLIENT_NAME>",
      "grantTypes": ["client_credentials"],
      "scope": "<custom_scope_1> <custom_scope_2>",
      "audience": ["<AUDIENCE_NAME>"],
    }
'
To create a client for the Task Service, use the following attributes:
  {
    "clientName": "Task Service",
    "grantTypes": ["client_credentials"],
    "scope": "event.view event.create event.edit event.delete file.view file.create file.edit file.delete",
    "audience": ["event", "file"]
  }
This allows the Task Service to perform all types of actions against both of the other services as long as it has a valid OAuth2 Access Token.
You have to save the create response because this is not persisted internally for security reasons. The information is necessary for the next steps.
3. Set Up your Authorization Service
In your Authorization Server backend, initialize the OAuth2Provider recipe.
Update the supertokens.init call to include the new recipe.
import supertokens from "supertokens-node";
import OAuth2Provider from "supertokens-node/recipe/oauth2provider";

supertokens.init({
    supertokens: {
        connectionURI: "...",
        apiKey: "...",
    },
    appInfo: {
        appName: "...",
        apiDomain: "...",
        websiteDomain: "...",
    },
    recipeList: [
      OAuth2Provider.init(),
    ]
});
4. Generate access tokens
App Info
Adjust these values based on the application that you are trying to configure. To learn more about what each field means check the references page.You can directly call the Authorization Server to generate Access Tokens. Check the following code snippet to see how you can do that:
curl -X POST <YOUR_API_DOMAIN>/auth/oauth/token \
-H "Content-Type: application/json" \
-d '{
  "client_id": "<CLIENT_ID>",
  "client_secret": "<CLIENT_SECRET>",
  "grant_type": "client_credentials",
  "scope": ["<RESOURCE_SCOPE>"],
  "audience": "<AUDIENCE>"
}'
You should limit the scopes that you are requesting to the ones necessary to perform the desired action.
If the Task Service wants to create an event on the Calendar Service, a token with the following attributes needs generation:
  {
    "client_id": "<TASK_SERVICE_CLIENT_ID>",
    "client_secret": "<TASK_SERVICE_CLIENT_SECRET>",
    "grant_type": "client_credentials",
    "scope": ["event.create"],
    "audience": "event"
  }
The Authorization Server returns a response that looks like this:
{
    "access_token": "<TOKEN_VALUE>",
    "expires_in": 3600
}
Save the access_token in memory for use in the next step. The expires_in field indicates how long the token is valid for.
Each service that you communicate with needs its own token.
With an OAuth2 Access Token, it can facilitate communication with the other services. Keep in mind to generate a new one when it expires.
5. Verify an OAuth2 Access Token
To check the validity of a token, use a generic JWT verification library.
Besides the standard OAuth2 token claims, the implementation includes an additional one called stt. This stands for SuperTokens Token Type. It ensures that the validation occurs for the correct token type:
- 0 represents a SuperTokens Session Access Token
- 1 represents an OAuth2 Access Token
- 2 represents an OAuth2 ID Token.
For NodeJS you can use jose to verify the token.
import * as jose from "jose";

const JWKS = jose.createRemoteJWKSet(new URL('<YOUR_API_DOMAIN>/auth/jwt/jwks.json'))

async function validateClientCredentialsToken(jwt: string) {
  const requiredScope = "<YOUR_REQUIRED_SCOPE>";
  const audience = '<AUDIENCE>';

  try {
    const { payload } = await jose.jwtVerify(jwt, JWKS, {
      audience,
      requiredClaims: ['stt', 'scp'],
    });

    if(payload.stt !== 1) return false;

    const scopes = payload.scp as string[];
    return scopes.includes(requiredScope);
  } catch (err) {
    return false;
  }
}
If the Task Service uses the previously generated token to create a calendar event, the Calendar Service needs to check the following:
- Set the stt claim to 1
- The scp claim contains event.create
- Set the aud claim to event
Handle both SuperTokens session tokens and OAuth2 access tokens
If you are using your Authorization Service also as a Resource Server, account for this in the way you verify the sessions.
This is necessary because two types of tokens are in use:
- SuperTokens Session Access Token: Used during the login/logout flows.
- OAuth2 Access Token: Used to access protected resources and perform actions that need authorization.
Hence, a way to distinguish between these two and prevent errors is necessary.
import supertokens from "supertokens-node";
import Session from "supertokens-node/recipe/session";
import express, { Request, Response, NextFunction } from 'express';
import * as jose from "jose";

async function verifySession(req: Request, res: Response, next: NextFunction) {
  let session = undefined;
  try {
    session = await Session.getSession(req, res, { sessionRequired: false });
  } catch (err) {
    if (
      !Session.Error.isErrorFromSuperTokens(err) ||
      err.type !== Session.Error.TRY_REFRESH_TOKEN
    ) {
      return next(err);
    }
  }

  // In this case we are dealing with a SuperTokens Session that has been validated
  if (session !== undefined) {
    return next();
  }

  // The OAuth2 Access Token needs to be manually extracted and validated
  let jwt: string | undefined = undefined;
  if (req.headers["authorization"]) {
    jwt = req.headers["authorization"].split("Bearer ")[1];
  }
  if (jwt === undefined) {
    return next(new Error("No JWT found in the request"));
  }

  try {
    await validateToken(jwt);
    return next();
  } catch (err) {
    return next(err);
  }
}

const JWKS = jose.createRemoteJWKSet(
  new URL("<YOUR_API_DOMAIN>/authjwt/jwks.json"),
);

// This is a basic example on how to validate an OAuth2 Token
// Use the previous example to extend it
async function validateToken(jwt: string) {
  const { payload } = await jose.jwtVerify(jwt, JWKS, {
    requiredClaims: ["stt", "scp", "sub"],
  });

  if (payload.stt !== 1) throw new Error("Invalid token");

  // If the Authorizaton Server will handle different types of Authorization Flows
  // You can differentiate between the different types of tokens by checking the `sessionHandle` claim
  const sessionHandle = payload['sessionHandle'] as string | undefined;
  if(sessionHandle === undefined) {
    // We are dealing with a Client Credentials Token
    // You can perform microservice authentication checks here
  } else {
    // Here we are validating tokens that have been generated in the Authorization Code Flow
  }
}

// You can then use the function as a middleware for a protected route
const app = express();
app.get("/protected", verifySession, async (req, res) => {
    // Custom logic
});