Legacy flow
Overview
This custom flow makes use of the SuperTokens Core without adhering to the OAuth2 standard. It involves creating private access tokens and passing them to the microservices.
The authentication sequence works in the following way:
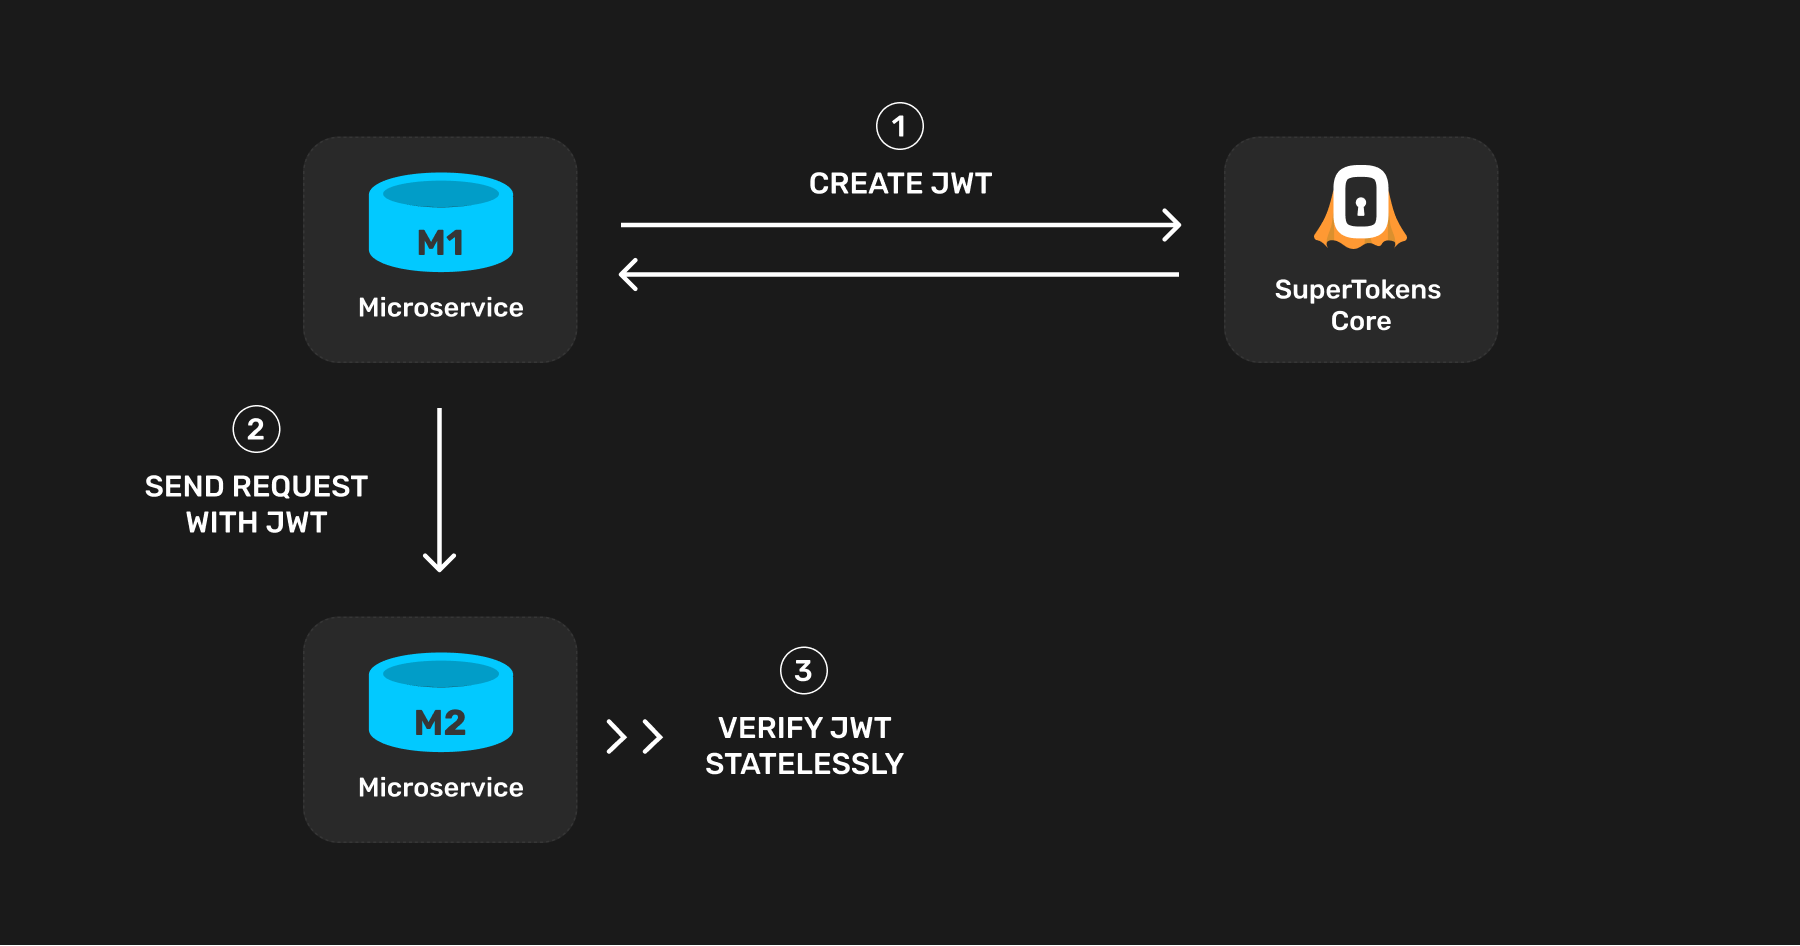
The first step is to create a JWT from the microservice that sends the request (refer to this microservice as M1). Other microservices verify this JWT when M1 sends them a request. Since this JWT remains static per microservice, the best time to create this is on process starts - that is when M1 starts.
The JWT can contain any information you like. At a minimum, it needs to contain information proving that it is a microservice allowed to query other microservices in your infrastructure. This is necessary since you may issue a JWT to an end user as well, and they should not be able to query any microservice directly. Add the following claim in the JWT to "mark" the JWT as one meant for microservice auth only:
{..., "source": "microservice", ...}
In the receiving microservice (M2), verify the JWT and check that this claim is present before serving the request.
Security considerations
Who can query the microservices?
Anyone or any service that has direct access to the SuperTokens core can produce a valid JWT and query your microservices. If the core is open to the internet, you must add an API key to protect it. Even though end users may receive a JWT for their session (that the core signs), they cannot query a microservice directly. Their JWT should not have the source: "microservice" claim in it.
What happens if someone compromises the core's API key?
Then the attacker can issue their own JWTs to be able to query your microservices. To limit this protection, you may want to add firewall rules to allow access to the core only from services on your backend. You can also provide multiple API keys to the core and give a unique key to each microservice in your infrastructure. This way, it would be easier to track where a leak came from.
What happens if someone compromises the JWT signing key?
In this case, the attacker could fabricate their own JWT to be able to query your microservices. To limit this risk, a JWT signing key rotation methodology is in place. Until then, you can limit the reachability of your microservices based on the request's IP address.
How to limit which microservice can query another one?
If an organisation has multiple teams and microservices, it is common to limit which other services a given microservice can query. For example, if there exists M1, M2 and M3 microservices, there may be a situation in which M1 should only be able to query M2 and not M3. With one SuperTokens core deployment, having this type of restriction is impossible. All the microservices create and verify their JWTs using the same public/private keys. Therefore M3 receives a request, it has no way of reliably knowing if the request is from M1 or M2 (assuming that IP-based access control is not implemented). This type of restriction can occur by deploying multiple cores connected to their own databases. In this example, a dedicated SuperTokens core can handle M3's auth, such that only M3 uses that to verify the incoming JWTs. Then, only other services that have access to that core can create JWTs that M3 accepts. If M1 doesn't have access to M3's core's API key, it can be assured that successful requests to M3 are not from M1.
Steps
1. Create a JWT
Are you using the SuperTokens SDK?
First, initialize the JWT recipe in the supertokens.init function call:
import supertokens from "supertokens-node"
import jwt from "supertokens-node/recipe/jwt"

supertokens.init({
    appInfo: {
        apiDomain: "...",
        appName: "...",
        websiteDomain: "..."
    },
    supertokens: {
        connectionURI: "...", // location of the core
        apiKey: "..." // provide the core's API key if configured
    },
    recipeList: [
        jwt.init()
    ]
})
- The value of apiDomain should be the domain part of the JWKS URL used to verify the JWT (from M2). This should ideally be the domain of the microservice that has all the other SuperTokens' recipes initialized in them.
- If this microservice does not initialize any other recipe, the values of appName and websiteDomain don't matter.
After this, you can use the JWT recipe to create your own JWT whenever required:
import jwt from "supertokens-node/recipe/jwt"

async function createJWT(payload: any) {
    let jwtResponse = await jwt.createJWT({
        ...payload,
        source: "microservice"
    });
    if (jwtResponse.status === "OK") {
        // Send JWT as Authorization header to M2
        return jwtResponse.jwt;
    }
    throw new Error("Unable to create JWT. Should never come here.")
}
By default, the lifetime of the JWT is a 100 years. You can pass a second argument to the createJWT function indicating a custom lifetime (in seconds) for the JWT.
By default, the JWT uses a static key for signing, not subject to the key rotation normally applied to access tokens. You can pass false as the third argument to the createJWT function to use the dynamic keys.
2. Store the JWT
Once you create the JWT, you can store it in a (globally accessible) variable and access it when you want to talk to a microservice. Add the JWT as an Authorization: Bearer token like this:
curl --location --request POST 'https://microservice_location/path' \
--header 'Authorization: Bearer eyJraWQiOiI0YTE...rCFPcIRgzu_bChIIpFdA' \
--header 'Content-Type: application/json; charset=utf-8' \
--data-raw '{
    "request": "payload"
}'
3. Verify JWTs
App Info
Adjust these values based on the application that you are trying to configure. To learn more about what each field means check the references page.When a target microservice receives a JWT, it must first verify it before proceeding to serve the request. The process involves two steps:
- A standard verification of the JWT
- Checking the JWT claim to make sure that another microservice has queried it.
Using JWKS endpoint
Get JWKS endpoint
The JWKS endpoint is <YOUR_API_DOMAIN>//auth/jwt/jwks.json. Here the apiDomain and apiBasePath are values pointing to the server in which you have initialized SuperTokens using the backend SDK.
Verify the JWT
Some libraries let you provide a JWKS endpoint to verify a JWT. For example for NodeJS you can use jsonwebtoken and jwks-rsa together to achieve this.
import JsonWebToken, { JwtHeader, SigningKeyCallback } from 'jsonwebtoken';
import jwksClient from 'jwks-rsa';

var client = jwksClient({
  jwksUri: '<YOUR_API_DOMAIN>/auth/jwt/jwks.json'
});

function getKey(header: JwtHeader, callback: SigningKeyCallback) {
  client.getSigningKey(header.kid, function (err, key) {
    var signingKey = key!.getPublicKey();
    callback(err, signingKey);
  });
}

let jwt = "...";
JsonWebToken.verify(jwt, getKey, {}, function (err, decoded) {
  let decodedJWT = decoded;
  // Use JWT
});
Using public key string
Some JWT verification libraries require you to provide the JWT secret / public key for verification. You can obtain the JWT secret from SuperTokens in the following way:
-
First, query the JWKS.json endpoint:
curl --location --request GET '<YOUR_API_DOMAIN>/auth/jwt/jwks.json'

{
  "keys": [
    {
      "kty": "RSA",
      "kid": "s-2de612a5-a5ba-413e-9216-4c43e2e78c86",
      "n": "AMZruthvYz7Ft-Dp0BC_SEEJaWK91s_YA-RR81iLJ6BTT6gJp0CcV4DfBynFU_59dRGOZyVQpAW6Drnc_6LyZpVWHROzqt-Fjh8TAqodayhPJVuZt25eQiYrqcaK_dnuHrm8qwUq-hko6q1o9NIIZWNfUBEVWmNhyAJFk5bi3pLwtKPYrUQzVLcTdDUe4SIltvvfpYHbVFnYtxkBVmqO68j7sI8ktmTXM_heals-W6WmozabDkC9_ITCeRat2f7A2l0t4QzO0ZCzZcJfhusF4X1niKgY6yYXpbX6is4HCfhYfdabcE52xYMNl-gw9XDjsIxfBMUDvOFRHWlx0rU8c=",
      "e": "AQAB",
      "alg": "RS256",
      "use": "sig"
    },
    {
      "kty": "RSA",
      "kid": "d-230...802340",
      "n": "AMZruthvYz7...lx0rU8c=",
      "e": "...",
      "alg": "RS256",
      "use": "sig"
    }
  ]
}importantThe above shows an example output which returns two keys. There could be more keys returned based on the configured key rotation setting in the core. If you notice, each key's kid starts with a s-.. or a d-... The s-.. key is a static key that never changes, whereas d-... keys are dynamic keys that keep changing. If you are hardcoding public keys somewhere, you always want to pick the s-.. key.
-
Next, run the NodeJS script below to convert the above output to a PEM file format.
import jwkToPem from 'jwk-to-pem';

// This JWK is copied from the result of the above SuperTokens core request
let jwk = {
  "kty": "RSA",
  "kid": "s-2de612a5-a5ba-413e-9216-4c43e2e78c86",
  "n": "AMZruthvYz7Ft-Dp0BC_SEEJaWK91s_YA-RR81iLJ6BTT6gJp0CcV4DfBynFU_59dRGOZyVQpAW6Drnc_6LyZpVWHROzqt-Fjh8TAqodayhPJVuZt25eQiYrqcaK_dnuHrm8qwUq-hko6q1o9NIIZWNfUBEVWmNhyAJFk5bi3pLwtKPYrUQzVLcTdDUe4SIltvvfpYHbVFnYtxkBVmqO68j7sI8ktmTXM_heals-W6WmozabDkC9_ITCeRat2f7A2l0t4QzO0ZCzZcJfhusF4X1niKgY6yYXpbX6is4HCfhYfdabcE52xYMNl-gw9XDjsIxfBMUDvOFRHWlx0rU8c=",
  "e": "AQAB",
  "alg": "RS256",
  "use": "sig"
};

let certString = jwkToPem(jwk);
The above snippet would generate the following certificate string:
-----BEGIN PUBLIC KEY-----
MIIBIjANBgkqhkiG9w0BAQEFAAOCAQ8AMIIBCgKCAQEAxmu62G9jPsW34OnQEL9I
QQlpYr3Wz9gD5FHzWIsnoFNPqAmnQJxXgN8HKcVT/n11EY5nJVCkBboOudz/ovJm
... (truncated for display)
XhfWeIqBjrJheltfqKzgcJ+Fh91ptwTnbFgw2X6DD1cOOwjF8ExQO84VEdaXHStT
xwIDAQAB
-----END PUBLIC KEY----- -
You can use the generated PEM string in your code like shown below:
import JsonWebToken from 'jsonwebtoken';

// Truncated for display
let certificate = "-----BEGIN PUBLIC KEY-----\nnMIIBIjANBgkqhki...\n-----END PUBLIC KEY-----";
let jwt = "..."; // fetch the JWT from sAccessToken cookie or Authorization Bearer header
JsonWebToken.verify(jwt, certificate, function (err, decoded) {
    let decodedJWT = decoded;
    // Use JWT
});
Claim verification
The second step is to get the JWT payload and check that it has the "source": "microservice" claim:
import JsonWebToken, { JwtHeader, SigningKeyCallback } from 'jsonwebtoken';
import jwksClient from 'jwks-rsa';

var client = jwksClient({
  jwksUri: '<YOUR_API_DOMAIN>/auth/jwt/jwks.json'
});

function getKey(header: JwtHeader, callback: SigningKeyCallback) {
  client.getSigningKey(header.kid, function (err, key) {
    var signingKey = key!.getPublicKey();
    callback(err, signingKey);
  });
}

let jwt = "...";
JsonWebToken.verify(jwt, getKey, {}, function (err, decoded) {
  let decodedJWT = decoded;
  if (decodedJWT === undefined || typeof decodedJWT === "string" || decodedJWT.source === undefined || decodedJWT.source !== "microservice") {
    // return a 401 unauthorised error
  } else {
    // handle API request...
  }
});
M2M and frontend session verification for the same API
You may have a setup wherein the same API receives calls from the frontend as well as from other microservices. The frontend session works differently than m2m sessions, therefore both forms of token inputs must be accounted for.
The approach here would be to first attempt frontend session verification, and if that fails, then attempt m2m JWT verification (using the above method). If both fail, then send back a 401 response.
The getSession function serves for frontend session verification.
import express from "express";
import Session from "supertokens-node/recipe/session";
import JsonWebToken, { JwtHeader, SigningKeyCallback } from 'jsonwebtoken';
import jwksClient from 'jwks-rsa';

let app = express();


var client = jwksClient({
  jwksUri: '<YOUR_API_DOMAIN>/auth/jwt/jwks.json'
});

function getKey(header: JwtHeader, callback: SigningKeyCallback) {
  client.getSigningKey(header.kid, function (err, key) {
    var signingKey = key!.getPublicKey();
    callback(err, signingKey);
  });
}


app.post("/like-comment", async (req, res, next) => {
    try {
        let session = await Session.getSession(req, res, { sessionRequired: false })

        if (session !== undefined) {
            // API call from the frontend and session verification is successful..
            let userId = session.getUserId();
        } else {
            // maybe this API is called from a microservice, so we attempt JWT verification as
            // shown above.
            let jwt = req.headers["authorization"];
            jwt = jwt === undefined ? undefined : jwt.split('Bearer ')[1];
            if (jwt === undefined) {
                // return a 401 unauthorised error...
            } else {
                JsonWebToken.verify(jwt, getKey, {}, function (err, decoded) {
                  let decodedJWT = decoded;
                  // microservices auth is successful..
                });
            }
        }
    } catch (err) {
        next(err);
    }
});
- Notice that the sessionRequired: false option appears when calling getSession. This is because in case the input tokens are from another microservice, then instead of throwing an unauthorised error, the getSession function returns undefined. It's important to note that if the session does exist, but the access token has expired, the getSession function throws a try refresh token error, sending a 401 to the frontend. This triggers a session refresh flow as expected.
- If the getSession function returns undefined, it means that the session is not from the frontend and a microservice auth verification can occur using the JWT verification method shown previously in this page.
- If that fails too, send back a 401 response.