Supabase Guide
Overview
The following guide shows you how to integrate a Next.js app with SuperTokens and Supabase. It includes instructions on how to:
- Create a Supabase project with a table to store your user data
- Create a Supabase JWT and store the user's session
- Enable row level security policies in your Supabase table to ensure only authorized users can access their data
In this example, the user's email is stored mapped to their SuperTokens userId in Supabase.
You can also check an example repository for specific references.
Before you start
The guide does not include instructions on how to setup a Next.js app with SuperTokens. To do this you can follow the app router or pages router instructions.
Steps
1. Configure Supabase
Supabase provides a database with authentication and authorization features. This guide uses Supabase to store the user's info mapped to their SuperTokens userId.
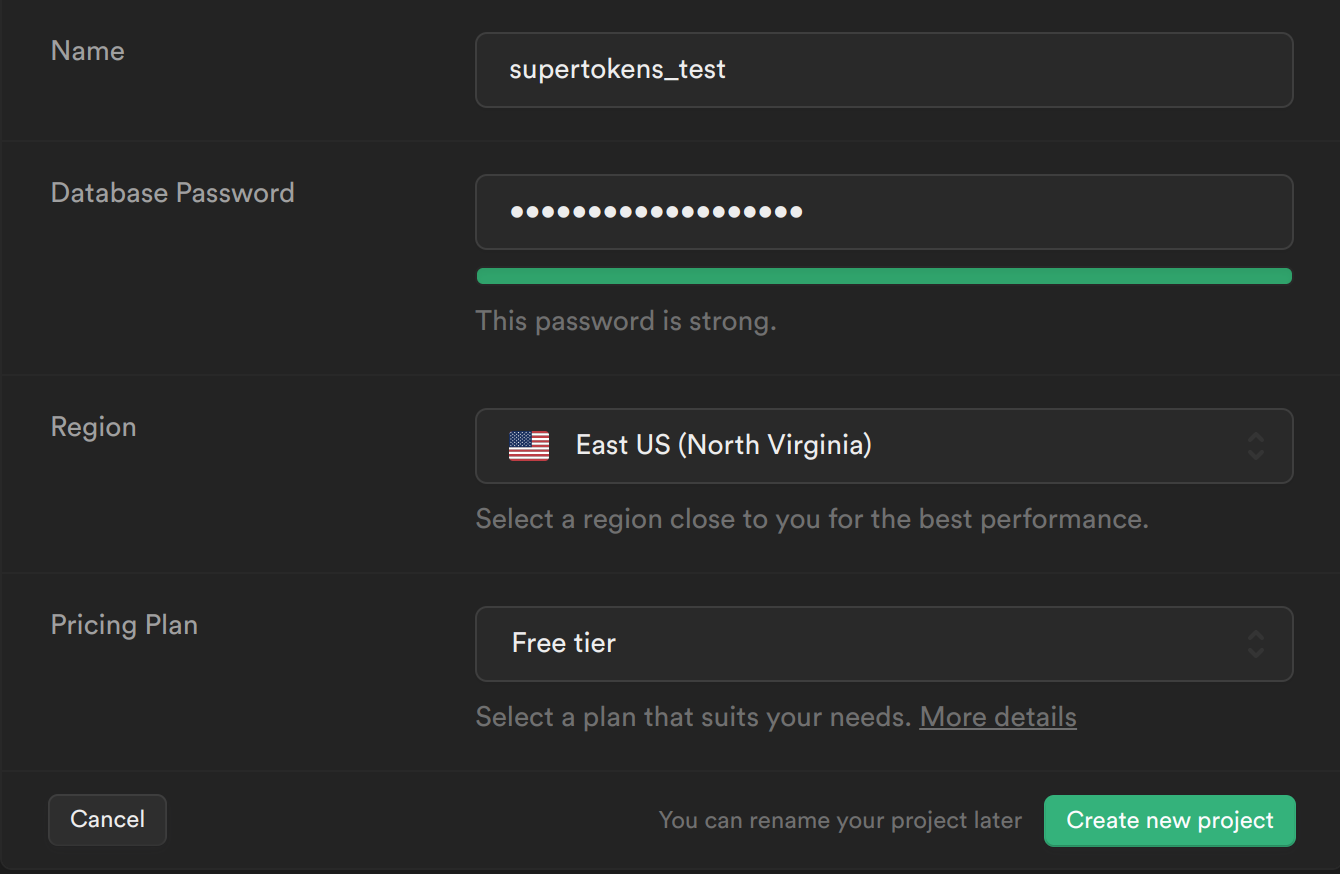
1.1 Create a new Supabase project
- From your Supabase dashboard, click New project.
- Enter a Name for your Supabase project.
- Enter a secure Database Password.
- Select the same Region you host your app's backend in.
- Click Create new project.
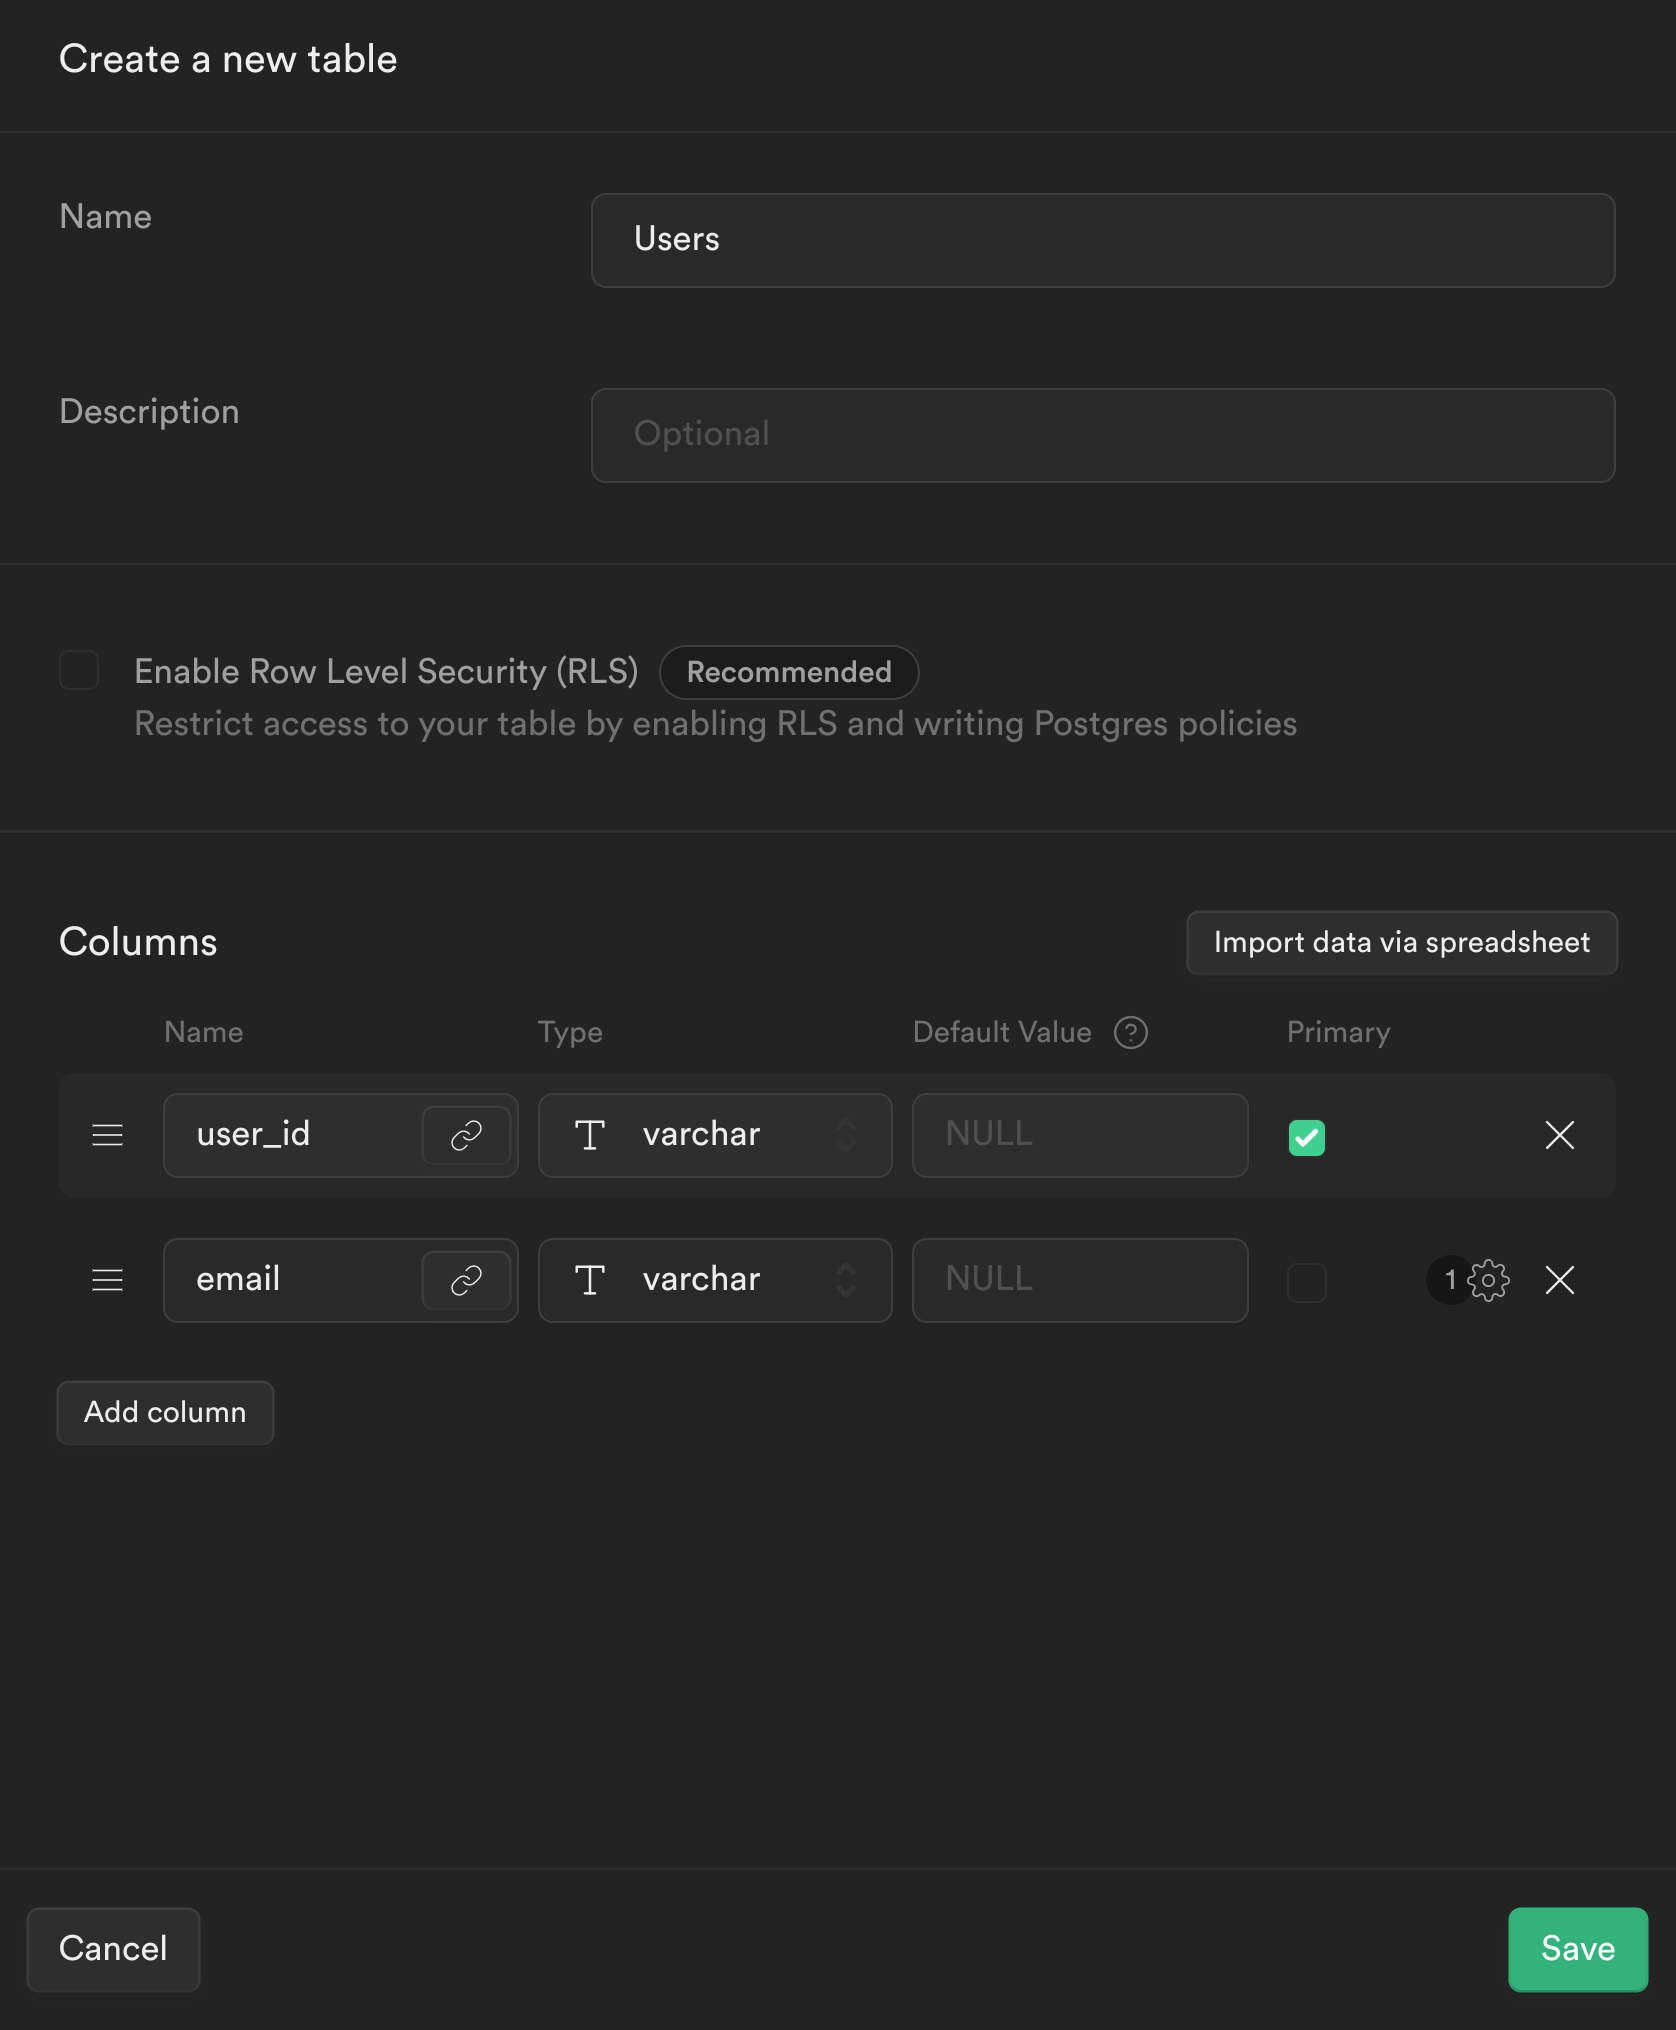
1.2 Create the user table in Supabase
- From the sidebar menu in the Supabase dashboard, click Table editor, then New table.
- Enter users as the Name field.
- Select Enable Row Level Security (RLS).
- Remove the default columns
- Create two new columns:
- user_id as varchar as primary key
- email as varchar
- Click Save to create the new table.
2. Setup JWT creation
In this section, the SuperTokens backend is overridden to create a JWT signed with Supabase's secret which contains the user's userId. This token is used on the frontend and backend to read and write to Supabase's database.
2.1 Integrate your Next.js app with SuperTokens
Follow either the app router or pages router guides for instructions on how to configure your application.
2.2 Save the Supabase configuration values
Retrieve the Supabase configuration values from the dashboard and add them to your .env file:
// retrieve the following from your supabase dashboard

NEXT_PUBLIC_SUPABASE_URL=
NEXT_PUBLIC_SUPABASE_KEY=
SUPABASE_SIGNING_SECRET=
2.3 Create the Supabase JWT
In the Next.js app when a user signs up, you'll want to store the user's email in Supabase. The email can then be retrieved from Supabase and displayed on the frontend. To use the Supabase client to query the database, you need to create a JWT signed with your Supabase app's signing secret. This JWT also needs to contain the user's userId so Supabase knows an authorized user is making the request. To create this flow, SuperTokens needs to be modified so that, when a user signs up or signs in, a JWT signed with Supabase's signing secret is created and attached to the user's session. Attaching the JWT to the user's session allows the Supabase JWT to be retrieved on the frontend and backend (post session verification), which can then be used to query Supabase.
To create the JWT signed with Supabase's signing secret, the jsonwebtoken library is used.
npm install jsonwebtoken
The JWT can be added to the user's session by overriding the createNewSession function and adding it to the accessTokenPayload
// config/backendConfig.ts

import EmailPassword from "supertokens-node/recipe/emailpassword";
import SessionNode from "supertokens-node/recipe/session";
import { TypeInput, AppInfo } from "supertokens-node/types";
import jwt from "jsonwebtoken";

let appInfo: AppInfo = {
    appName: "TODO: add your app name",
    apiDomain: "TODO: add your website domain",
    websiteDomain: "TODO: add your website domain"
}

let supabase_signing_secret = process.env.SUPABASE_SIGNING_SECRET || "TODO: Your Supabase Signing Secret";

let backendConfig = (): TypeInput => {
    return {
        framework: "express",
        supertokens: {
            connectionURI: "https://try.supertokens.com",
        },
        appInfo,
        recipeList: [
            EmailPassword.init({/*...*/}),
            SessionNode.init({
                override: {
                    functions: (originalImplementation) => {
                        return {
                            ...originalImplementation,
                            createNewSession: async function (input) {
                                const payload = {
                                    userId: input.userId,
                                    exp: Math.floor(Date.now() / 1000) + 60 * 60,
                                };

                                const supabase_jwt_token = jwt.sign(payload, supabase_signing_secret);

                                input.accessTokenPayload = {
                                    ...input.accessTokenPayload,
                                    supabase_token: supabase_jwt_token,
                                };

                                return await originalImplementation.createNewSession(input);
                            },
                        };
                    },
                },
            }),
        ],
        isInServerlessEnv: true,
    };
};
3. Create a Supabase client
A client is created to interact with Supabase using the supabase-js library.
3.1 Install the supabase-js library
npm install @supabase/supabase-js
3.2 Create a new file called utils/supabase.ts and add the following:
// utils/supabase.ts

import { createClient } from '@supabase/supabase-js'

let supabase_url = process.env.NEXT_PUBLIC_SUPABASE_URL || "TODO: Your Supabase URL"
let supabase_key = process.env.NEXT_PUBLIC_SUPABASE_KEY || "TODO: Your Supabase Key"

const getSupabase = (access_token: string) => {
  const supabase = createClient(
    supabase_url,
    supabase_key
  )

  supabase.auth.session = () => ({
    access_token,
    token_type: "",
    user: null
  })

  return supabase
}

export { getSupabase }
4. Insert users into Supabase when they sign up
In this example app, the user can sign up via Email-Password authentication. The API needs to be overridden such that when a user signs up, their email mapped to their userId is stored in Supabase.
4.1 Override the Email-Password sign up function
// config/backendConfig.ts

let appInfo: AppInfo = {
    appName: "TODO: add your app name",
    apiDomain: "TODO: add your website domain",
    websiteDomain: "TODO: add your website domain"
}

// take a look at the Creating Supabase Client section to see how to define getSupabase
let getSupabase: any;

let backendConfig = (): TypeInput => {
    return {
        framework: "express",
        supertokens: {
            connectionURI: "https://try.supertokens.com",
        },
        appInfo,
        recipeList: [
            .init({
                override: {
                    apis: (originalImplementation) => {
                        return {
                            ...originalImplementation,
                            // the signUpPOST function handles sign up
                            signUpPOST: async function (input) {
                                if (originalImplementation.signUpPOST === undefined) {
                                    throw Error("Should never come here");
                                }

                                let response = await originalImplementation.signUpPOST(input);

                                if (response.status === "OK" && response.user.loginMethods.length === 1 && input.session === undefined) {

                                    // retrieve the accessTokenPayload from the user's session
                                    const accessTokenPayload = response.session.getAccessTokenPayload();

                                    // create a supabase client with the supabase_token from the accessTokenPayload
                                    const supabase = getSupabase(accessTokenPayload.supabase_token);

                                    // store the user's email mapped to their userId in Supabase
                                    const { error } = await supabase
                                        .from("users")
                                        .insert({ email: response.user.emails[0], user_id: response.user.id });

                                    if (error !== null) {

                                        throw error;
                                    }
                                }

                                return response;
                            },
                        };
                    },
                },
            }),
            SessionNode.init({/*...*/}),
        ],
        isInServerlessEnv: true,
    };
};
The Email-Password sign up flow is changed by overriding the signUpPOST API. When a user signs up, the supabase_token is retrieved from the user's accessTokenPayload(this was added in the previous step where the createNewSession function was changed) and used to query Supabase to insert the new user's information.
5. Retrieve the user email on the frontend
What type of UI are you using?
With the backend setup, the frontend can be modified to retrieve the user's email from Supabase.
// pages/index.tsx

import React, { useState, useEffect } from 'react'
import Head from 'next/head'
import { SessionAuth, useSessionContext } from 'supertokens-auth-react/recipe/session'

// take a look at the Creating Supabase Client section to see how to define getSupabase
let getSupabase: any;

export default function Home() {
  return (
    // The ProtectedPage component is wrapped with the SessionAuth so only an
    // authenticated user can access it.
    <SessionAuth>
      <ProtectedPage />
    </SessionAuth>
  )
}

function ProtectedPage() {
  // retrieve the authenticated user's accessTokenPayload and userId from the sessionContext
  const session = useSessionContext()

  const [userEmail, setEmail] = useState('')
  useEffect(() => {
    async function getUserEmail() {
      if (session.loading) {
        return;
      }
      // retrieve the supabase client who's JWT contains users userId, this is
      // used by supabase to check that the user can only access table entries which contain their own userId
      const supabase = getSupabase(session.accessTokenPayload.supabase_token)

      // retrieve the user's name from the users table whose email matches the email in the JWT
      const { data } = await supabase.from('users').select('email').eq('user_id', session.userId)

      if (data.length > 0) {
        setEmail(data[0].email)
      }
    }
    getUserEmail()
  }, [session])

  if (session.loading) {
    return null;
  }

  return (
    <div>
      <Head>
        <title>SuperTokens 💫</title>
        <link rel="icon" href="/favicon.ico" />
      </Head>

      <main>
        <p>
          You are authenticated with SuperTokens! (UserId: {session.userId})
          <br />
          Your email retrieved from Supabase: {userEmail}
        </p>
      </main>
    </div>
  )
}
As seen above, the access token payload is fetched from SuperTokens to retrieve the authenticated user's Supabase access token which can be used to fetch the user's email from Supabase.
6. Enforce row level security for select and insert requests
To enforce Row Level Security for the Users table, you need to create policies for Select and Insert requests. These polices retrieve the userId from the JWT and check if it matches the userId in the Supabase table. A PostgreSQL function is needed to extract the userId from the JWT.
The payload in the JWT has the following structure:
{
    userId,
    exp
}
6.1 Create PostgreSQL function to retrieve userId from JWT
To create the PostgreSQL function, navigate back to the Supabase dashboard, select SQL from the sidebar menu, and click New query. This creates a new query called new sql snippet, which allows you to run any SQL against the Postgres database. Write the following and click Run.
create or replace function auth.user_id() returns text as $$
select nullif(current_setting('request.jwt.claims', true)::json->>'userId', '')::text;
$$ language sql stable;
- This creates a function called auth.user_id(), which inspects the userId field of our JWT payload.
6.2 Create Policies for SELECT and INSERT queries:
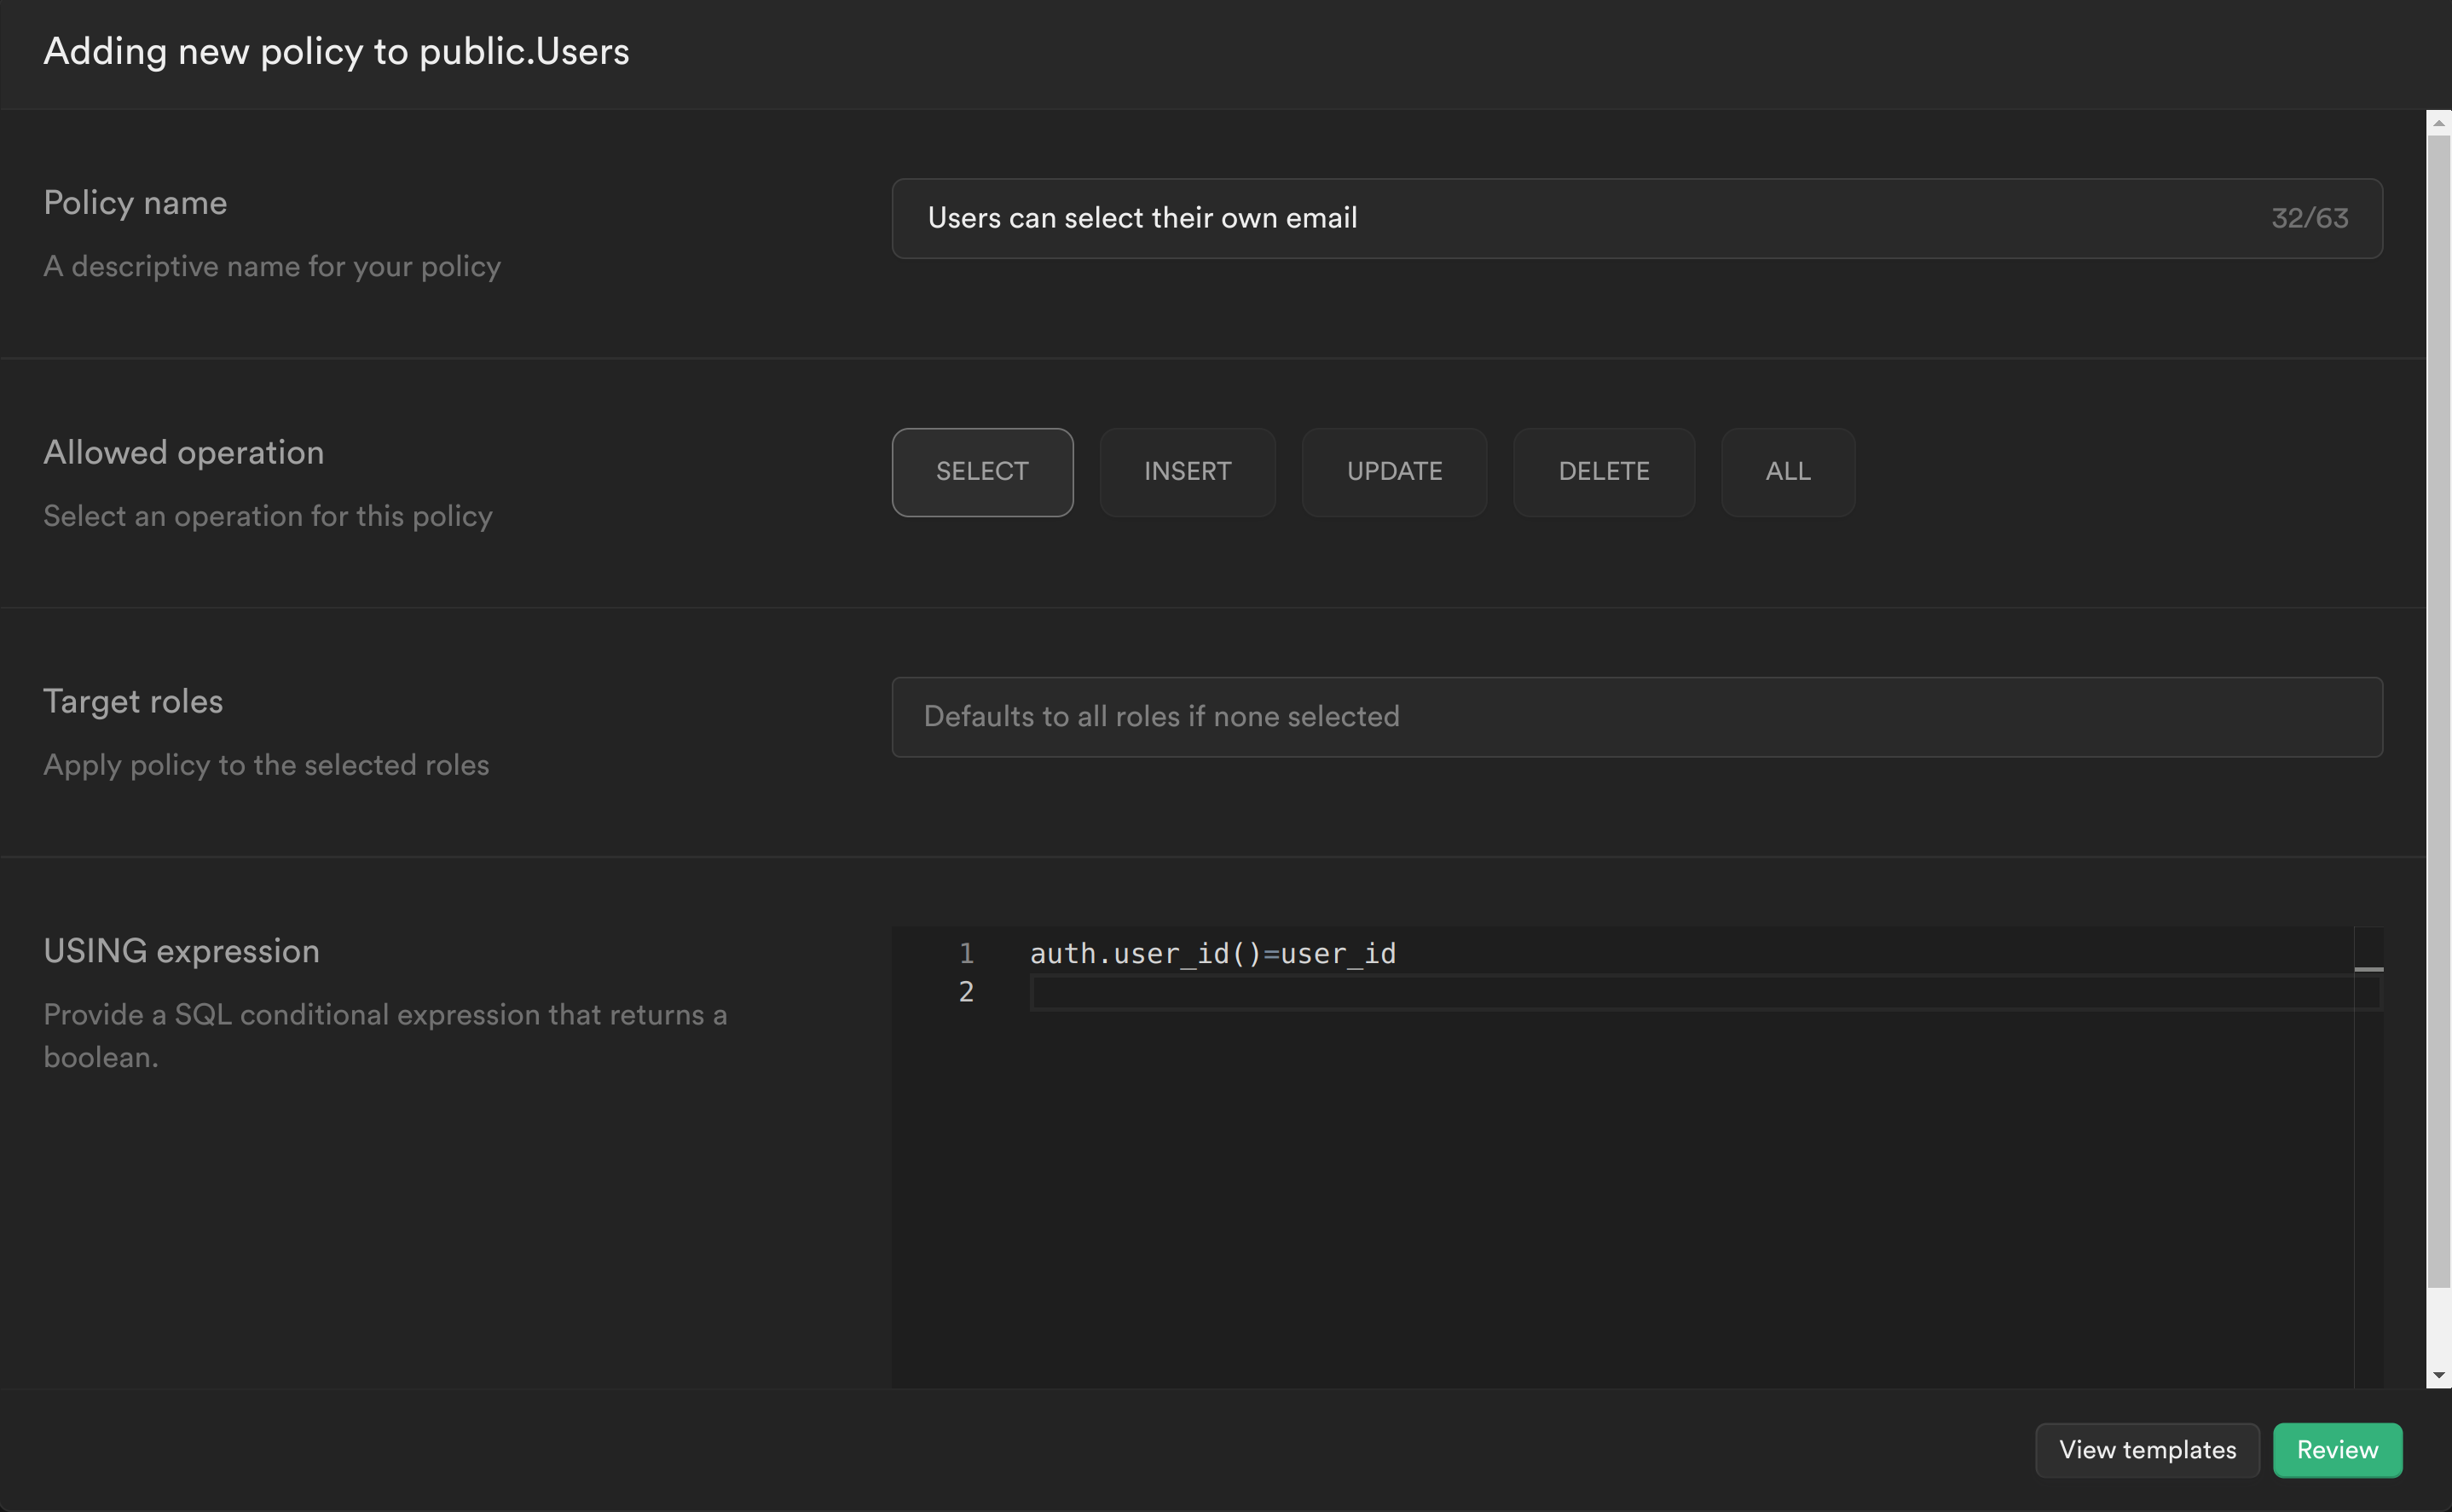
SELECT query policy
The first policy checks whether the user is the owner of the email being retrieved.
-
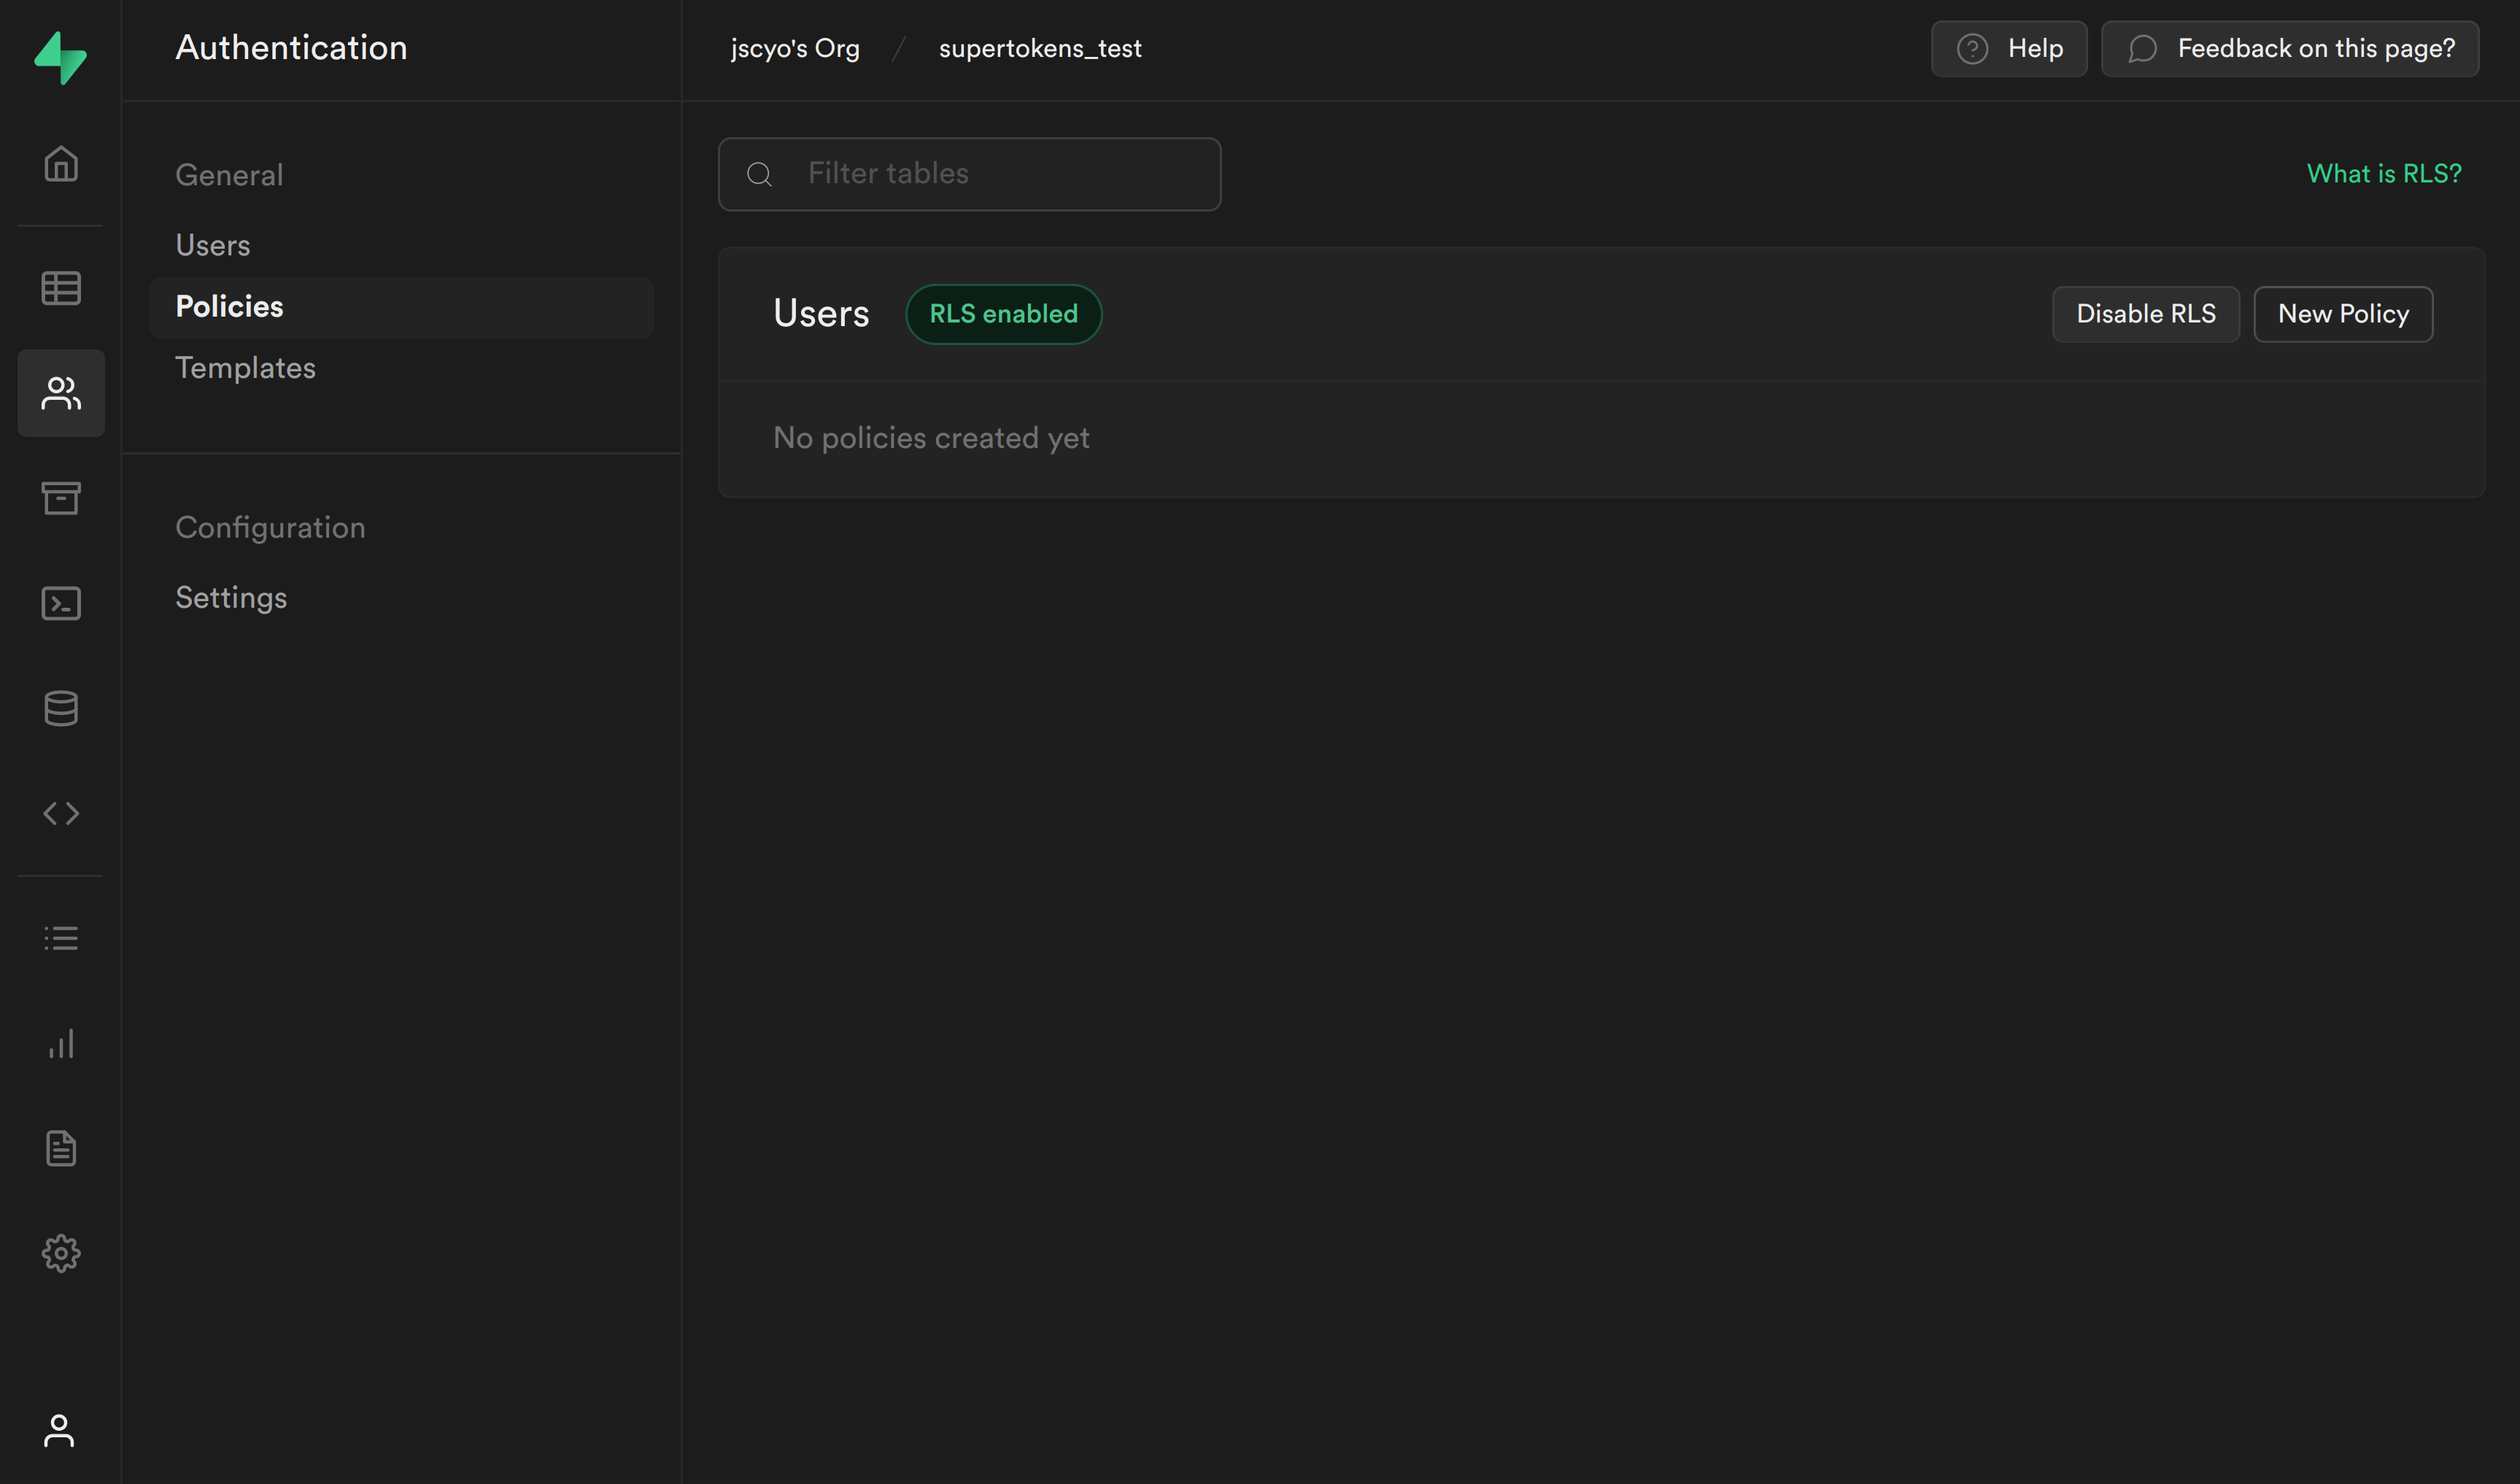
Select Authentication from the Supabase sidebar menu, click Policies, and then New Policy on the Users table.
-
From the modal, select Create a policy from scratch and add the following.
-
This policy is calling the PostgreSQL function we just created to get the currently logged in user's ID auth.user_id() and checking whether this matches the user_id column for the current email. If it does, then it allows the user to select it, otherwise it continues to deny.
-
Click Review and then Save policy.
INSERT query policy
The second policy checks whether the user_id being inserted is the same as the userId in the JWT.
-
Create another policy and add the following:
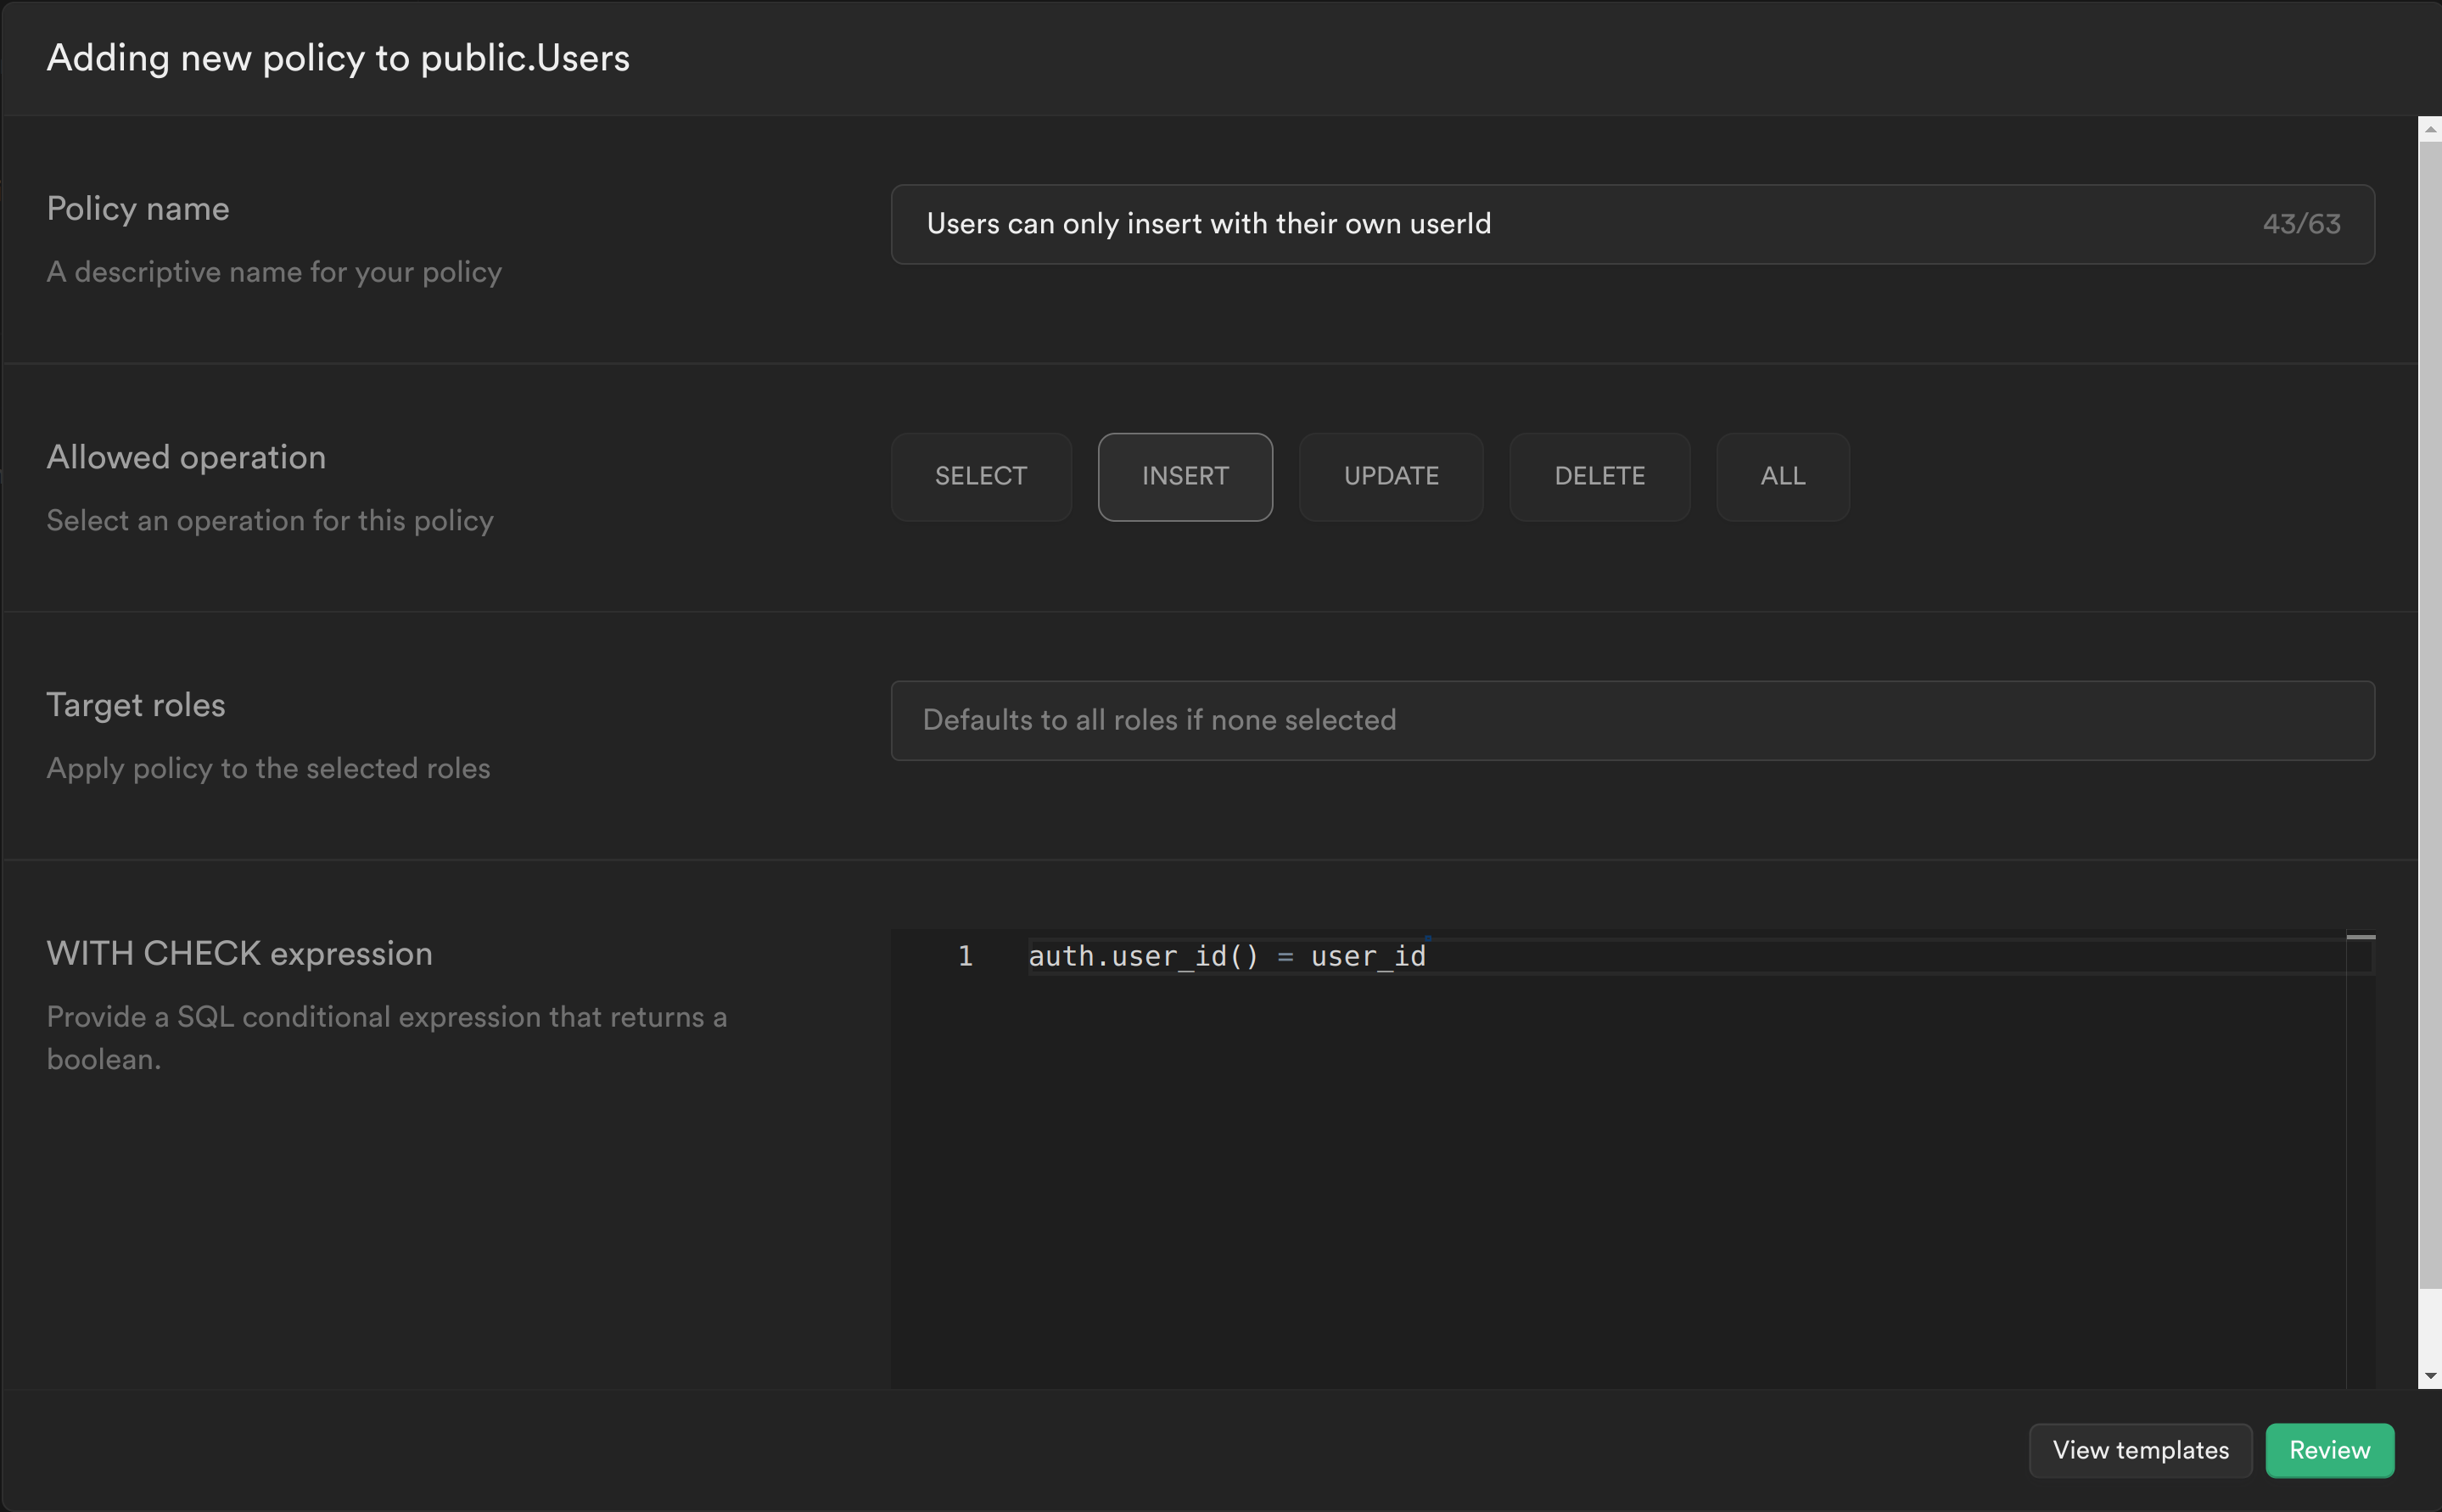
Similar to the previous policy, the PostgreSQL function that was created is called to get the currently logged in user's ID and check whether this matches the user_id column for the row being inserted. If it does, then it allows the user to insert the row, otherwise it continues to deny.
Click Review and then Save policy.
6.3 Test your changes
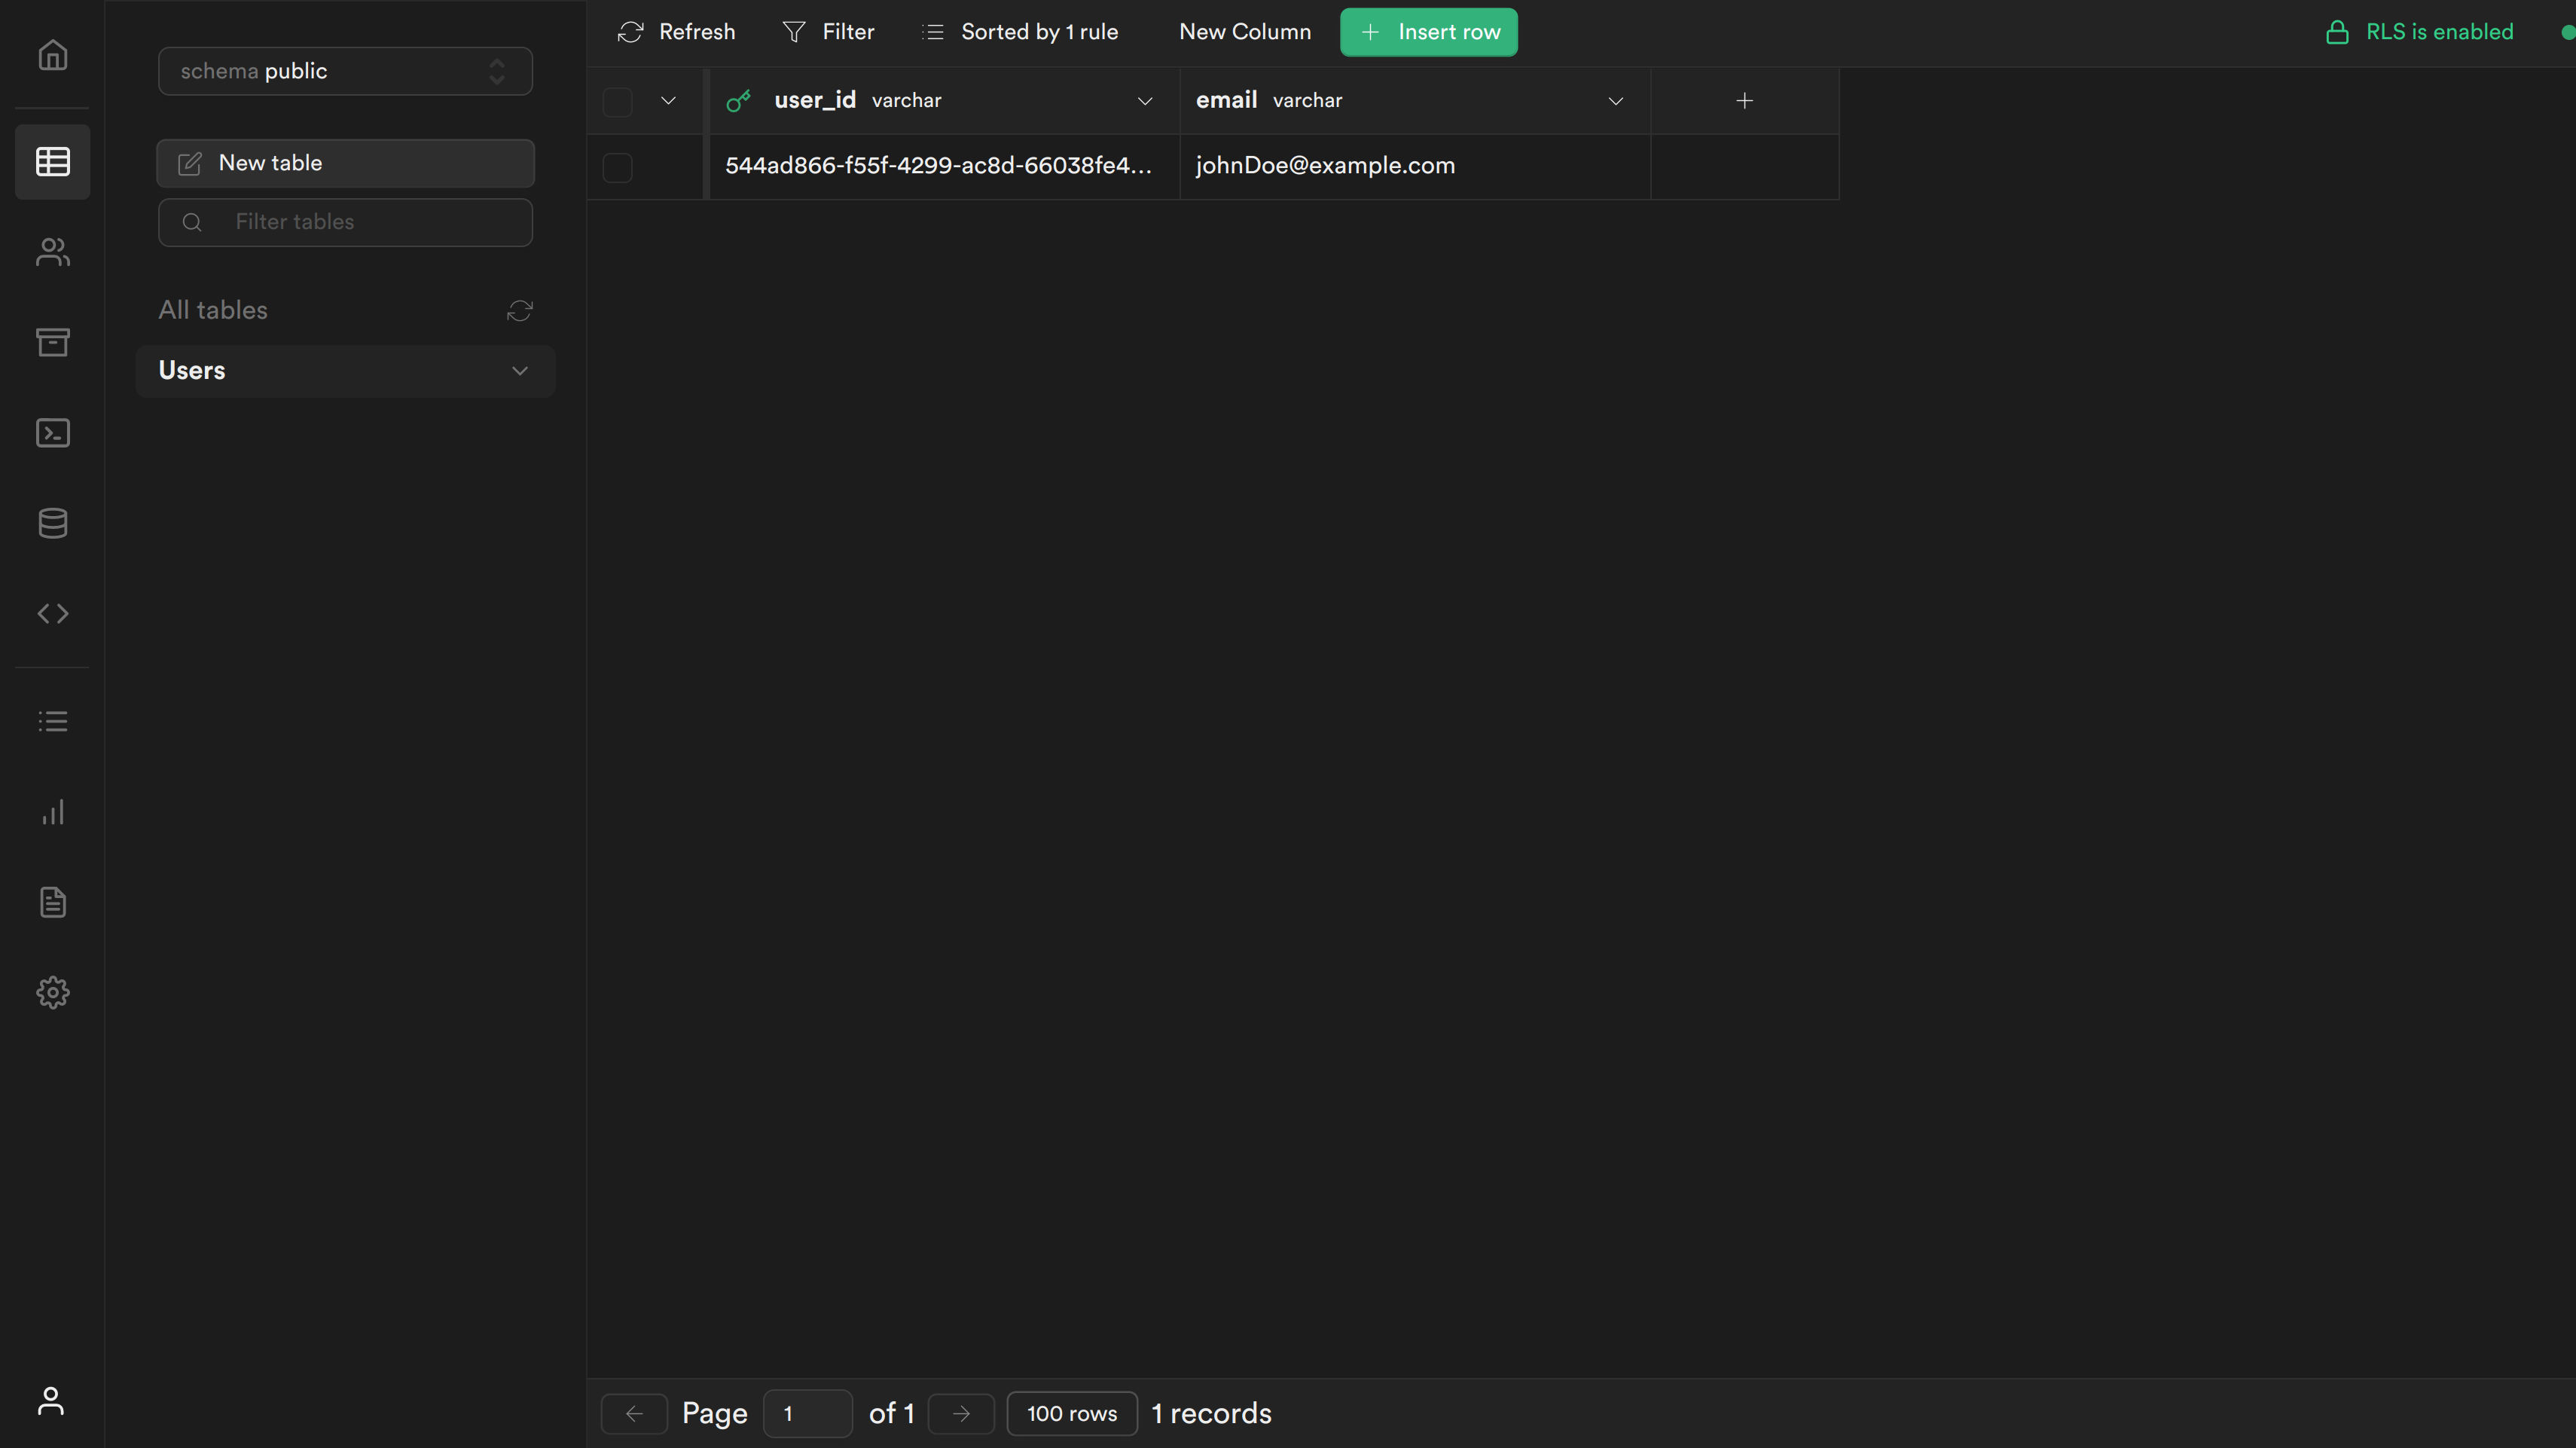
You can now sign up and you should see the following screen:

If you navigate to your table you should see a new row with the user's user_id and email.