Reuse website login for desktop and mobile apps
Overview
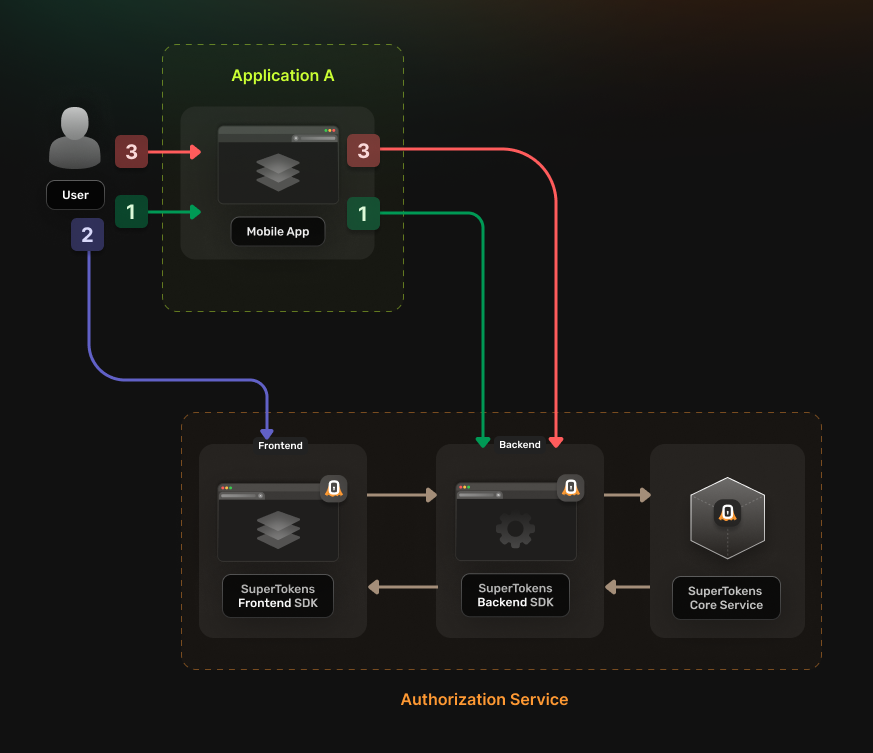
This pattern is useful if you want to have the same web authentication experience for your desktop and mobile apps. The implementation allows you to save development time but keep in mind that it does not involve a native authentication interface. Users get directed to a separate browser page where they complete the authentication flow and then return to your application.
The authentication flow works in the following way:
- The user gets redirected to Authorization Service authentication URL.
- The Authorization Service redirects the user to the login UI
- The Authorization Service backend redirects the user to the callback URL.
- This URL should be a deep link that your actual application can open.
- The application saves the returned token.
Before you start
This feature is only available to paid users.
These instructions assume that you already have gone through the main quickstart guide. If you have skipped that page, please follow the tutorial and return here once you're done.
Steps
1. Enable the Unified Login feature
Go to the SuperTokens.com SaaS Dashboard and follow these instructions:
- Click on the Enabled Paid Features button
- Click on Managed Service
- Check the Unified Login / M2M option
- Click Save
2. Create the OAuth2 Clients
For each of your applications you need to create a separate OAuth2 client. You can do this by directly calling the SuperTokens Core API.
curl --location --request POST '<CORE_API_ENDPOINT>/recipe/oauth/clients' \
     --header 'api-key: <YOUR_API_KEY>' \
     --header 'Content-Type: application/json; charset=utf-8' \
     --data '
    {
      "clientName": "<YOUR_CLIENT_NAME>",
      "responseTypes": ["code", "id_token"],
      "grantTypes": ["authorization_code", "refresh_token"],
      "tokenEndpointAuthMethod": "none",
      "scope": "offline_access <custom_scope_1> <custom_scope_2>",
      "redirectUris": ["https://<YOUR_APPLICATION_DOMAIN>/oauth/callback"],
    }
'
You have to save the create OAuth2 Client response because this is not persisted internally for security reasons. The information is necessary for the next steps.
Based on the client creation process, you can infer two additional values that you need later on:
- authorizeUrl corresponds to <YOUR_API_DOMAIN>/auth/oauth/auth
- tokenFetchUrl corresponds to <YOUR_API_DOMAIN>/auth/oauth/token
3. Configure the Authorization Service
Check one of the previous guides that show you how to set up the Authorization Service and then return to this page. Choose the tutorial based whether you use multiple backend services or not:
4. Update the login flow in your applications
In each of your individual applications, you need to set up logic for handling the OAuth 2.0 authentication flow. You can use a generic OIDC or OAuth library to do this.
You can use the react-native-app-auth library. Follow the instructions to set up your application.
You can identify the configuration parameters based on the response received in step 2, when creating the OAuth2 Client.
- issuer corresponds to the endpoint of the Authorization Service <YOUR_API_DOMAIN>/auth
- clientID corresponds to clientId
- redirectUrl corresponds a value from callbackUrls
- scopes corresponds to scopes
You also need to set the additionalParameters property with the following values:
- max_age: 0 This forces a new authentication flow once the user ends up on the Authorization Service frontend.
- tenant_id: <TENANT_ID> Optional, in case you are using a multi tenant setup. Set this to the actual tenant ID.
If you want to use the OAuth2 Refresh Tokens make sure to include the offline_access scope during the initialization step.
5. Test the new authentication flow
With everything set up, you can test your login flow. Use the setup created in the previous step to check if the authentication flow completes without any issues.