Multiple frontend domains with separate backends
Overview
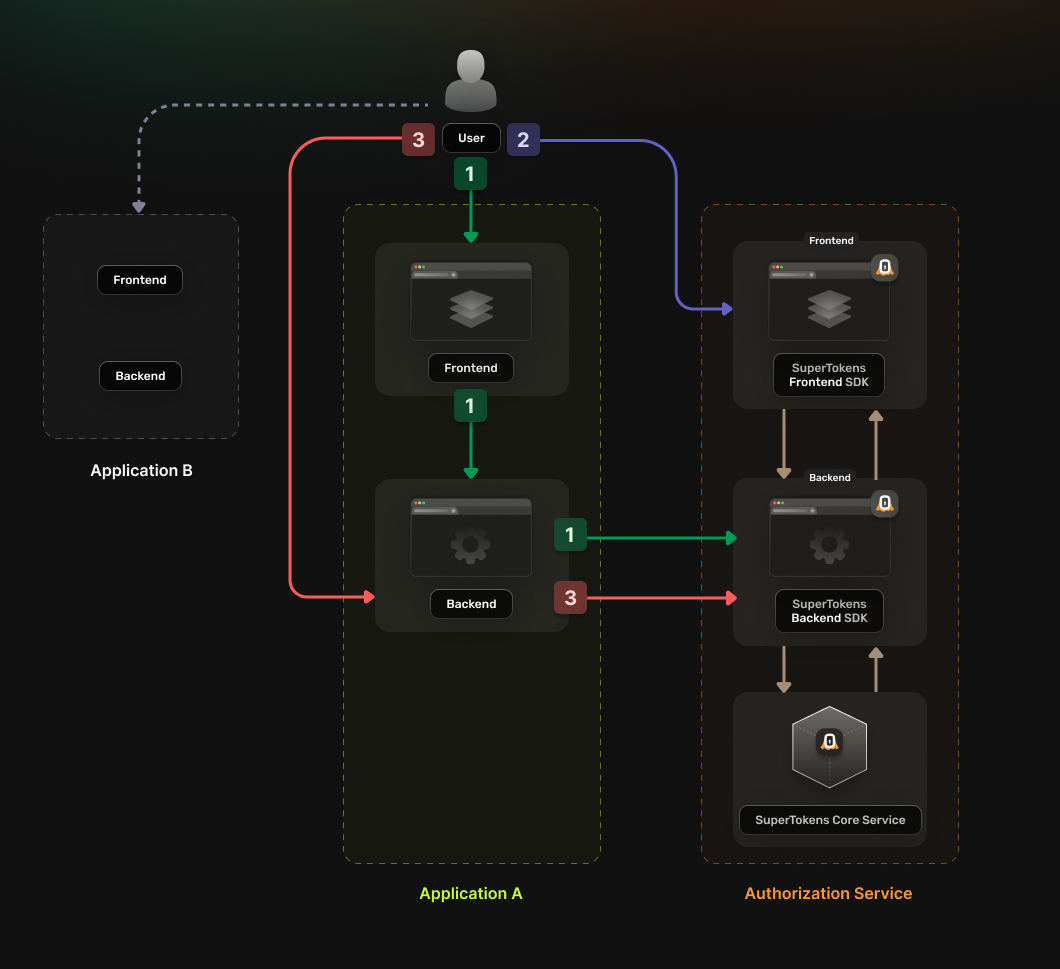
You can use the following guide if you have a single Authorization Service that multiple applications use. In turn, each app has separate frontend and backend instances that serve from different domains. The authentication flow works in the following way:
- The application frontend calls a login endpoint on the backend application.
- The backend application generates an authorization URL to the Authorization Service and redirects the user to it.
- The Authorization Service backend redirects the user to the login UI
- The Authorization Service backend redirects the user to a callback URL that includes the Authorization Code.
- The Authentication Code gets sent to the application backend
- The backend exchanges the Authentication Code for an OAuth2 Access Token
- The backend saves the received token in a server session and sends it back to the frontend as a cookie.
The frontend can use the new cookie to access protected resources from the backend.
Before you start
This feature is only available to paid users.
These instructions assume that you already have gone through the main quickstart guide. If you have skipped that page, please follow the tutorial and return here once you're done.
Note that, if the frontends and backends are in different sub domains, you don't need to use OAuth and can instead use session sharing across sub domains.
Steps
1. Enable the Unified Login feature
Go to the SuperTokens.com SaaS Dashboard and follow these instructions:
- Click on the Enabled Paid Features button
- Click on Managed Service
- Check the Unified Login / M2M option
- Click Save
2. Create the OAuth2 Clients
For each of your applications you need to create a separate OAuth2 client. You can do this by directly calling the SuperTokens Core API.
curl --location --request POST '<CORE_API_ENDPOINT>/recipe/oauth/clients' \
     --header 'api-key: <YOUR_API_KEY>' \
     --header 'Content-Type: application/json; charset=utf-8' \
     --data '
    {
      "clientName": "<YOUR_CLIENT_NAME>",
      "responseTypes": ["code"],
      "grantTypes": ["authorization_code", "refresh_token"],
      "scope": "offline_access <custom_scope_1> <custom_scope_2>",
      "redirectUris": ["https://<YOUR_APPLICATION_DOMAIN>/oauth/callback"],
    }
'
You have to save the create OAuth2 Client response because this is not persisted internally for security reasons. The information is necessary for the next steps.
3. Set Up your Authorization Service backend
In your Authorization Service you need to initialize the OAuth2Provider recipe. The recipe exposes the endpoints needed for enabling the OAuth 2.0 flow.
Update the supertokens.init call to include the OAuth2Provider recipe.
Add the import statement for the recipe and update the list of recipes with the new initialization step.
import supertokens from "supertokens-node";
import OAuth2Provider from "supertokens-node/recipe/oauth2provider";

supertokens.init({
    supertokens: {
        connectionURI: "...",
        apiKey: "...",
    },
    appInfo: {
        appName: "...",
        apiDomain: "...",
        websiteDomain: "...",
    },
    recipeList: [
        OAuth2Provider.init(),
    ]
});
4. Configure the Authorization Service frontend
What type of UI are you using?
4.1 Initialize the recipe
Add the import statement for the new recipe and update the list of recipe to also include the new initialization.
import OAuth2Provider from "supertokens-auth-react/recipe/oauth2provider";
import SuperTokens from "supertokens-auth-react";

SuperTokens.init({
    appInfo: {
        appName: "...",
        apiDomain: "...",
        websiteDomain: "...",
    },
    recipeList: [
        OAuth2Provider.init()
    ]
});
4.2 Include the pre-built UI in the rendering tree.
Do you use react-router-dom?
5. Set up session handling in each application
In each of your individual applications you need to set up logic for handling the OAuth 2.0 authentication flow. You can use a generic OIDC or OAuth2 library to do this.
You can use the passport-oauth2 library. Follow the instructions on the library's page and set up your application backend. You can determine the configuration parameters based on the response received in step 2, when creating the OAuth2 Client.
- authorizationURL corresponds to authorizeUrl
- tokenURL corresponds to tokenFetchUrl
- clientID corresponds to clientId
- clientSecret corresponds to clientSecret
- callbackURL corresponds to a value from callbackUrls
- scope corresponds to scope
Make sure that you expose an endpoint that calls passport.authenticate('oauth2'). This way the user ends up accessing the actual login page served by the Authorization Service.
If you want to use the OAuth2 Refresh Tokens make sure to include the offline_access scope during the initialization step.
6. Update the login flow in your frontend applications
In your frontend applications you need to add a login action that directs the user to the authentication page.
The user should first redirect to the backend authentication endpoint defined during the previous step. There the backend generates a safe authorization URL using the OAuth2 library and then redirects the user there. After the user has logged in from the Authorization Service they redirect to the backend callback URL. Then the backend creates the authentication session and sends it to the user agent as a cookie.
7. Test the new authentication flow
With everything set up, you can test your login flow. Use the setup created in the previous step to check if the authentication flow completes without any issues.