File length: 33498
# Authentication - Unified Login - Quickstart Guides - Multiple frontend domains with a common backend
Source: https://supertokens.com/docs/authentication/unified-login/quickstart-guides/multiple-frontends-with-a-single-backend
## Overview
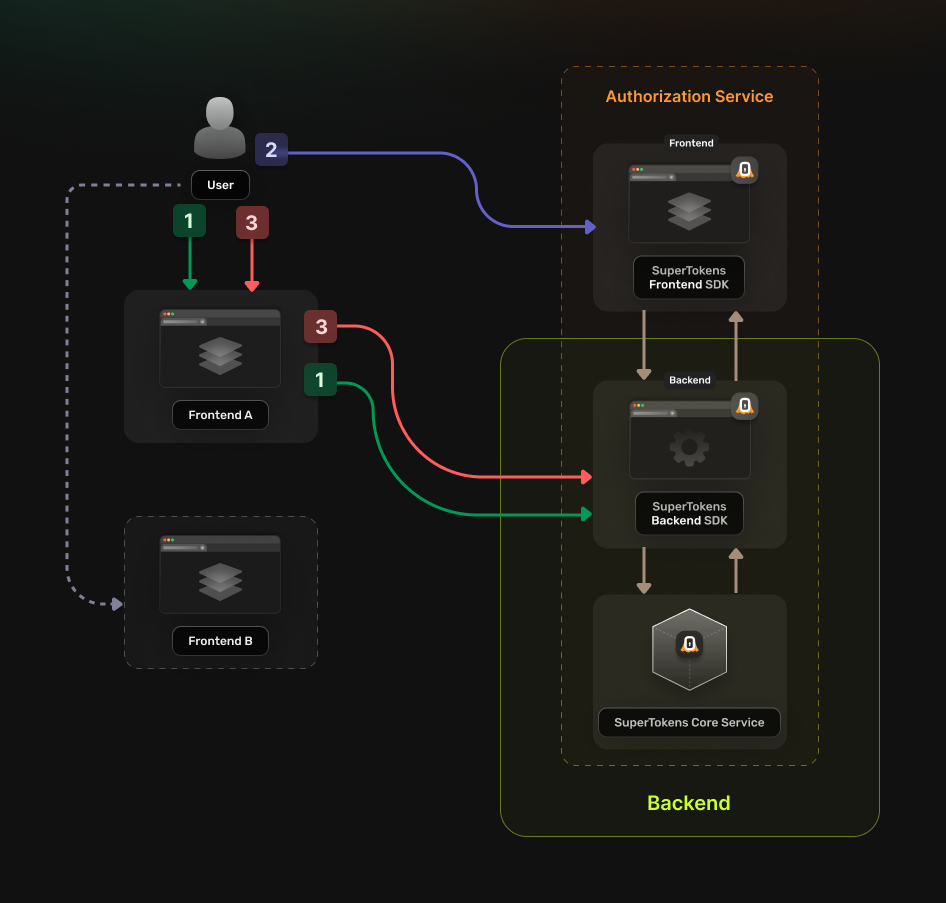
You can implement the following guide if you have multiple **`frontend applications`** that use the same **`backend service`**.
The authentication flow works in the following way:
## The User accesses the `frontend` application:
- The application `frontend` redirects the user to the **Authorization Service** backend, using the authorize URL.
- The **Authorization Service** backend redirects the user to the login UI.
## The User completes the login attempt:
- The **Authorization Service** backend redirects the user to the `callback URL`.
## The user accesses the callback URL:
- The `frontend` uses the callback URL information to obtain a **OAuth2 Access Token** from the **Authorization Service** backend.
 ## Before you start
These instructions assume that you already have gone through the main [quickstart guide](/docs/quickstart/introduction).
If you have skipped that page, please follow the tutorial and return here once you're done.
:::info
If your frontend applications are on the same **domain**, but on different **sub-domains**, you can use [Session Sharing Across Subdomains](/docs/post-authentication/session-management/share-session-across-sub-domains).
:::
## Steps
### 1. Enable the Unified Login feature
Go to the [**SuperTokens.com SaaS Dashboard**](https://supertokens.com) and follow these instructions:
1. Click on the **Enabled Paid Features** button
2. Click on **Managed Service**
3. Check the **Unified Login / M2M** option
4. Click *Save*
### 2. Create the OAuth2 Clients
For each of your **`frontend`** applications create a separate [**OAuth2 client**](/docs/authentication/unified-login/oauth2-basics#client).
This can occur by directly calling the **SuperTokens Core** API.
```bash
curl --location --request POST '/recipe/oauth/clients' \
--header 'api-key: ^{coreInfo.key}' \
--header 'Content-Type: application/json; charset=utf-8' \
--data '
{
"clientName": "",
"responseTypes": ["code"],
"grantTypes": ["authorization_code", "refresh_token"],
"scope": "offline_access ",
"redirectUris": ["https:///oauth/callback"],
}
'
```
```tsx
const BASE_URL = '';
const API_KEY = '^{coreInfo.key}';
const url = `${BASE_URL}/recipe/oauth/clients`;
const options = {
method: 'POST',
headers: {
'api-key': API_KEY,
'Content-Type': 'application/json; charset=utf-8',
},
body: JSON.stringify({
clientName: "",
responseTypes: ["code"],
grantTypes: ["authorization_code", "refresh_token"],
scope: "offline_access ",
redirectUris: ["https:///oauth/callback"],
})
};
fetch(url, options)
.then(response => response.json())
.then(json => console.log(json))
.catch(err => console.error(err));
```
```go
BASE_URL = ""
API_KEY = "^{coreInfo.key}"
url = f"{BASE_URL}/recipe/oauth/clients"
payload: Dict[str, Any] ={
"clientName": "",
"responseTypes": ["code"],
"grantTypes": ["authorization_code", "refresh_token"],
"scope": "offline_access ",
"redirectUris": ["https:///oauth/callback"],
}
headers = {
"api-key": API_KEY,
"Content-Type": "application/json",
}
response = requests.post(url, json=payload, headers=headers)
print(response.json())
```
:::caution
You have to save the create OAuth2 Client response because this is not persisted internally for security reasons.
The information is necessary in the next steps.
:::
### 3. Set up the Authorization Service Backend
#### 3.1 Initialize the OAuth2 recipe
Update the `supertokens.init` call to include the new recipe.
```tsx
supertokens.init({
supertokens: {
connectionURI: "...",
apiKey: "...",
},
appInfo: {
appName: "...",
apiDomain: "...",
websiteDomain: "...",
},
recipeList: [
OAuth2Provider.init(),
]
});
```
:::caution
At the moment, there is no support for creating OAuth2 providers in the Go SDK.
:::
```python
from supertokens_python import init, InputAppInfo, SupertokensConfig
from supertokens_python.recipe import oauth2provider
init(
app_info=InputAppInfo(
app_name="...",
api_domain="...",
website_domain="...",
),
framework="fastapi",
supertokens_config=SupertokensConfig(
connection_uri="...",
api_key="..."
),
recipe_list=[
oauth2provider.init()
],
)
```
#### 3.2 Update the CORS configuration
Set up the Backend API to allow requests from all the frontend domains.
```tsx
const app = express();
// Add your actual frontend domains here
const allowedOrigins = ["", "", ""];
app.use(cors({
// highlight-start
origin: allowedOrigins,
allowedHeaders: ["content-type", ...supertokens.getAllCORSHeaders()],
credentials: true,
// highlight-end
}));
```
:::caution
At the moment, there is no support for creating OAuth2 providers in the Go SDK.
:::
```python
from supertokens_python import get_all_cors_headers
from fastapi import FastAPI
from starlette.middleware.cors import CORSMiddleware
from supertokens_python.framework.fastapi import get_middleware
app = FastAPI()
app.add_middleware(get_middleware())
app.add_middleware(
CORSMiddleware,
# highlight-start
allow_origins=[
"", "", ""
],
# highlight-end
allow_credentials=True,
allow_methods=["GET", "PUT", "POST", "DELETE", "OPTIONS", "PATCH"],
allow_headers=["Content-Type"] + get_all_cors_headers(),
)
```
#### 3.3 Implement a custom session verification function
Given that the backend, the **Authorization Server**, also acts as a **Resource Server** you have to account for this in the session verification process.
This is necessary because the flow uses two types of tokens:
- **SuperTokens Session Access Token**: Used during the login and logout.
- **OAuth2 Access Token**: Used to access protected resources and perform actions that need authorization.
Hence the logic should distinguish between these two and prevent errors.
Here is an example of how to implement this in the context of an Express API:
```tsx
interface RequestWithUserId extends Request {
userId?: string;
}
async function verifySession(req: RequestWithUserId, res: Response, next: NextFunction) {
let session = undefined;
try {
session = await Session.getSession(req, res, { sessionRequired: false });
} catch (err) {
if (
!Session.Error.isErrorFromSuperTokens(err) ||
err.type !== Session.Error.TRY_REFRESH_TOKEN
) {
return next(err);
}
}
// In this case we are dealing with a SuperTokens Session
if (session !== undefined) {
const userId = session.getUserId();
req.userId = userId;
return next();
}
// The OAuth2 Access Token needs to be manually extracted and validated
let jwt: string | undefined = undefined;
if (req.headers["authorization"]) {
jwt = req.headers["authorization"].split("Bearer ")[1];
}
if (jwt === undefined) {
return next(new Error("No JWT found in the request"));
}
try {
const tokenPayload = await validateToken(jwt, '');
const userId = tokenPayload.sub;
req.userId = userId;
return next();
} catch (err) {
return next(err);
}
}
const JWKS = jose.createRemoteJWKSet(
new URL("/jwt/jwks.json"),
);
// This is a basic example on how to validate an OAuth2 Token
// We have a separate page that talks more in depth about the process
async function validateToken(jwt: string, requiredScope: string) {
const { payload } = await jose.jwtVerify(jwt, JWKS, {
requiredClaims: ["stt", "scp", "sub"],
});
if (payload.stt !== 1) throw new Error("Invalid token");
const scopes = payload.scp as string[];
if (!scopes.includes(requiredScope)) throw new Error("Invalid token");
return payload;
}
// You can then use the function as a middleware for a protected route
const app = express();
app.get("/protected", verifySession, async (req, res) => {
// Custom logic
});
```
For more information on how to verify the **OAuth2 Access Tokens**, please check the [separate guide](/docs/authentication/unified-login/verify-tokens).
:::caution
At the moment, there is no support for creating OAuth2 providers in the Go SDK.
:::
```python
from supertokens_python.recipe.session.syncio import get_session
from supertokens_python.recipe.session.exceptions import SuperTokensSessionError, TryRefreshTokenError
from fastapi.requests import Request
from typing import List, Optional
return True
def validate_token(token: str, required_scope: str) -> bool:
api_domain = ""
api_base_path = ""
client_id = ""
jwks_url = f"{api_domain}{api_base_path}/jwt/jwks.json"
jwks_client = PyJWKClient(jwks_url)
try:
signing_key = jwks_client.get_signing_key_from_jwt(token)
decoded = jwt.decode(
token,
signing_key.key,
algorithms=['RS256'],
options={"require": ["stt", "client_id", "scp"]}
)
stt: Optional[int] = decoded.get('stt')
if stt != 1:
return False
token_client_id: Optional[str] = decoded.get('client_id', None)
if client_id != token_client_id:
return False
scopes: List[str] = decoded.get('scp', [])
if required_scope not in scopes:
return False
return True
except Exception:
return False
#
```
### 4. Configure the Authorization Service Frontend
#### 4.1 Initialize the recipe
Add the import statement for the new recipe and update the list of recipe to also include the new initialization.
```tsx
SuperTokens.init({
appInfo: {
appName: "...",
apiDomain: "...",
websiteDomain: "...",
},
recipeList: [
OAuth2Provider.init()
]
});
```
##### Include the pre-built UI in the rendering tree.
```tsx
class App extends React.Component {
render() {
return (
{/*This renders the login UI on the /auth route*/}
{getSuperTokensRoutesForReactRouterDom(reactRouterDom, [OAuth2ProviderPreBuiltUI])}
{/*Your app routes*/}
);
}
}
```
```tsx
class App extends React.Component {
render() {
if (canHandleRoute([OAuth2ProviderPreBuiltUI])) {
// This renders the login UI on the /auth route
return getRoutingComponent([OAuth2ProviderPreBuiltUI])
}
return (
{/*Your app*/}
);
}
}
```
Update the `AuthComponent` to include the `OAuth2Provider` recipe.
You need to add a new item in the `recipeList` array.
```tsx title="/app/auth/auth.component.ts"
@Component({
selector: "app-auth",
template: '',
})
export class AuthComponent implements OnDestroy, AfterViewInit {
constructor(
private renderer: Renderer2,
@Inject(DOCUMENT) private document: Document
) { }
ngAfterViewInit() {
this.loadScript('^{jsdeliver_prebuiltui}');
}
ngOnDestroy() {
// Remove the script when the component is destroyed
const script = this.document.getElementById('supertokens-script');
if (script) {
script.remove();
}
}
private loadScript(src: string) {
const script = this.renderer.createElement('script');
script.type = 'text/javascript';
script.src = src;
script.id = 'supertokens-script';
script.onload = () => {
supertokensUIInit({
appInfo: {
appName: "",
apiDomain: "",
websiteDomain: "",
apiBasePath: "",
websiteBasePath: ""
},
recipeList: [
// Don't forget to also include the other recipes that you are already using
supertokensUIOAuth2Provider.init()
],
});
}
this.renderer.appendChild(this.document.body, script);
}
}
```
Update the `AuthView` component to include the `OAuth2Provider` recipe.
You need to add a new item in the `recipeList` array, inside the `supertokensUIInit` call.
```tsx
```
#### 4.2 Disable network interceptors
The **Authorization Service Frontend** that you are configuring makes use of two types of access tokens:
- **SuperTokens Session Access Token**: Used only during the login flow to keep track of the authentication state.
- **OAuth2 Access Token**: Returned after a successful login attempt. It can then access protected resources.
By default, the **SuperTokens** frontend SDK intercepts all the network requests sent to your Backend API and adjusts them based on the **SuperTokens Session Tokens**.
This allows operations, such as automatic token refreshing or adding authorization headers, without needing to configure anything else.
Given that in the scenario you are implementing, the **OAuth2 Access Tokens** serve authorization purposes.
The automatic request interception causes conflicts.
To prevent this, you need to override the `shouldDoInterceptionBasedOnUrl` function in the `Session.init` call.
:::caution
The code samples assume that you are using `` as the `apiBasePath` for the backend authentication routes.
If that is different please adjust them based on your use case.
:::
```tsx
Session.init({
override: {
functions: (oI) => {
return {
...oI,
shouldDoInterceptionBasedOnUrl: (url, apiDomain, sessionTokenBackendDomain) => {
try {
let urlObj = new URL(url);
// Interception should be done only for routes that need the SuperTokens Session Tokens
const isAuthApiRoute = urlObj.pathname.startsWith("");
const isOAuth2ApiRoute = urlObj.pathname.startsWith("/oauth");
if (!isAuthApiRoute || isOAuth2ApiRoute) {
return false;
}
} catch (ignored) { }
return oI.shouldDoInterceptionBasedOnUrl(url, apiDomain, sessionTokenBackendDomain);
}
}
}
}
})
```
You need to make changes to the auth route configuration, as well as to the `supertokens-web-js` SDK configuration at the root of your application:
This change is in your auth route configuration.
```tsx
// this goes in the auth route config of your frontend app (once the pre-built UI script has been loaded)
supertokensUISession.init({
override: {
functions: (oI) => {
return {
...oI,
shouldDoInterceptionBasedOnUrl: (url, apiDomain, sessionTokenBackendDomain) => {
try {
let urlObj = new URL(url);
if (!urlObj.pathname.startsWith("")) {
return false;
}
} catch (ignored) { }
return oI.shouldDoInterceptionBasedOnUrl(url, apiDomain, sessionTokenBackendDomain);
}
}
}
}
})
```
This change goes in the `supertokens-web-js` SDK configuration at the root of your application:
```tsx
Session.init({
override: {
functions: (oI) => {
return {
...oI,
shouldDoInterceptionBasedOnUrl: (url, apiDomain, sessionTokenBackendDomain) => {
try {
let urlObj = new URL(url);
if (!urlObj.pathname.startsWith("")) {
return false;
}
} catch (ignored) { }
return oI.shouldDoInterceptionBasedOnUrl(url, apiDomain, sessionTokenBackendDomain);
}
}
}
}
})
```
You need to make changes to the auth route configuration, as well as to the `supertokens-web-js` SDK configuration at the root of your application:
This change is in your auth route configuration.
```tsx
// this goes in the auth route config of your frontend app (once the pre-built UI script has been loaded)
supertokensUISession.init({
override: {
functions: (oI) => {
return {
...oI,
shouldDoInterceptionBasedOnUrl: (url, apiDomain, sessionTokenBackendDomain) => {
try {
let urlObj = new URL(url);
if (!urlObj.pathname.startsWith("")) {
return false;
}
} catch (ignored) { }
return oI.shouldDoInterceptionBasedOnUrl(url, apiDomain, sessionTokenBackendDomain);
}
}
}
}
})
```
This change goes in the `supertokens-web-js` SDK configuration at the root of your application:
```tsx
Session.init({
override: {
functions: (oI) => {
return {
...oI,
shouldDoInterceptionBasedOnUrl: (url, apiDomain, sessionTokenBackendDomain) => {
try {
let urlObj = new URL(url);
if (!urlObj.pathname.startsWith("")) {
return false;
}
} catch (ignored) { }
return oI.shouldDoInterceptionBasedOnUrl(url, apiDomain, sessionTokenBackendDomain);
}
}
}
}
})
```
The code snippet only allows interception for API endpoints that start with ``.
This ensures that calls made from the Frontend SDKs continue to use the **SuperTokens Session Tokens**. As a result, the authentication flow ends up working.
For the other routes, you have full control on how you want to attach the **OAuth2 Access Tokens** to the API calls.
The user interface that you are going to build should respect this flow:
## A user accesses your application and tries to login.
It's up to you how you want to handle this.
They can click a button to login or you can directly start the login flow.
## They get redirected to the **Authorization Service Backend**
A **OAuth2/OpenID Connect (OIDC)** library can execute this action.
Check the previous guides for information on what you could use.
## The **Authorization Service Backend** redirects them to the **Authorization Service Frontend** login page.
The page URL contains a `loginChallenge` parameter that keeps track of the login attempt.
Besides that, the URL can also include a `forceFreshAuth` parameter.
As the name suggests, this should force the login UI to be visible even though the user has an existing valid session.
This guide shows you how to handle this.
## The **Authorization Service Frontend** renders the login UI and the user performs the login action.
The login UI should render based on instructions that are specific to each authentication method which you are using.
The additional thing that you have to do here is to consider the `forceFreshAuth` parameter.
## The **Authorization Service Frontend** redirects the user back to the **Authorization Service Backend**
After the user submits the login form, you need to redirect them to a specific route that sends them to the original application.
From here, the authentication flow completes.
Let's see how you can actually implement this UI.
#### 4.1 Configure the redirection URLs
As it has hinted in the previous section, the **Authorization Service Backend** sends the user to different pages from the **Authorization Service Frontend**, based on the action that needs execution.
The default values for these routes are:
- The login page maps to `` (this is also the place where a user ends up after logout)
- The token refresh page maps to `/try-refresh`
- The logout page maps to `/logout`
If you want to change these routes, you need to add a custom override.
:::info
This override needs addition to the **Authorization Service Backend**.
:::
```tsx
OAuth2Provider.init({
override: {
functions: (originalFunctions) => ({
...originalFunctions,
getFrontendRedirectionURL: async (input) => {
const websiteDomain = '';
const websiteBasePath = '';
if (input.type === "login") {
const queryParams = new URLSearchParams({
loginChallenge: input.loginChallenge,
});
if (input.hint !== undefined) {
queryParams.set("hint", input.hint);
}
if (input.forceFreshAuth) {
queryParams.set("forceFreshAuth", "true");
}
return `?${queryParams.toString()}`;
} else if (input.type === "try-refresh") {
return `/try-refresh?loginChallenge=${input.loginChallenge}`;
} else if (input.type === "post-logout-fallback") {
return ``;
} else if (input.type === "logout-confirmation") {
return `/oauth/logout?logoutChallenge=${input.logoutChallenge}`;
}
return ``;
},
}),
},
})
```
:::caution
At the moment, there is no support for creating OAuth2 providers in the Go SDK.
:::
:::caution
At the moment, there is no support for creating OAuth2 providers in the Python SDK.
:::
#### 4.2 Handle the forceFreshAuth parameter
Sometimes, even though there is an existing valid session in the **Authorization Service Frontend**, the requesting **Client** might force a new login attempt.
The `forceFreshAuth` parameter shows this.
When the login page renders, you also need to check for this parameter. You are doing this to know if you need to show the login UI.
Here is an example of how you can evaluate this case.
```tsx
async function shouldLogin() {
const urlParams = new URLSearchParams(window.location.search);
const forceFreshAuth = urlParams.get('forceFreshAuth') as string;
if(forceFreshAuth === "true") return true;
return Session.doesSessionExist();
}
```
:::info Multi Tenancy
If you are using multi-tenancy, you also need to keep track of the `tenantId` query parameter and pass it between the **Authorization Service Frontend** pages.
:::
#### 4.3 Complete the login attempt
After the user submits the login form, you need to redirect them to a specific route to complete the **OAuth 2** flow.
The following code sample shows you how to determine which URL to use.
```tsx
async function getInitialRedirectionURL() {
const urlParams = new URLSearchParams(window.location.search);
const loginChallenge = urlParams.get('loginChallenge') as string;
const redirectionResponse = await OAuth2Provider.getRedirectURLToContinueOAuthFlow({ loginChallenge });
if (redirectionResponse.status === "OK") {
return redirectionResponse.frontendRedirectTo;
}
}
```
:::caution
For mobile apps, you need to reuse the web authentication flow. Check this [guide](/docs/authentication/unified-login/reuse-website-login) for more information.
:::
#### 4.4 Add the token refresh page
To have support for token refreshing, you need to add a new page to your application.
The path should correspond to the one outlined during the first step.
When the user ends up on this page, you need to use the `Session` recipe to perform the refresh action.
Then they need redirection to a page from your application.
Here's a code sample that shows you how to do this.
```tsx
async function refreshToken() {
await Session.attemptRefreshingSession();
const urlParams = new URLSearchParams(window.location.search);
const loginChallenge = urlParams.get('loginChallenge') as string;
const redirectionResponse = await OAuth2Provider.getRedirectURLToContinueOAuthFlow({ loginChallenge });
if (redirectionResponse.status === "OK") {
window.location.href = redirectionResponse.frontendRedirectTo;
}
}
```
:::caution
For mobile apps, you need to reuse the web authentication flow. Check this [guide](/docs/authentication/unified-login/reuse-website-login) for more information.
:::
#### 4.5 Add the logout page
You need to add a logout page that users access when they want to end their session.
The path should correspond to the one outlined during the first step.
The logout action should first ask the user for confirmation.
If the confirmation passes, then you can call the recipe function.
Based on the final response you can redirect the user to the provided redirection URL.
```tsx
async function logout() {
const confirmation = confirm("Are you sure that you want to log out?");
if(!confirmation) return;
const urlParams = new URLSearchParams(window.location.search);
const logoutChallenge = urlParams.get('logoutChallenge') as string;
const redirectResponse = await OAuth2Provider.logOut({ logoutChallenge });
window.location.href = redirectResponse.frontendRedirectTo;
}
```
:::caution
For mobile apps, you need to reuse the web authentication flow. Check this [guide](/docs/authentication/unified-login/reuse-website-login) for more information.
:::
### 5. Update the login flow in your frontend applications
Use a generic OAuth2 library to handle the login flow
You can use the [react-oidc-context](https://github.com/authts/react-oidc-context) library.
Follow the instructions from the library's page.
Identify the configuration parameters based on the response received on **step 2**, when creating the **OAuth2 Client**.
- `authority` corresponds to the endpoint of the **Authorization Service** ``
- `clientID` corresponds to `clientId`
- `redirectUri` corresponds to a value from `callbackUrls`
- `scope` corresponds to `scope`
If you are using a multi-tenant setup, you also need to specify the `tenantId` parameter in the authorization URL.
To do this, set the `extraQueryParams` property with a specific value that should look like this: `{ tenant_id: "" }`.
You can use the [angular-oauth2-oidc](https://github.com/manfredsteyer/angular-oauth2-oidc) library.
Follow the instructions described in the [GitHub repository](https://github.com/manfredsteyer/angular-oauth2-oidc?tab=readme-ov-file#logging-in).
Identify the configuration parameters based on the response received on **step 2**, when creating the **OAuth2 Client**.
- `issuer` corresponds to the endpoint of the **Authorization Service** ``
- `client_id` corresponds to `clientId`
- `redirect_uri` corresponds to a value from `callbackUrls`
- `scope` corresponds to `scope`
If you are using a multi-tenant setup, you also need to specify the `tenantId` parameter in the authorization URL.
To do this, set the `extraQueryParams` property with a specific value that should look like this: `{ tenant_id: "" }`.
You can use the [oidc-client-ts](https://github.com/authts/oidc-client-ts?tab=readme-ov-file) library.
Follow the instructions described in the [GitHub repository](https://github.com/authts/oidc-client-ts/blob/main/docs/protocols/authorization-code-grant-with-pkce.md).
Identify the configuration parameters based on the response received on **step 2**, when creating the **OAuth2 Client**.
- `issuer` corresponds to the endpoint of the **Authorization Service** ``
- `client_id` corresponds to `clientId`
- `redirect_uri` corresponds to a value from `callbackUrls`
- `scope` corresponds to `scope`
If you are using a multi-tenant setup, you also need to specify the `tenantId` parameter in the authorization URL.
To do this, set the `extraQueryParams` property with a specific value that should look like this: `{ tenant_id: "" }`.
:::info
If you want to use the [**OAuth2 Refresh Tokens**](/docs/authentication/unified-login/oauth2-basics#oauth2-refresh-token) make sure to include the `offline_access` scope during the initialization step.
:::
### 6. Test the new authentication flow
With everything set up, you can test your login flow.
Use the setup created in the previous step to check if the authentication flow completes without any issues.
## Before you start
These instructions assume that you already have gone through the main [quickstart guide](/docs/quickstart/introduction).
If you have skipped that page, please follow the tutorial and return here once you're done.
:::info
If your frontend applications are on the same **domain**, but on different **sub-domains**, you can use [Session Sharing Across Subdomains](/docs/post-authentication/session-management/share-session-across-sub-domains).
:::
## Steps
### 1. Enable the Unified Login feature
Go to the [**SuperTokens.com SaaS Dashboard**](https://supertokens.com) and follow these instructions:
1. Click on the **Enabled Paid Features** button
2. Click on **Managed Service**
3. Check the **Unified Login / M2M** option
4. Click *Save*
### 2. Create the OAuth2 Clients
For each of your **`frontend`** applications create a separate [**OAuth2 client**](/docs/authentication/unified-login/oauth2-basics#client).
This can occur by directly calling the **SuperTokens Core** API.
```bash
curl --location --request POST '/recipe/oauth/clients' \
--header 'api-key: ^{coreInfo.key}' \
--header 'Content-Type: application/json; charset=utf-8' \
--data '
{
"clientName": "",
"responseTypes": ["code"],
"grantTypes": ["authorization_code", "refresh_token"],
"scope": "offline_access ",
"redirectUris": ["https:///oauth/callback"],
}
'
```
```tsx
const BASE_URL = '';
const API_KEY = '^{coreInfo.key}';
const url = `${BASE_URL}/recipe/oauth/clients`;
const options = {
method: 'POST',
headers: {
'api-key': API_KEY,
'Content-Type': 'application/json; charset=utf-8',
},
body: JSON.stringify({
clientName: "",
responseTypes: ["code"],
grantTypes: ["authorization_code", "refresh_token"],
scope: "offline_access ",
redirectUris: ["https:///oauth/callback"],
})
};
fetch(url, options)
.then(response => response.json())
.then(json => console.log(json))
.catch(err => console.error(err));
```
```go
BASE_URL = ""
API_KEY = "^{coreInfo.key}"
url = f"{BASE_URL}/recipe/oauth/clients"
payload: Dict[str, Any] ={
"clientName": "",
"responseTypes": ["code"],
"grantTypes": ["authorization_code", "refresh_token"],
"scope": "offline_access ",
"redirectUris": ["https:///oauth/callback"],
}
headers = {
"api-key": API_KEY,
"Content-Type": "application/json",
}
response = requests.post(url, json=payload, headers=headers)
print(response.json())
```
:::caution
You have to save the create OAuth2 Client response because this is not persisted internally for security reasons.
The information is necessary in the next steps.
:::
### 3. Set up the Authorization Service Backend
#### 3.1 Initialize the OAuth2 recipe
Update the `supertokens.init` call to include the new recipe.
```tsx
supertokens.init({
supertokens: {
connectionURI: "...",
apiKey: "...",
},
appInfo: {
appName: "...",
apiDomain: "...",
websiteDomain: "...",
},
recipeList: [
OAuth2Provider.init(),
]
});
```
:::caution
At the moment, there is no support for creating OAuth2 providers in the Go SDK.
:::
```python
from supertokens_python import init, InputAppInfo, SupertokensConfig
from supertokens_python.recipe import oauth2provider
init(
app_info=InputAppInfo(
app_name="...",
api_domain="...",
website_domain="...",
),
framework="fastapi",
supertokens_config=SupertokensConfig(
connection_uri="...",
api_key="..."
),
recipe_list=[
oauth2provider.init()
],
)
```
#### 3.2 Update the CORS configuration
Set up the Backend API to allow requests from all the frontend domains.
```tsx
const app = express();
// Add your actual frontend domains here
const allowedOrigins = ["", "", ""];
app.use(cors({
// highlight-start
origin: allowedOrigins,
allowedHeaders: ["content-type", ...supertokens.getAllCORSHeaders()],
credentials: true,
// highlight-end
}));
```
:::caution
At the moment, there is no support for creating OAuth2 providers in the Go SDK.
:::
```python
from supertokens_python import get_all_cors_headers
from fastapi import FastAPI
from starlette.middleware.cors import CORSMiddleware
from supertokens_python.framework.fastapi import get_middleware
app = FastAPI()
app.add_middleware(get_middleware())
app.add_middleware(
CORSMiddleware,
# highlight-start
allow_origins=[
"", "", ""
],
# highlight-end
allow_credentials=True,
allow_methods=["GET", "PUT", "POST", "DELETE", "OPTIONS", "PATCH"],
allow_headers=["Content-Type"] + get_all_cors_headers(),
)
```
#### 3.3 Implement a custom session verification function
Given that the backend, the **Authorization Server**, also acts as a **Resource Server** you have to account for this in the session verification process.
This is necessary because the flow uses two types of tokens:
- **SuperTokens Session Access Token**: Used during the login and logout.
- **OAuth2 Access Token**: Used to access protected resources and perform actions that need authorization.
Hence the logic should distinguish between these two and prevent errors.
Here is an example of how to implement this in the context of an Express API:
```tsx
interface RequestWithUserId extends Request {
userId?: string;
}
async function verifySession(req: RequestWithUserId, res: Response, next: NextFunction) {
let session = undefined;
try {
session = await Session.getSession(req, res, { sessionRequired: false });
} catch (err) {
if (
!Session.Error.isErrorFromSuperTokens(err) ||
err.type !== Session.Error.TRY_REFRESH_TOKEN
) {
return next(err);
}
}
// In this case we are dealing with a SuperTokens Session
if (session !== undefined) {
const userId = session.getUserId();
req.userId = userId;
return next();
}
// The OAuth2 Access Token needs to be manually extracted and validated
let jwt: string | undefined = undefined;
if (req.headers["authorization"]) {
jwt = req.headers["authorization"].split("Bearer ")[1];
}
if (jwt === undefined) {
return next(new Error("No JWT found in the request"));
}
try {
const tokenPayload = await validateToken(jwt, '');
const userId = tokenPayload.sub;
req.userId = userId;
return next();
} catch (err) {
return next(err);
}
}
const JWKS = jose.createRemoteJWKSet(
new URL("/jwt/jwks.json"),
);
// This is a basic example on how to validate an OAuth2 Token
// We have a separate page that talks more in depth about the process
async function validateToken(jwt: string, requiredScope: string) {
const { payload } = await jose.jwtVerify(jwt, JWKS, {
requiredClaims: ["stt", "scp", "sub"],
});
if (payload.stt !== 1) throw new Error("Invalid token");
const scopes = payload.scp as string[];
if (!scopes.includes(requiredScope)) throw new Error("Invalid token");
return payload;
}
// You can then use the function as a middleware for a protected route
const app = express();
app.get("/protected", verifySession, async (req, res) => {
// Custom logic
});
```
For more information on how to verify the **OAuth2 Access Tokens**, please check the [separate guide](/docs/authentication/unified-login/verify-tokens).
:::caution
At the moment, there is no support for creating OAuth2 providers in the Go SDK.
:::
```python
from supertokens_python.recipe.session.syncio import get_session
from supertokens_python.recipe.session.exceptions import SuperTokensSessionError, TryRefreshTokenError
from fastapi.requests import Request
from typing import List, Optional
return True
def validate_token(token: str, required_scope: str) -> bool:
api_domain = ""
api_base_path = ""
client_id = ""
jwks_url = f"{api_domain}{api_base_path}/jwt/jwks.json"
jwks_client = PyJWKClient(jwks_url)
try:
signing_key = jwks_client.get_signing_key_from_jwt(token)
decoded = jwt.decode(
token,
signing_key.key,
algorithms=['RS256'],
options={"require": ["stt", "client_id", "scp"]}
)
stt: Optional[int] = decoded.get('stt')
if stt != 1:
return False
token_client_id: Optional[str] = decoded.get('client_id', None)
if client_id != token_client_id:
return False
scopes: List[str] = decoded.get('scp', [])
if required_scope not in scopes:
return False
return True
except Exception:
return False
#
```
### 4. Configure the Authorization Service Frontend
#### 4.1 Initialize the recipe
Add the import statement for the new recipe and update the list of recipe to also include the new initialization.
```tsx
SuperTokens.init({
appInfo: {
appName: "...",
apiDomain: "...",
websiteDomain: "...",
},
recipeList: [
OAuth2Provider.init()
]
});
```
##### Include the pre-built UI in the rendering tree.
```tsx
class App extends React.Component {
render() {
return (
{/*This renders the login UI on the /auth route*/}
{getSuperTokensRoutesForReactRouterDom(reactRouterDom, [OAuth2ProviderPreBuiltUI])}
{/*Your app routes*/}
);
}
}
```
```tsx
class App extends React.Component {
render() {
if (canHandleRoute([OAuth2ProviderPreBuiltUI])) {
// This renders the login UI on the /auth route
return getRoutingComponent([OAuth2ProviderPreBuiltUI])
}
return (
{/*Your app*/}
);
}
}
```
Update the `AuthComponent` to include the `OAuth2Provider` recipe.
You need to add a new item in the `recipeList` array.
```tsx title="/app/auth/auth.component.ts"
@Component({
selector: "app-auth",
template: '',
})
export class AuthComponent implements OnDestroy, AfterViewInit {
constructor(
private renderer: Renderer2,
@Inject(DOCUMENT) private document: Document
) { }
ngAfterViewInit() {
this.loadScript('^{jsdeliver_prebuiltui}');
}
ngOnDestroy() {
// Remove the script when the component is destroyed
const script = this.document.getElementById('supertokens-script');
if (script) {
script.remove();
}
}
private loadScript(src: string) {
const script = this.renderer.createElement('script');
script.type = 'text/javascript';
script.src = src;
script.id = 'supertokens-script';
script.onload = () => {
supertokensUIInit({
appInfo: {
appName: "",
apiDomain: "",
websiteDomain: "",
apiBasePath: "",
websiteBasePath: ""
},
recipeList: [
// Don't forget to also include the other recipes that you are already using
supertokensUIOAuth2Provider.init()
],
});
}
this.renderer.appendChild(this.document.body, script);
}
}
```
Update the `AuthView` component to include the `OAuth2Provider` recipe.
You need to add a new item in the `recipeList` array, inside the `supertokensUIInit` call.
```tsx
```
#### 4.2 Disable network interceptors
The **Authorization Service Frontend** that you are configuring makes use of two types of access tokens:
- **SuperTokens Session Access Token**: Used only during the login flow to keep track of the authentication state.
- **OAuth2 Access Token**: Returned after a successful login attempt. It can then access protected resources.
By default, the **SuperTokens** frontend SDK intercepts all the network requests sent to your Backend API and adjusts them based on the **SuperTokens Session Tokens**.
This allows operations, such as automatic token refreshing or adding authorization headers, without needing to configure anything else.
Given that in the scenario you are implementing, the **OAuth2 Access Tokens** serve authorization purposes.
The automatic request interception causes conflicts.
To prevent this, you need to override the `shouldDoInterceptionBasedOnUrl` function in the `Session.init` call.
:::caution
The code samples assume that you are using `` as the `apiBasePath` for the backend authentication routes.
If that is different please adjust them based on your use case.
:::
```tsx
Session.init({
override: {
functions: (oI) => {
return {
...oI,
shouldDoInterceptionBasedOnUrl: (url, apiDomain, sessionTokenBackendDomain) => {
try {
let urlObj = new URL(url);
// Interception should be done only for routes that need the SuperTokens Session Tokens
const isAuthApiRoute = urlObj.pathname.startsWith("");
const isOAuth2ApiRoute = urlObj.pathname.startsWith("/oauth");
if (!isAuthApiRoute || isOAuth2ApiRoute) {
return false;
}
} catch (ignored) { }
return oI.shouldDoInterceptionBasedOnUrl(url, apiDomain, sessionTokenBackendDomain);
}
}
}
}
})
```
You need to make changes to the auth route configuration, as well as to the `supertokens-web-js` SDK configuration at the root of your application:
This change is in your auth route configuration.
```tsx
// this goes in the auth route config of your frontend app (once the pre-built UI script has been loaded)
supertokensUISession.init({
override: {
functions: (oI) => {
return {
...oI,
shouldDoInterceptionBasedOnUrl: (url, apiDomain, sessionTokenBackendDomain) => {
try {
let urlObj = new URL(url);
if (!urlObj.pathname.startsWith("")) {
return false;
}
} catch (ignored) { }
return oI.shouldDoInterceptionBasedOnUrl(url, apiDomain, sessionTokenBackendDomain);
}
}
}
}
})
```
This change goes in the `supertokens-web-js` SDK configuration at the root of your application:
```tsx
Session.init({
override: {
functions: (oI) => {
return {
...oI,
shouldDoInterceptionBasedOnUrl: (url, apiDomain, sessionTokenBackendDomain) => {
try {
let urlObj = new URL(url);
if (!urlObj.pathname.startsWith("")) {
return false;
}
} catch (ignored) { }
return oI.shouldDoInterceptionBasedOnUrl(url, apiDomain, sessionTokenBackendDomain);
}
}
}
}
})
```
You need to make changes to the auth route configuration, as well as to the `supertokens-web-js` SDK configuration at the root of your application:
This change is in your auth route configuration.
```tsx
// this goes in the auth route config of your frontend app (once the pre-built UI script has been loaded)
supertokensUISession.init({
override: {
functions: (oI) => {
return {
...oI,
shouldDoInterceptionBasedOnUrl: (url, apiDomain, sessionTokenBackendDomain) => {
try {
let urlObj = new URL(url);
if (!urlObj.pathname.startsWith("")) {
return false;
}
} catch (ignored) { }
return oI.shouldDoInterceptionBasedOnUrl(url, apiDomain, sessionTokenBackendDomain);
}
}
}
}
})
```
This change goes in the `supertokens-web-js` SDK configuration at the root of your application:
```tsx
Session.init({
override: {
functions: (oI) => {
return {
...oI,
shouldDoInterceptionBasedOnUrl: (url, apiDomain, sessionTokenBackendDomain) => {
try {
let urlObj = new URL(url);
if (!urlObj.pathname.startsWith("")) {
return false;
}
} catch (ignored) { }
return oI.shouldDoInterceptionBasedOnUrl(url, apiDomain, sessionTokenBackendDomain);
}
}
}
}
})
```
The code snippet only allows interception for API endpoints that start with ``.
This ensures that calls made from the Frontend SDKs continue to use the **SuperTokens Session Tokens**. As a result, the authentication flow ends up working.
For the other routes, you have full control on how you want to attach the **OAuth2 Access Tokens** to the API calls.
The user interface that you are going to build should respect this flow:
## A user accesses your application and tries to login.
It's up to you how you want to handle this.
They can click a button to login or you can directly start the login flow.
## They get redirected to the **Authorization Service Backend**
A **OAuth2/OpenID Connect (OIDC)** library can execute this action.
Check the previous guides for information on what you could use.
## The **Authorization Service Backend** redirects them to the **Authorization Service Frontend** login page.
The page URL contains a `loginChallenge` parameter that keeps track of the login attempt.
Besides that, the URL can also include a `forceFreshAuth` parameter.
As the name suggests, this should force the login UI to be visible even though the user has an existing valid session.
This guide shows you how to handle this.
## The **Authorization Service Frontend** renders the login UI and the user performs the login action.
The login UI should render based on instructions that are specific to each authentication method which you are using.
The additional thing that you have to do here is to consider the `forceFreshAuth` parameter.
## The **Authorization Service Frontend** redirects the user back to the **Authorization Service Backend**
After the user submits the login form, you need to redirect them to a specific route that sends them to the original application.
From here, the authentication flow completes.
Let's see how you can actually implement this UI.
#### 4.1 Configure the redirection URLs
As it has hinted in the previous section, the **Authorization Service Backend** sends the user to different pages from the **Authorization Service Frontend**, based on the action that needs execution.
The default values for these routes are:
- The login page maps to `` (this is also the place where a user ends up after logout)
- The token refresh page maps to `/try-refresh`
- The logout page maps to `/logout`
If you want to change these routes, you need to add a custom override.
:::info
This override needs addition to the **Authorization Service Backend**.
:::
```tsx
OAuth2Provider.init({
override: {
functions: (originalFunctions) => ({
...originalFunctions,
getFrontendRedirectionURL: async (input) => {
const websiteDomain = '';
const websiteBasePath = '';
if (input.type === "login") {
const queryParams = new URLSearchParams({
loginChallenge: input.loginChallenge,
});
if (input.hint !== undefined) {
queryParams.set("hint", input.hint);
}
if (input.forceFreshAuth) {
queryParams.set("forceFreshAuth", "true");
}
return `?${queryParams.toString()}`;
} else if (input.type === "try-refresh") {
return `/try-refresh?loginChallenge=${input.loginChallenge}`;
} else if (input.type === "post-logout-fallback") {
return ``;
} else if (input.type === "logout-confirmation") {
return `/oauth/logout?logoutChallenge=${input.logoutChallenge}`;
}
return ``;
},
}),
},
})
```
:::caution
At the moment, there is no support for creating OAuth2 providers in the Go SDK.
:::
:::caution
At the moment, there is no support for creating OAuth2 providers in the Python SDK.
:::
#### 4.2 Handle the forceFreshAuth parameter
Sometimes, even though there is an existing valid session in the **Authorization Service Frontend**, the requesting **Client** might force a new login attempt.
The `forceFreshAuth` parameter shows this.
When the login page renders, you also need to check for this parameter. You are doing this to know if you need to show the login UI.
Here is an example of how you can evaluate this case.
```tsx
async function shouldLogin() {
const urlParams = new URLSearchParams(window.location.search);
const forceFreshAuth = urlParams.get('forceFreshAuth') as string;
if(forceFreshAuth === "true") return true;
return Session.doesSessionExist();
}
```
:::info Multi Tenancy
If you are using multi-tenancy, you also need to keep track of the `tenantId` query parameter and pass it between the **Authorization Service Frontend** pages.
:::
#### 4.3 Complete the login attempt
After the user submits the login form, you need to redirect them to a specific route to complete the **OAuth 2** flow.
The following code sample shows you how to determine which URL to use.
```tsx
async function getInitialRedirectionURL() {
const urlParams = new URLSearchParams(window.location.search);
const loginChallenge = urlParams.get('loginChallenge') as string;
const redirectionResponse = await OAuth2Provider.getRedirectURLToContinueOAuthFlow({ loginChallenge });
if (redirectionResponse.status === "OK") {
return redirectionResponse.frontendRedirectTo;
}
}
```
:::caution
For mobile apps, you need to reuse the web authentication flow. Check this [guide](/docs/authentication/unified-login/reuse-website-login) for more information.
:::
#### 4.4 Add the token refresh page
To have support for token refreshing, you need to add a new page to your application.
The path should correspond to the one outlined during the first step.
When the user ends up on this page, you need to use the `Session` recipe to perform the refresh action.
Then they need redirection to a page from your application.
Here's a code sample that shows you how to do this.
```tsx
async function refreshToken() {
await Session.attemptRefreshingSession();
const urlParams = new URLSearchParams(window.location.search);
const loginChallenge = urlParams.get('loginChallenge') as string;
const redirectionResponse = await OAuth2Provider.getRedirectURLToContinueOAuthFlow({ loginChallenge });
if (redirectionResponse.status === "OK") {
window.location.href = redirectionResponse.frontendRedirectTo;
}
}
```
:::caution
For mobile apps, you need to reuse the web authentication flow. Check this [guide](/docs/authentication/unified-login/reuse-website-login) for more information.
:::
#### 4.5 Add the logout page
You need to add a logout page that users access when they want to end their session.
The path should correspond to the one outlined during the first step.
The logout action should first ask the user for confirmation.
If the confirmation passes, then you can call the recipe function.
Based on the final response you can redirect the user to the provided redirection URL.
```tsx
async function logout() {
const confirmation = confirm("Are you sure that you want to log out?");
if(!confirmation) return;
const urlParams = new URLSearchParams(window.location.search);
const logoutChallenge = urlParams.get('logoutChallenge') as string;
const redirectResponse = await OAuth2Provider.logOut({ logoutChallenge });
window.location.href = redirectResponse.frontendRedirectTo;
}
```
:::caution
For mobile apps, you need to reuse the web authentication flow. Check this [guide](/docs/authentication/unified-login/reuse-website-login) for more information.
:::
### 5. Update the login flow in your frontend applications
Use a generic OAuth2 library to handle the login flow
You can use the [react-oidc-context](https://github.com/authts/react-oidc-context) library.
Follow the instructions from the library's page.
Identify the configuration parameters based on the response received on **step 2**, when creating the **OAuth2 Client**.
- `authority` corresponds to the endpoint of the **Authorization Service** ``
- `clientID` corresponds to `clientId`
- `redirectUri` corresponds to a value from `callbackUrls`
- `scope` corresponds to `scope`
If you are using a multi-tenant setup, you also need to specify the `tenantId` parameter in the authorization URL.
To do this, set the `extraQueryParams` property with a specific value that should look like this: `{ tenant_id: "" }`.
You can use the [angular-oauth2-oidc](https://github.com/manfredsteyer/angular-oauth2-oidc) library.
Follow the instructions described in the [GitHub repository](https://github.com/manfredsteyer/angular-oauth2-oidc?tab=readme-ov-file#logging-in).
Identify the configuration parameters based on the response received on **step 2**, when creating the **OAuth2 Client**.
- `issuer` corresponds to the endpoint of the **Authorization Service** ``
- `client_id` corresponds to `clientId`
- `redirect_uri` corresponds to a value from `callbackUrls`
- `scope` corresponds to `scope`
If you are using a multi-tenant setup, you also need to specify the `tenantId` parameter in the authorization URL.
To do this, set the `extraQueryParams` property with a specific value that should look like this: `{ tenant_id: "" }`.
You can use the [oidc-client-ts](https://github.com/authts/oidc-client-ts?tab=readme-ov-file) library.
Follow the instructions described in the [GitHub repository](https://github.com/authts/oidc-client-ts/blob/main/docs/protocols/authorization-code-grant-with-pkce.md).
Identify the configuration parameters based on the response received on **step 2**, when creating the **OAuth2 Client**.
- `issuer` corresponds to the endpoint of the **Authorization Service** ``
- `client_id` corresponds to `clientId`
- `redirect_uri` corresponds to a value from `callbackUrls`
- `scope` corresponds to `scope`
If you are using a multi-tenant setup, you also need to specify the `tenantId` parameter in the authorization URL.
To do this, set the `extraQueryParams` property with a specific value that should look like this: `{ tenant_id: "" }`.
:::info
If you want to use the [**OAuth2 Refresh Tokens**](/docs/authentication/unified-login/oauth2-basics#oauth2-refresh-token) make sure to include the `offline_access` scope during the initialization step.
:::
### 6. Test the new authentication flow
With everything set up, you can test your login flow.
Use the setup created in the previous step to check if the authentication flow completes without any issues.