File length: 17641
# Authentication - Machine to Machine - Client credentials authentication
Source: https://supertokens.com/docs/authentication/m2m/client-credentials
## Overview
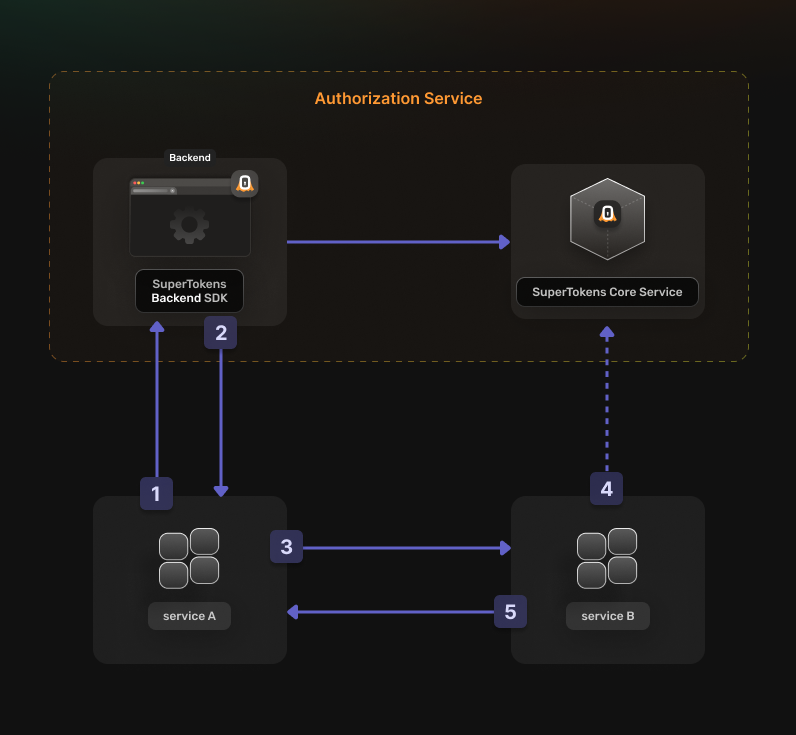
In the **Client Credentials Flow** the authentication sequence works in the following way:
## `Service A` uses credentials to get an **OAuth2 Access Token**
## [**Authorization Service**](/docs/authentication/unified-login/oauth2-basics#authorization-server) returns the **OAuth2 Access Token**
## `Service A` uses the **OAuth2 Access Token** to communicate with `Service B`
## `Service B` validates the **OAuth2 Access Token**
## If the token is valid `Service B` returns the requested resource
 Before going into the actual instructions, start by imagining a real life example that you can reference along the way.
This makes it easier to understand what is happening.
We are going to configure authentication for the following setup:
- A **Calendar Service** that exposes these actions: `event.view`, `event.create`, `event.update` and `event.delete`
- A **File Service** that exposes these actions: `file.view`, `file.create`, `file.update` and `file.delete`
- A **Task Service** that interacts with the **Calendar Service** and the **File Service** in the process of scheduling a task
The aim is to allow the **Task Service** to perform an authenticated action on the **Calendar Service**.
Proceed to the actual steps.
## Before you start
These instructions assume that you already have gone through the main [quickstart guide](/docs/quickstart/introduction).
If you have skipped that page, please follow the tutorial and return here once you're done.
## Steps
### 1. Enable the OAuth2 features from the Dashboard
You first have to enable the **OAuth2** features from the **SuperTokens.com Dashboard**.
1. Open the **SuperTokens.com Dashboard**
2. Click on the **Enabled Paid Features** button
3. Click on **Managed Service**
4. Check the **Unified Login / M2M** option
5. Click *Save*
You should be able to use the OAuth2 recipes in your applications.
### 2. Create the OAuth2 Clients
For each of your **`microservices`** you need to create a separate [**OAuth2 client**](/docs/authentication/unified-login/oauth2-basics#client).
This can occur by directly calling the **SuperTokens Core** API.
```bash
curl --location --request POST '/recipe/oauth/clients' \
--header 'api-key: ^{coreInfo.key}' \
--header 'Content-Type: application/json; charset=utf-8' \
--data '
{
"clientName": "",
"grantTypes": ["client_credentials"],
"scope": " ",
"audience": [""],
}
'
```
```tsx
const BASE_URL = '';
const API_KEY = '^{coreInfo.key}';
const url = `${BASE_URL}/recipe/oauth/clients`;
const options = {
method: 'POST',
headers: {
'api-key': API_KEY,
'Content-Type': 'application/json; charset=utf-8',
},
body: JSON.stringify({
clientName: "",
grantTypes: ["client_credentials"],
scope: " ",
audience: [""],
})
};
fetch(url, options)
.then(response => response.json())
.then(json => console.log(json))
.catch(err => console.error(err));
```
```go
BASE_URL = ""
API_KEY = "^{coreInfo.key}"
url = f"{BASE_URL}/recipe/oauth/clients"
payload: Dict[str, Any] ={
"clientName": "",
"grantTypes": ["client_credentials"],
"scope": "custom_scope_1> ",
"audience": [""],
}
headers = {
"api-key": API_KEY,
"Content-Type": "application/json",
}
response = requests.post(url, json=payload, headers=headers)
print(response.json())
```
:::info Custom Example
To create a client for the **Task Service**, use the following attributes:
```json
{
"clientName": "Task Service",
"grantTypes": ["client_credentials"],
"scope": "event.view event.create event.edit event.delete file.view file.create file.edit file.delete",
"audience": ["event", "file"]
}
```
This allows the **Task Service** to perform all types of actions against both of the other services as long as it has a valid **OAuth2 Access Token**.
:::
:::caution
You have to save the create response because this is not persisted internally for security reasons.
The information is necessary for the next steps.
:::
### 3. Set Up your Authorization Service
In your [**Authorization Server**](/docs/authentication/unified-login/oauth2-basics#authorization-server) backend, initialize the **OAuth2Provider** recipe.
Update the `supertokens.init` call to include the new recipe.
```tsx
supertokens.init({
supertokens: {
connectionURI: "...",
apiKey: "...",
},
appInfo: {
appName: "...",
apiDomain: "...",
websiteDomain: "...",
},
recipeList: [
OAuth2Provider.init(),
]
});
```
:::caution
At the moment, there is no support for creating OAuth2 providers in the Go SDK.
You can use the [legacy method](/docs/microservice_auth/legacy/implementation-guide) to authenticate microservices based on your language.
:::
```python
from supertokens_python import init, InputAppInfo, SupertokensConfig
from supertokens_python.recipe import oauth2provider
init(
app_info=InputAppInfo(
app_name="...",
api_domain="...",
website_domain="...",
),
framework="fastapi",
supertokens_config=SupertokensConfig(
connection_uri="...",
api_key="..."
),
recipe_list=[
oauth2provider.init()
],
)
```
### 4. Generate access tokens
You can directly call the [**Authorization Server**](/docs/authentication/unified-login/oauth2-basics#authorization-server) to generate Access Tokens.
Check the following code snippet to see how you can do that:
```bash
curl -X POST /oauth/token \
-H "Content-Type: application/json" \
-d '{
"client_id": "",
"client_secret": "",
"grant_type": "client_credentials",
"scope": [""],
"audience": ""
}'
```
You should limit the scopes that you are requesting to the ones necessary to perform the desired action.
:::info Custom Example
If the **Task Service** wants to create an event on the **Calendar Service**, a token with the following attributes needs generation:
```json
{
"client_id": "",
"client_secret": "",
"grant_type": "client_credentials",
"scope": ["event.create"],
"audience": "event"
}
```
:::
The **Authorization Server** returns a response that looks like this:
```json
{
"access_token": "",
"expires_in": 3600
}
```
Save the `access_token` in memory for use in the next step.
The `expires_in` field indicates how long the token is valid for.
Each service that you communicate with needs its own token.
With an **OAuth2 Access Token**, it can facilitate communication with the other services.
Keep in mind to generate a new one when it expires.
### 5. Verify an OAuth2 Access Token
To check the validity of a token, use a generic **JWT** verification library.
Besides the standard **OAuth2** token claims, the implementation includes an additional one called `stt`.
This stands for `SuperTokens Token Type`.
It ensures that the validation occurs for the correct token type:
- `0` represents a **SuperTokens Session Access Token**
- `1` represents an **OAuth2 Access Token**
- `2` represents an **OAuth2 ID Token**.
For NodeJS you can use [`jose`](https://github.com/panva/jose) to verify the token.
```tsx
const JWKS = jose.createRemoteJWKSet(new URL('/jwt/jwks.json'))
async function validateClientCredentialsToken(jwt: string) {
const requiredScope = "";
const audience = '';
try {
const { payload } = await jose.jwtVerify(jwt, JWKS, {
audience,
requiredClaims: ['stt', 'scp'],
});
if(payload.stt !== 1) return false;
const scopes = payload.scp as string[];
return scopes.includes(requiredScope);
} catch (err) {
return false;
}
}
```
You can use the [`jwx`](https://github.com/lestrrat-go/jwx) library to verify the token.
```go
return true
}
}
return false;
}
```
You can use the [PyJWT](https://github.com/jpadilla/pyjwt) library to verify the token.
```python
from typing import Optional, List
use Firebase\JWT\JWT;
use Firebase\JWT\Key;
function validateToken($jwt) {
$apiDomain = "";
$apiBasePath = "";
$jwksUrl = $apiDomain . $apiBasePath . '/jwt/jwks.json';
$requiredScope = "";
$audience = "";
$jwks = json_decode(file_get_contents($jwksUrl), true);
try {
$decoded = JWT::decode($jwt, JWK::parseKeySet($jwks), 'RS256'));
if ($decoded->aud !== $audience) {
return false;
}
if ($decoded->sst !== 1) {
return false;
}
return in_array($requiredScope, $decoded->scp);
} catch (Exception $e) {
return false;
}
}
```
You can use the [Auth0 JWT](https://github.com/auth0/java-jwt) library to verify the token.
```java
public class JWTVerifier {
private static final String JWKS_URL = "jwt/jwks.json";
private static final String AUDIENCE = "";
private static Map fetchJWKS() throws Exception {
URL url = new URL(JWKS_URL);
HttpURLConnection connection = (HttpURLConnection) url.openConnection();
connection.setRequestMethod("GET");
InputStream responseStream = connection.getInputStream();
Scanner scanner = new Scanner(responseStream, StandardCharsets.UTF_8.name());
String responseBody = scanner.useDelimiter("\\A").next();
scanner.close();
return JWT.decode(responseBody).getHeader();
}
public static boolean validateToken(String token) {
try {
Map jwks = fetchJWKS();
Algorithm algorithm = Algorithm.RSA256(jwks.get("x5c"), null);
JWTVerifier verifier = JWT.require(algorithm)
.withAudience(AUDIENCE)
.build();
DecodedJWT jwt = verifier.verify(token);
if(jwt.getClaim("sst").asInt() != 1) {
return false;
}
List scopes = jwt.getClaim("scp").asList();
return scopes.contains(requiredScope);
} catch (Exception e) {
return false;
}
}
}
```
You can use the [IdentityModel](https://github.com/IdentityModel/IdentityModel) library to verify the token.
```csharp
using System;
using System.Linq;
using Microsoft.IdentityModel.Tokens;
using System.IdentityModel.Tokens.Jwt;
using System.Net.Http;
using System.Threading.Tasks;
using Newtonsoft.Json.Linq;
class ClientCredentialsTokenValidator
{
static async Task ValidateToken(string jwtStr)
{
string apiDomain = "";
string apiBasePath = "";
string audience = "";
string requiredScope = "";
HttpClient client = new HttpClient();
var response = await client.GetStringAsync($"//jwt/jwks.json");
var jwks = new JsonWebKeySet(response);
var tokenHandler = new JwtSecurityTokenHandler();
var validationParameters = new TokenValidationParameters
{
ValidAudience = audience,
IssuerSigningKeys = jwks.Keys
};
try
{
SecurityToken validatedToken;
var principal = tokenHandler.ValidateToken(jwtStr, validationParameters, out validatedToken);
var claims = principal.Claims.ToDictionary(c => c.Type, c => c.Value);
if (!claims.ContainsKey("stt") || claims["stt"] != "1")
{
return false;
}
var scopes = claims["scp"].Split(" ");
if (!scopes.Contains(requiredScope))
{
return false;
}
return true;
}
catch (Exception)
{
return false;
}
}
}
```
:::info Custom Example
If the **Task Service** uses the previously generated token to create a calendar event, the **Calendar Service** needs to check the following:
- Set the `stt` claim to `1`
- The `scp` claim contains `event.create`
- Set the `aud` claim to `event`
:::
#### Handle both SuperTokens session tokens and OAuth2 access tokens
If you are using your **Authorization Service** also as a **Resource Server**, account for this in the way you verify the sessions.
This is necessary because two types of tokens are in use:
- **SuperTokens Session Access Token**: Used during the login/logout flows.
- **OAuth2 Access Token**: Used to access protected resources and perform actions that need authorization.
Hence, a way to distinguish between these two and prevent errors is necessary.
```tsx
async function verifySession(req: Request, res: Response, next: NextFunction) {
let session = undefined;
try {
session = await Session.getSession(req, res, { sessionRequired: false });
} catch (err) {
if (
!Session.Error.isErrorFromSuperTokens(err) ||
err.type !== Session.Error.TRY_REFRESH_TOKEN
) {
return next(err);
}
}
// In this case we are dealing with a SuperTokens Session that has been validated
if (session !== undefined) {
return next();
}
// The OAuth2 Access Token needs to be manually extracted and validated
let jwt: string | undefined = undefined;
if (req.headers["authorization"]) {
jwt = req.headers["authorization"].split("Bearer ")[1];
}
if (jwt === undefined) {
return next(new Error("No JWT found in the request"));
}
try {
await validateToken(jwt);
return next();
} catch (err) {
return next(err);
}
}
const JWKS = jose.createRemoteJWKSet(
new URL("jwt/jwks.json"),
);
// This is a basic example on how to validate an OAuth2 Token
// Use the previous example to extend it
async function validateToken(jwt: string) {
const { payload } = await jose.jwtVerify(jwt, JWKS, {
requiredClaims: ["stt", "scp", "sub"],
});
if (payload.stt !== 1) throw new Error("Invalid token");
// If the Authorizaton Server will handle different types of Authorization Flows
// You can differentiate between the different types of tokens by checking the `sessionHandle` claim
const sessionHandle = payload['sessionHandle'] as string | undefined;
if(sessionHandle === undefined) {
// We are dealing with a Client Credentials Token
// You can perform microservice authentication checks here
} else {
// Here we are validating tokens that have been generated in the Authorization Code Flow
}
}
// You can then use the function as a middleware for a protected route
const app = express();
app.get("/protected", verifySession, async (req, res) => {
// Custom logic
});
```
```python
from supertokens_python.recipe.session.syncio import get_session
from supertokens_python.recipe.session.exceptions import SuperTokensSessionError, TryRefreshTokenError
from fastapi.requests import Request
from typing import List, Optional
return True
def validate_token(token: str, required_scope: str) -> bool:
api_domain = ""
api_base_path = "/auth"
client_id = ""
jwks_url = f"{api_domain}{api_base_path}jwt/jwks.json"
jwks_client = PyJWKClient(jwks_url)
try:
signing_key = jwks_client.get_signing_key_from_jwt(token)
decoded = jwt.decode(
token,
signing_key.key,
algorithms=['RS256'],
options={"require": ["stt", "client_id", "scp"]}
)
stt: Optional[int] = decoded.get('stt')
if stt != 1:
return False
token_client_id: Optional[str] = decoded.get('client_id', None)
if client_id != token_client_id:
return False
scopes: List[str] = decoded.get('scp', [])
if required_scope not in scopes:
return False
return True
except Exception:
return False
#
```
:::caution
At the moment, there is no support for creating OAuth2 providers in the Go SDK.
:::
Before going into the actual instructions, start by imagining a real life example that you can reference along the way.
This makes it easier to understand what is happening.
We are going to configure authentication for the following setup:
- A **Calendar Service** that exposes these actions: `event.view`, `event.create`, `event.update` and `event.delete`
- A **File Service** that exposes these actions: `file.view`, `file.create`, `file.update` and `file.delete`
- A **Task Service** that interacts with the **Calendar Service** and the **File Service** in the process of scheduling a task
The aim is to allow the **Task Service** to perform an authenticated action on the **Calendar Service**.
Proceed to the actual steps.
## Before you start
These instructions assume that you already have gone through the main [quickstart guide](/docs/quickstart/introduction).
If you have skipped that page, please follow the tutorial and return here once you're done.
## Steps
### 1. Enable the OAuth2 features from the Dashboard
You first have to enable the **OAuth2** features from the **SuperTokens.com Dashboard**.
1. Open the **SuperTokens.com Dashboard**
2. Click on the **Enabled Paid Features** button
3. Click on **Managed Service**
4. Check the **Unified Login / M2M** option
5. Click *Save*
You should be able to use the OAuth2 recipes in your applications.
### 2. Create the OAuth2 Clients
For each of your **`microservices`** you need to create a separate [**OAuth2 client**](/docs/authentication/unified-login/oauth2-basics#client).
This can occur by directly calling the **SuperTokens Core** API.
```bash
curl --location --request POST '/recipe/oauth/clients' \
--header 'api-key: ^{coreInfo.key}' \
--header 'Content-Type: application/json; charset=utf-8' \
--data '
{
"clientName": "",
"grantTypes": ["client_credentials"],
"scope": " ",
"audience": [""],
}
'
```
```tsx
const BASE_URL = '';
const API_KEY = '^{coreInfo.key}';
const url = `${BASE_URL}/recipe/oauth/clients`;
const options = {
method: 'POST',
headers: {
'api-key': API_KEY,
'Content-Type': 'application/json; charset=utf-8',
},
body: JSON.stringify({
clientName: "",
grantTypes: ["client_credentials"],
scope: " ",
audience: [""],
})
};
fetch(url, options)
.then(response => response.json())
.then(json => console.log(json))
.catch(err => console.error(err));
```
```go
BASE_URL = ""
API_KEY = "^{coreInfo.key}"
url = f"{BASE_URL}/recipe/oauth/clients"
payload: Dict[str, Any] ={
"clientName": "",
"grantTypes": ["client_credentials"],
"scope": "custom_scope_1> ",
"audience": [""],
}
headers = {
"api-key": API_KEY,
"Content-Type": "application/json",
}
response = requests.post(url, json=payload, headers=headers)
print(response.json())
```
:::info Custom Example
To create a client for the **Task Service**, use the following attributes:
```json
{
"clientName": "Task Service",
"grantTypes": ["client_credentials"],
"scope": "event.view event.create event.edit event.delete file.view file.create file.edit file.delete",
"audience": ["event", "file"]
}
```
This allows the **Task Service** to perform all types of actions against both of the other services as long as it has a valid **OAuth2 Access Token**.
:::
:::caution
You have to save the create response because this is not persisted internally for security reasons.
The information is necessary for the next steps.
:::
### 3. Set Up your Authorization Service
In your [**Authorization Server**](/docs/authentication/unified-login/oauth2-basics#authorization-server) backend, initialize the **OAuth2Provider** recipe.
Update the `supertokens.init` call to include the new recipe.
```tsx
supertokens.init({
supertokens: {
connectionURI: "...",
apiKey: "...",
},
appInfo: {
appName: "...",
apiDomain: "...",
websiteDomain: "...",
},
recipeList: [
OAuth2Provider.init(),
]
});
```
:::caution
At the moment, there is no support for creating OAuth2 providers in the Go SDK.
You can use the [legacy method](/docs/microservice_auth/legacy/implementation-guide) to authenticate microservices based on your language.
:::
```python
from supertokens_python import init, InputAppInfo, SupertokensConfig
from supertokens_python.recipe import oauth2provider
init(
app_info=InputAppInfo(
app_name="...",
api_domain="...",
website_domain="...",
),
framework="fastapi",
supertokens_config=SupertokensConfig(
connection_uri="...",
api_key="..."
),
recipe_list=[
oauth2provider.init()
],
)
```
### 4. Generate access tokens
You can directly call the [**Authorization Server**](/docs/authentication/unified-login/oauth2-basics#authorization-server) to generate Access Tokens.
Check the following code snippet to see how you can do that:
```bash
curl -X POST /oauth/token \
-H "Content-Type: application/json" \
-d '{
"client_id": "",
"client_secret": "",
"grant_type": "client_credentials",
"scope": [""],
"audience": ""
}'
```
You should limit the scopes that you are requesting to the ones necessary to perform the desired action.
:::info Custom Example
If the **Task Service** wants to create an event on the **Calendar Service**, a token with the following attributes needs generation:
```json
{
"client_id": "",
"client_secret": "",
"grant_type": "client_credentials",
"scope": ["event.create"],
"audience": "event"
}
```
:::
The **Authorization Server** returns a response that looks like this:
```json
{
"access_token": "",
"expires_in": 3600
}
```
Save the `access_token` in memory for use in the next step.
The `expires_in` field indicates how long the token is valid for.
Each service that you communicate with needs its own token.
With an **OAuth2 Access Token**, it can facilitate communication with the other services.
Keep in mind to generate a new one when it expires.
### 5. Verify an OAuth2 Access Token
To check the validity of a token, use a generic **JWT** verification library.
Besides the standard **OAuth2** token claims, the implementation includes an additional one called `stt`.
This stands for `SuperTokens Token Type`.
It ensures that the validation occurs for the correct token type:
- `0` represents a **SuperTokens Session Access Token**
- `1` represents an **OAuth2 Access Token**
- `2` represents an **OAuth2 ID Token**.
For NodeJS you can use [`jose`](https://github.com/panva/jose) to verify the token.
```tsx
const JWKS = jose.createRemoteJWKSet(new URL('/jwt/jwks.json'))
async function validateClientCredentialsToken(jwt: string) {
const requiredScope = "";
const audience = '';
try {
const { payload } = await jose.jwtVerify(jwt, JWKS, {
audience,
requiredClaims: ['stt', 'scp'],
});
if(payload.stt !== 1) return false;
const scopes = payload.scp as string[];
return scopes.includes(requiredScope);
} catch (err) {
return false;
}
}
```
You can use the [`jwx`](https://github.com/lestrrat-go/jwx) library to verify the token.
```go
return true
}
}
return false;
}
```
You can use the [PyJWT](https://github.com/jpadilla/pyjwt) library to verify the token.
```python
from typing import Optional, List
use Firebase\JWT\JWT;
use Firebase\JWT\Key;
function validateToken($jwt) {
$apiDomain = "";
$apiBasePath = "";
$jwksUrl = $apiDomain . $apiBasePath . '/jwt/jwks.json';
$requiredScope = "";
$audience = "";
$jwks = json_decode(file_get_contents($jwksUrl), true);
try {
$decoded = JWT::decode($jwt, JWK::parseKeySet($jwks), 'RS256'));
if ($decoded->aud !== $audience) {
return false;
}
if ($decoded->sst !== 1) {
return false;
}
return in_array($requiredScope, $decoded->scp);
} catch (Exception $e) {
return false;
}
}
```
You can use the [Auth0 JWT](https://github.com/auth0/java-jwt) library to verify the token.
```java
public class JWTVerifier {
private static final String JWKS_URL = "jwt/jwks.json";
private static final String AUDIENCE = "";
private static Map fetchJWKS() throws Exception {
URL url = new URL(JWKS_URL);
HttpURLConnection connection = (HttpURLConnection) url.openConnection();
connection.setRequestMethod("GET");
InputStream responseStream = connection.getInputStream();
Scanner scanner = new Scanner(responseStream, StandardCharsets.UTF_8.name());
String responseBody = scanner.useDelimiter("\\A").next();
scanner.close();
return JWT.decode(responseBody).getHeader();
}
public static boolean validateToken(String token) {
try {
Map jwks = fetchJWKS();
Algorithm algorithm = Algorithm.RSA256(jwks.get("x5c"), null);
JWTVerifier verifier = JWT.require(algorithm)
.withAudience(AUDIENCE)
.build();
DecodedJWT jwt = verifier.verify(token);
if(jwt.getClaim("sst").asInt() != 1) {
return false;
}
List scopes = jwt.getClaim("scp").asList();
return scopes.contains(requiredScope);
} catch (Exception e) {
return false;
}
}
}
```
You can use the [IdentityModel](https://github.com/IdentityModel/IdentityModel) library to verify the token.
```csharp
using System;
using System.Linq;
using Microsoft.IdentityModel.Tokens;
using System.IdentityModel.Tokens.Jwt;
using System.Net.Http;
using System.Threading.Tasks;
using Newtonsoft.Json.Linq;
class ClientCredentialsTokenValidator
{
static async Task ValidateToken(string jwtStr)
{
string apiDomain = "";
string apiBasePath = "";
string audience = "";
string requiredScope = "";
HttpClient client = new HttpClient();
var response = await client.GetStringAsync($"//jwt/jwks.json");
var jwks = new JsonWebKeySet(response);
var tokenHandler = new JwtSecurityTokenHandler();
var validationParameters = new TokenValidationParameters
{
ValidAudience = audience,
IssuerSigningKeys = jwks.Keys
};
try
{
SecurityToken validatedToken;
var principal = tokenHandler.ValidateToken(jwtStr, validationParameters, out validatedToken);
var claims = principal.Claims.ToDictionary(c => c.Type, c => c.Value);
if (!claims.ContainsKey("stt") || claims["stt"] != "1")
{
return false;
}
var scopes = claims["scp"].Split(" ");
if (!scopes.Contains(requiredScope))
{
return false;
}
return true;
}
catch (Exception)
{
return false;
}
}
}
```
:::info Custom Example
If the **Task Service** uses the previously generated token to create a calendar event, the **Calendar Service** needs to check the following:
- Set the `stt` claim to `1`
- The `scp` claim contains `event.create`
- Set the `aud` claim to `event`
:::
#### Handle both SuperTokens session tokens and OAuth2 access tokens
If you are using your **Authorization Service** also as a **Resource Server**, account for this in the way you verify the sessions.
This is necessary because two types of tokens are in use:
- **SuperTokens Session Access Token**: Used during the login/logout flows.
- **OAuth2 Access Token**: Used to access protected resources and perform actions that need authorization.
Hence, a way to distinguish between these two and prevent errors is necessary.
```tsx
async function verifySession(req: Request, res: Response, next: NextFunction) {
let session = undefined;
try {
session = await Session.getSession(req, res, { sessionRequired: false });
} catch (err) {
if (
!Session.Error.isErrorFromSuperTokens(err) ||
err.type !== Session.Error.TRY_REFRESH_TOKEN
) {
return next(err);
}
}
// In this case we are dealing with a SuperTokens Session that has been validated
if (session !== undefined) {
return next();
}
// The OAuth2 Access Token needs to be manually extracted and validated
let jwt: string | undefined = undefined;
if (req.headers["authorization"]) {
jwt = req.headers["authorization"].split("Bearer ")[1];
}
if (jwt === undefined) {
return next(new Error("No JWT found in the request"));
}
try {
await validateToken(jwt);
return next();
} catch (err) {
return next(err);
}
}
const JWKS = jose.createRemoteJWKSet(
new URL("jwt/jwks.json"),
);
// This is a basic example on how to validate an OAuth2 Token
// Use the previous example to extend it
async function validateToken(jwt: string) {
const { payload } = await jose.jwtVerify(jwt, JWKS, {
requiredClaims: ["stt", "scp", "sub"],
});
if (payload.stt !== 1) throw new Error("Invalid token");
// If the Authorizaton Server will handle different types of Authorization Flows
// You can differentiate between the different types of tokens by checking the `sessionHandle` claim
const sessionHandle = payload['sessionHandle'] as string | undefined;
if(sessionHandle === undefined) {
// We are dealing with a Client Credentials Token
// You can perform microservice authentication checks here
} else {
// Here we are validating tokens that have been generated in the Authorization Code Flow
}
}
// You can then use the function as a middleware for a protected route
const app = express();
app.get("/protected", verifySession, async (req, res) => {
// Custom logic
});
```
```python
from supertokens_python.recipe.session.syncio import get_session
from supertokens_python.recipe.session.exceptions import SuperTokensSessionError, TryRefreshTokenError
from fastapi.requests import Request
from typing import List, Optional
return True
def validate_token(token: str, required_scope: str) -> bool:
api_domain = ""
api_base_path = "/auth"
client_id = ""
jwks_url = f"{api_domain}{api_base_path}jwt/jwks.json"
jwks_client = PyJWKClient(jwks_url)
try:
signing_key = jwks_client.get_signing_key_from_jwt(token)
decoded = jwt.decode(
token,
signing_key.key,
algorithms=['RS256'],
options={"require": ["stt", "client_id", "scp"]}
)
stt: Optional[int] = decoded.get('stt')
if stt != 1:
return False
token_client_id: Optional[str] = decoded.get('client_id', None)
if client_id != token_client_id:
return False
scopes: List[str] = decoded.get('scp', [])
if required_scope not in scopes:
return False
return True
except Exception:
return False
#
```
:::caution
At the moment, there is no support for creating OAuth2 providers in the Go SDK.
:::