File length: 93047 # Additional Verification - Multi Factor Authentication - Initial setup Source: https://supertokens.com/docs/additional-verification/mfa/initial-setup ## Overview To integrate multi-factor authentication, MFA, in your application, you first need to decide on what factors you want to support and when to ask for them. The following guide shows you how to implement a basic setup while also covering customization methods. ## Before you start These instructions assume that you already have some knowledge of MFA. If you are not familiar with terms like authentication factors and challenges, please go through the [MFA concepts page](/docs/additional-verification/mfa/important-concepts). If you plan to use the `otp-email` factor as a form of email verification, you also need to initialize the `emailverification` recipe in `REQUIRED` mode on the backend. This configuration ensures that the email verification process passes only if the originally provided email has been verified. ## Steps ### 1. Set up the backend #### 1.1 Enable account linking MFA requires account linking to be active. You can enable it in the following way: ```ts SuperTokens.init({ supertokens: { connectionURI: "..." }, appInfo: { appName: "...", apiDomain: "...", websiteDomain: "..." }, recipeList: [ // ... // highlight-start AccountLinking.init({ shouldDoAutomaticAccountLinking: async (newAccountInfo: AccountInfoWithRecipeId & { recipeUserId?: RecipeUserId }, user: User | undefined, session: SessionContainerInterface | undefined, tenantId: string, userContext: UserContext) => { if (session === undefined) { // we do not want to do first factor account linking by default. To enable that, // please see the automatic account linking docs in the recipe docs for your first factor. return { shouldAutomaticallyLink: false }; } if (user === undefined || session.getUserId() === user.id) { // if it comes here, it means that a session exists, and we are trying to link the // newAccountInfo to the session user, which means it's an MFA flow, so we enable // linking here. return { shouldAutomaticallyLink: true, shouldRequireVerification: false } } return { shouldAutomaticallyLink: false }; } }), // highlight-end ] }) ``` :::note At the moment this feature is not supported through the Go SDK. ::: ```python from supertokens_python import init, InputAppInfo, SupertokensConfig from supertokens_python.recipe import accountlinking from supertokens_python.types import User from supertokens_python.recipe.session.interfaces import SessionContainer from supertokens_python.recipe.accountlinking.types import AccountInfoWithRecipeIdAndUserId, ShouldNotAutomaticallyLink, ShouldAutomaticallyLink from typing import Dict, Any, Optional, Union async def should_do_automatic_account_linking( new_account_info: AccountInfoWithRecipeIdAndUserId, user: Optional[User], session: Optional[SessionContainer], tenant_id: str, user_context: Dict[str, Any] ) -> Union[ShouldNotAutomaticallyLink, ShouldAutomaticallyLink]: if session is None: # We do not want to do first factor account linking by default. # To enable that, please see the automatic account linking docs # in the recipe docs for your first factor. return ShouldNotAutomaticallyLink() if user is None or session.get_user_id() == user.id: # If it comes here, it means that a session exists, and we are trying to link the # account_info to the session user, which means it's an MFA flow, so we enable # linking here. return ShouldAutomaticallyLink(should_require_verification=False) return ShouldNotAutomaticallyLink() init( app_info=InputAppInfo( app_name="...", api_domain="...", website_domain="...", ), supertokens_config=SupertokensConfig( connection_uri="...", ), framework='...', # type: ignore recipe_list=[ accountlinking.init(should_do_automatic_account_linking=should_do_automatic_account_linking) ], ) ``` - The above snippet enables auto account linking only during the second factor and not for the first factor login. This means that if a user has an email password account, and then they login via Google (with the same email), those two accounts are not linked. However, if the second factor for logging in is email or phone OTP, then that passwordless account links to the first factor login method of that session. - Notice that `shouldRequireVerification: false` configures account linking. It means that the second factor can connect to the first factor even though the first factor is not verified. If you want to do email verification of the first factor before setting up the second factor (for example if the first factor is email password, and the second is phone OTP), then you can set this boolean to `true`, and also init the email verification recipe on the frontend and backend in `REQUIRED` mode. - If you also want to enable first factor automatic account linking, see [this link](/docs/post-authentication/account-linking/automatic-account-linking). :::important Account linking is a paid feature, and you need to generate a license key to enable it. Enabling the MFA feature also enables account linking automatically, meaning you don't need to check the account linking feature. ::: #### 1.2 Configure the first factors We start by initializing the MFA recipe on the backend and specifying the list of first factors using their [factor IDs](/docs/additional-verification/mfa/important-concepts#factors). You still have to initialize all the auth recipes in the `recipeList`, and configure them based on your needs. For example, the code below initializes `thirdparty`, `emailpassword` and `passwordless` recipes and sets the `firstFactor` array to be `["emailpassword", "thirdparty"]`. This means that email password and social login appear to the user as the first factor (using the `thirdparty` + `emailpassword` recipe), and `passwordless` serves as the second factor. ```ts supertokens.init({ supertokens: { connectionURI: "..." }, appInfo: { appName: "...", apiDomain: "...", websiteDomain: "..." }, recipeList: [ // ... // highlight-start ThirdParty.init({ //... }), EmailPassword.init({ //... }), Passwordless.init({ contactMethod: "EMAIL", flowType: "USER_INPUT_CODE" }), MultiFactorAuth.init({ firstFactors: [ MultiFactorAuth.FactorIds.EMAILPASSWORD, MultiFactorAuth.FactorIds.THIRDPARTY ] }) // highlight-end ] }) ``` :::note At the moment this feature is not supported through the Go SDK. ::: ```python from supertokens_python import init, InputAppInfo, SupertokensConfig from supertokens_python.recipe import emailpassword, multifactorauth, thirdparty, passwordless from supertokens_python.recipe.passwordless import ContactEmailOnlyConfig from supertokens_python.recipe.multifactorauth.types import FactorIds init( app_info=InputAppInfo( app_name="...", api_domain="...", website_domain="...", ), supertokens_config=SupertokensConfig( connection_uri="...", ), framework='...', # type: ignore recipe_list=[ emailpassword.init(), thirdparty.init(), multifactorauth.init(), passwordless.init(contact_config=ContactEmailOnlyConfig(), flow_type="USER_INPUT_CODE"), multifactorauth.init(first_factors=[FactorIds.EMAILPASSWORD, FactorIds.THIRDPARTY]) ], ) ``` Other combinations of first factors exists. For example, if you want passwordless as the first factor, then you would init the passwordless recipe and add `"passwordless"` in the `firstFactors` array. For a multi-tenancy setup, where each tenant can have a different set of first factors, you can leave the `firstFactors` array as `undefined` in the `MultiFactorAuth.init`. Configure the `firstFactors` on a per-tenant basis when creating or updating a tenant as shown below: ```tsx async function createNewTenant() { let resp = await Multitenancy.createOrUpdateTenant("customer1", { firstFactors: [MultiFactorAuth.FactorIds.EMAILPASSWORD] }); if (resp.createdNew) { // Tenant created successfully } else { // Existing tenant's config was modified. } } ``` `firstFactors` includes only `"emailpassword"`. This means that users who login to this tenant can only use email password as the first factor. Later on, the configuration for passwordless as a second factor for this tenant appears. :::important - If you do not configure `firstFactors` array on a tenant configuration, then no factors activate for that tenant by default. - To remove the `firstFactors` configuration for a tenant, you can pass a `null` value for the `firstFactors` key in the tenant configuration. For that tenant, this makes SuperTokens default to the `firstFactors` array in the `MultiFactorAuth.init` from the backend `init` configuration. ::: :::note At the moment this feature is not supported through the Go SDK. ::: ```python from supertokens_python.recipe.multitenancy.asyncio import create_or_update_tenant from supertokens_python.recipe.multitenancy.interfaces import TenantConfigCreateOrUpdate from supertokens_python.recipe.multifactorauth.types import FactorIds async def create_new_tenant(): resp = await create_or_update_tenant( "customer1", TenantConfigCreateOrUpdate(first_factors=[FactorIds.EMAILPASSWORD]) ) if resp.created_new: # Tenant created successfully pass else: # Existing tenant's config was modified pass ``` ```python from supertokens_python.recipe.multitenancy.syncio import create_or_update_tenant from supertokens_python.recipe.multitenancy.interfaces import TenantConfigCreateOrUpdate from supertokens_python.recipe.multifactorauth.types import FactorIds def create_new_tenant(): resp = create_or_update_tenant( "customer1", TenantConfigCreateOrUpdate(first_factors=[FactorIds.EMAILPASSWORD]) ) if resp.created_new: # Tenant created successfully pass else: # Existing tenant's config was modified pass ``` ```bash showAppTypeSelect curl --location --request PUT 'http://localhost:3567/recipe/multitenancy/tenant/v2' \ --header 'api-key: YOUR_API_KEY' \ --header 'Content-Type: application/json' \ --data-raw '{ "tenantId": "customer1", "firstFactors": ["emailpassword"] }' ``` `firstFactors` includes only `"emailpassword"`. This means that users who login to this tenant can only use email password as the first factor. Later on, the configuration for passwordless as a second factor for this tenant appears. :::important - If you do not configure `firstFactors` array on a tenant configuration, then no factors activate for that tenant by default. - To remove the `firstFactors` configuration for a tenant, you can pass a `null` value for the `firstFactors` key in the tenant configuration. For that tenant, this makes SuperTokens default to the `firstFactors` array in the `MultiFactorAuth.init` from the backend `init` configuration. ::: Email Password enabled 
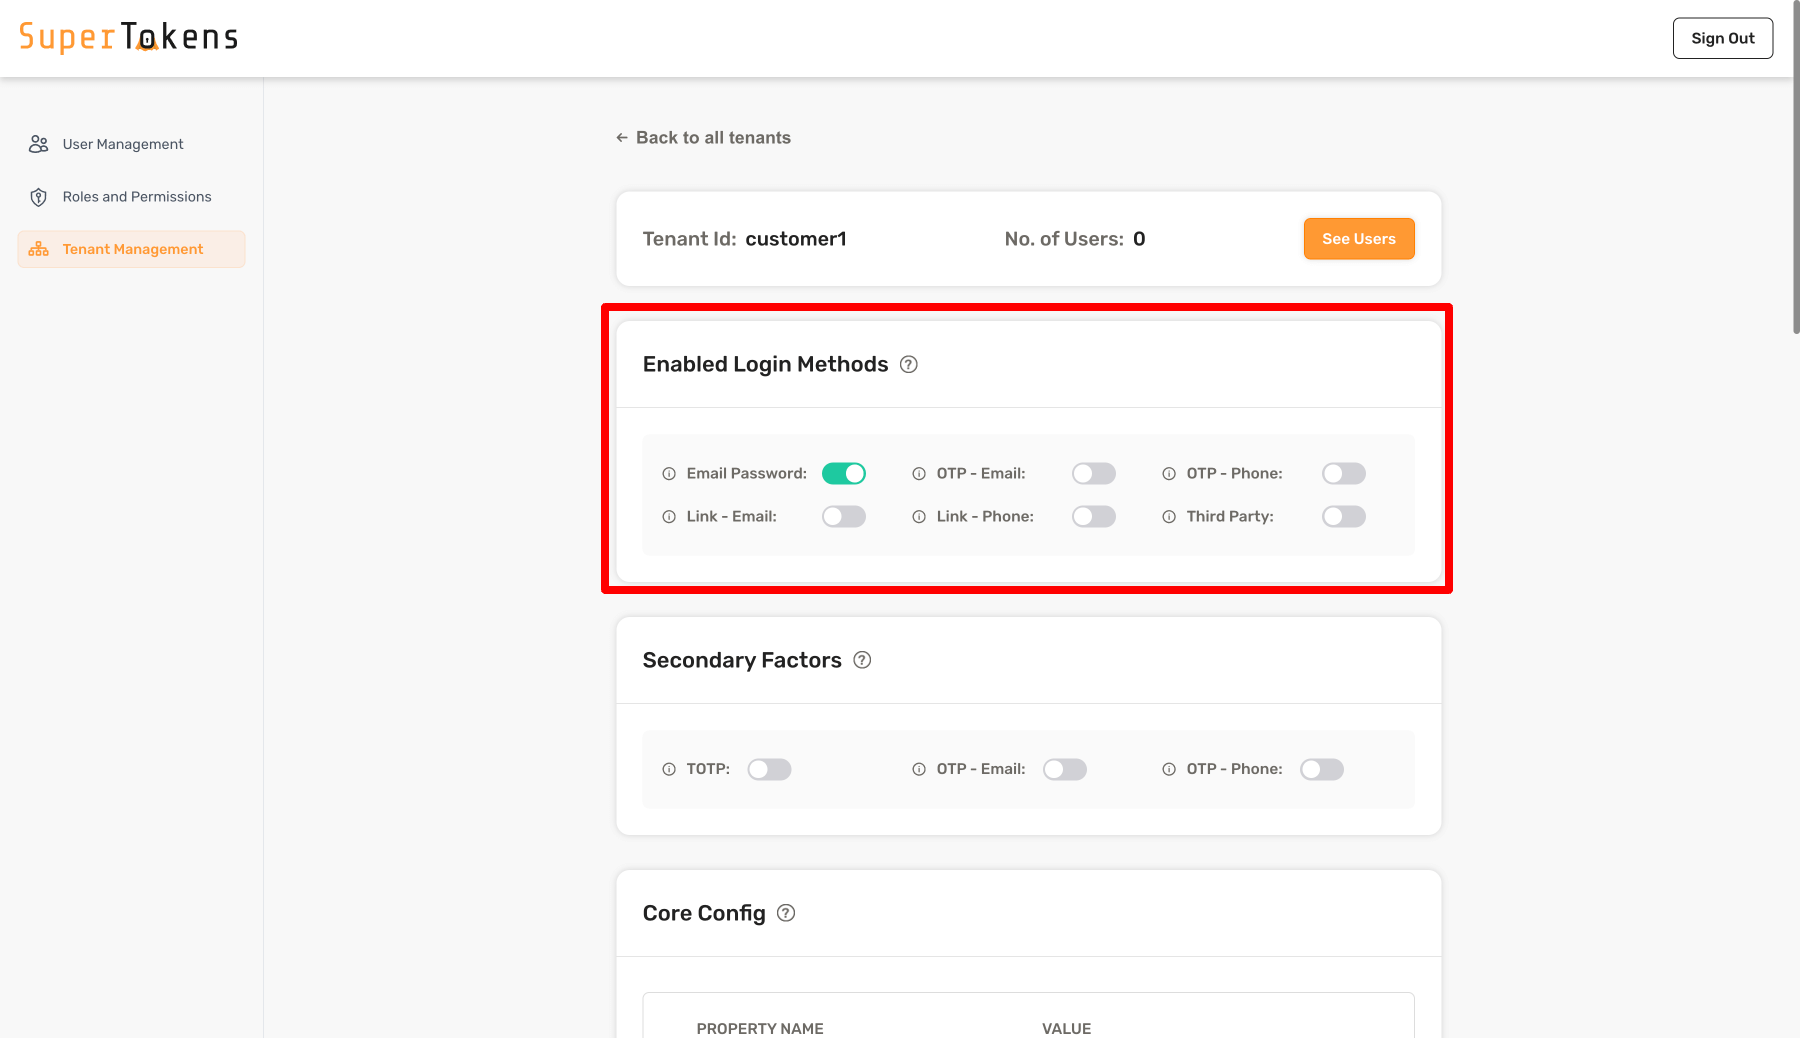
In the above setting, Email Password is active in the **Login Methods** section. This means that users who login to this tenant can only use email password as the first factor. Later on, the configuration for passwordless as a second factor for this tenant appears. By default, no login methods activate for a tenant. #### 1.3 Configure the second factor This section explains how to configure SuperTokens such that a second factor is necessary for all users during sign up and during sign in. TOTP serves as an example for the second factor. The following code snippet accomplishes this: ```ts SuperTokens.init({ supertokens: { connectionURI: "..." }, appInfo: { appName: "...", apiDomain: "...", websiteDomain: "..." }, recipeList: [ // ... ThirdParty.init({ //... }), EmailPassword.init({ //... }), Passwordless.init({ contactMethod: "EMAIL", flowType: "USER_INPUT_CODE" }), totp.init(), MultiFactorAuth.init({ firstFactors: [ MultiFactorAuth.FactorIds.EMAILPASSWORD, MultiFactorAuth.FactorIds.THIRDPARTY ], // highlight-start override: { functions: (originalImplementation) => { return { ...originalImplementation, getMFARequirementsForAuth: async function (input) { return [MultiFactorAuth.FactorIds.TOTP] } } } } // highlight-end }) ] }) ``` :::note At the moment this feature is not supported through the Go SDK. ::: ```python from supertokens_python import init, InputAppInfo, SupertokensConfig from supertokens_python.recipe import ( emailpassword, multifactorauth, thirdparty, passwordless, ) from supertokens_python.recipe.passwordless import ContactEmailOnlyConfig from supertokens_python.recipe.multifactorauth.types import FactorIds, OverrideConfig from supertokens_python.recipe.multifactorauth.interfaces import RecipeInterface from typing import Dict, Any, Callable, Awaitable, List from supertokens_python.types import User from supertokens_python.recipe.multifactorauth.types import MFARequirementList def override_functions(original_implementation: RecipeInterface): async def get_mfa_requirements_for_auth( tenant_id: str, access_token_payload: Dict[str, Any], completed_factors: Dict[str, int], user: Callable[[], Awaitable[User]], factors_set_up_for_user: Callable[[], Awaitable[List[str]]], required_secondary_factors_for_user: Callable[[], Awaitable[List[str]]], required_secondary_factors_for_tenant: Callable[[], Awaitable[List[str]]], user_context: Dict[str, Any], ) -> MFARequirementList: return [FactorIds.TOTP] original_implementation.get_mfa_requirements_for_auth = ( get_mfa_requirements_for_auth ) return original_implementation init( app_info=InputAppInfo( app_name="...", api_domain="...", website_domain="...", ), supertokens_config=SupertokensConfig( connection_uri="...", ), framework="...", # type: ignore recipe_list=[ emailpassword.init(), thirdparty.init(), multifactorauth.init(), passwordless.init( contact_config=ContactEmailOnlyConfig(), flow_type="USER_INPUT_CODE" ), multifactorauth.init( first_factors=[FactorIds.EMAILPASSWORD, FactorIds.THIRDPARTY], override=OverrideConfig(functions=override_functions), ), ], ) ``` In the above snippet, you configure email password and social login as the first factor, followed by TOTP as the second factor. After sign in or sign up, SuperTokens calls the `getMFARequirementsForAuth` function to get a list of secondary factors for the user. The returned value determines the boolean value of `v` that's stored in the session's access token payload. If the returned factor is already completed (it's in the `c` object of the session's payload), then the value of `v` is `true`, else `false`. In the above example, `"totp"` returns as a required factor for all users. However, you can also dynamically decide which factor to return based on the `input` arguments, which contains the `User` object, the `tenantId`, and the current session's access token payload. The default implementation of `getMFARequirementsForAuth` returns the set of factors specifically enabled for this user (see next section) or for the tenant (see later section). The output of this function can be more complex than a `string[]`. You can also return an object which tells SuperTokens that any one of the factors must satisfy: ## Require one of multiple factors ```ts supertokens.init({ supertokens: { connectionURI: "..." }, appInfo: { appName: "...", apiDomain: "...", websiteDomain: "..." }, recipeList: [ // ... MultiFactorAuth.init({ firstFactors: [ MultiFactorAuth.FactorIds.EMAILPASSWORD, MultiFactorAuth.FactorIds.THIRDPARTY ], override: { functions: (originalImplementation) => { return { ...originalImplementation, getMFARequirementsForAuth: async function (input) { // highlight-start return [{ oneOf: [ MultiFactorAuth.FactorIds.TOTP, MultiFactorAuth.FactorIds.OTP_EMAIL ] }] // highlight-end } } } } }) ] }) ``` :::note At the moment this feature is not supported through the Go SDK. ::: ```python from supertokens_python import init, InputAppInfo, SupertokensConfig from supertokens_python.recipe import multifactorauth from supertokens_python.recipe.multifactorauth.types import FactorIds, OverrideConfig from supertokens_python.recipe.multifactorauth.interfaces import RecipeInterface from typing import Dict, Any, Callable, Awaitable, List from supertokens_python.types import User from supertokens_python.recipe.multifactorauth.types import MFARequirementList def override_functions(original_implementation: RecipeInterface): async def get_mfa_requirements_for_auth( tenant_id: str, access_token_payload: Dict[str, Any], completed_factors: Dict[str, int], user: Callable[[], Awaitable[User]], factors_set_up_for_user: Callable[[], Awaitable[List[str]]], required_secondary_factors_for_user: Callable[[], Awaitable[List[str]]], required_secondary_factors_for_tenant: Callable[[], Awaitable[List[str]]], user_context: Dict[str, Any], ) -> MFARequirementList: # highlight-next-line return [FactorIds.TOTP, FactorIds.OTP_EMAIL] original_implementation.get_mfa_requirements_for_auth = ( get_mfa_requirements_for_auth ) return original_implementation init( app_info=InputAppInfo( app_name="...", api_domain="...", website_domain="...", ), supertokens_config=SupertokensConfig( connection_uri="...", ), framework="...", # type: ignore recipe_list=[ multifactorauth.init( first_factors=[FactorIds.EMAILPASSWORD, FactorIds.THIRDPARTY], override=OverrideConfig(functions=override_functions), ), ], ) ``` ## Require multiple factors in any order ```ts supertokens.init({ supertokens: { connectionURI: "..." }, appInfo: { appName: "...", apiDomain: "...", websiteDomain: "..." }, recipeList: [ // ... MultiFactorAuth.init({ firstFactors: [ MultiFactorAuth.FactorIds.EMAILPASSWORD, MultiFactorAuth.FactorIds.THIRDPARTY ], override: { functions: (originalImplementation) => { return { ...originalImplementation, getMFARequirementsForAuth: async function (input) { // highlight-start return [{ allOfInAnyOrder: [ MultiFactorAuth.FactorIds.TOTP, MultiFactorAuth.FactorIds.OTP_EMAIL ] }] // highlight-end } } } } }) ] }) ``` :::note At the moment this feature is not supported through the Go SDK. ::: ```python from supertokens_python import init, InputAppInfo, SupertokensConfig from supertokens_python.recipe import multifactorauth from supertokens_python.recipe.multifactorauth.types import FactorIds, OverrideConfig from supertokens_python.recipe.multifactorauth.interfaces import RecipeInterface from typing import Dict, Any, Callable, Awaitable, List from supertokens_python.types import User from supertokens_python.recipe.multifactorauth.types import MFARequirementList def override_functions(original_implementation: RecipeInterface): async def get_mfa_requirements_for_auth( tenant_id: str, access_token_payload: Dict[str, Any], completed_factors: Dict[str, int], user: Callable[[], Awaitable[User]], factors_set_up_for_user: Callable[[], Awaitable[List[str]]], required_secondary_factors_for_user: Callable[[], Awaitable[List[str]]], required_secondary_factors_for_tenant: Callable[[], Awaitable[List[str]]], user_context: Dict[str, Any], ) -> MFARequirementList: # highlight-next-line return [{"allOfInAnyOrder": [FactorIds.TOTP, FactorIds.OTP_EMAIL]}] original_implementation.get_mfa_requirements_for_auth = ( get_mfa_requirements_for_auth ) return original_implementation init( app_info=InputAppInfo( app_name="...", api_domain="...", website_domain="...", ), supertokens_config=SupertokensConfig( connection_uri="...", ), framework="...", # type: ignore recipe_list=[ multifactorauth.init( first_factors=[FactorIds.EMAILPASSWORD, FactorIds.THIRDPARTY], override=OverrideConfig(functions=override_functions), ), ], ) ``` ## Require multiple factors in a specific order ```ts supertokens.init({ supertokens: { connectionURI: "..." }, appInfo: { appName: "...", apiDomain: "...", websiteDomain: "..." }, recipeList: [ // ... MultiFactorAuth.init({ firstFactors: [ MultiFactorAuth.FactorIds.EMAILPASSWORD, MultiFactorAuth.FactorIds.THIRDPARTY ], override: { functions: (originalImplementation) => { return { ...originalImplementation, getMFARequirementsForAuth: async function (input) { // highlight-start let currentCompletedFactors = MultiFactorAuth.MultiFactorAuthClaim.getValueFromPayload(input.accessTokenPayload) if (MultiFactorAuth.FactorIds.TOTP in currentCompletedFactors.c) { // this means the totp factor is completed return [MultiFactorAuth.FactorIds.OTP_EMAIL] } else { // this means we have not finished totp yet, and we want // to do that right after first factor login return [MultiFactorAuth.FactorIds.TOTP] } // highlight-end } } } } }) ] }) ``` :::note At the moment this feature is not supported through the Go SDK. ::: ```python from supertokens_python import init, InputAppInfo, SupertokensConfig from supertokens_python.recipe import multifactorauth from supertokens_python.recipe.multifactorauth.types import FactorIds, OverrideConfig from supertokens_python.recipe.multifactorauth.interfaces import RecipeInterface from typing import Dict, Any, Callable, Awaitable, List from supertokens_python.types import User from supertokens_python.recipe.multifactorauth.types import MFARequirementList from supertokens_python.recipe.multifactorauth.multi_factor_auth_claim import ( MultiFactorAuthClaim, ) def override_functions(original_implementation: RecipeInterface): async def get_mfa_requirements_for_auth( tenant_id: str, access_token_payload: Dict[str, Any], completed_factors: Dict[str, int], user: Callable[[], Awaitable[User]], factors_set_up_for_user: Callable[[], Awaitable[List[str]]], required_secondary_factors_for_user: Callable[[], Awaitable[List[str]]], required_secondary_factors_for_tenant: Callable[[], Awaitable[List[str]]], user_context: Dict[str, Any], ) -> MFARequirementList: # highlight-start current_completed_factors = MultiFactorAuthClaim.get_value_from_payload( access_token_payload ) if current_completed_factors and FactorIds.TOTP in current_completed_factors.c: # this means the totp factor is completed return [FactorIds.OTP_EMAIL] else: # this means we have not finished totp yet, and we want # to do that right after first factor login return [FactorIds.TOTP] # highlight-end original_implementation.get_mfa_requirements_for_auth = ( get_mfa_requirements_for_auth ) return original_implementation init( app_info=InputAppInfo( app_name="...", api_domain="...", website_domain="...", ), supertokens_config=SupertokensConfig( connection_uri="...", ), framework="...", # type: ignore recipe_list=[ multifactorauth.init( first_factors=[FactorIds.EMAILPASSWORD, FactorIds.THIRDPARTY], override=OverrideConfig(functions=override_functions), ), ], ) ```
:::note no-title You can return an empty array from `getMFARequirementsForAuth` if you don't want any further MFA done for the current user. :::
For a multi tenant setup, you can configure a list of secondary factors when creating / modifying a tenant as shown below: ```tsx async function createNewTenant() { let resp = await Multitenancy.createOrUpdateTenant("customer1", { firstFactors: [MultiFactorAuth.FactorIds.EMAILPASSWORD], requiredSecondaryFactors: [MultiFactorAuth.FactorIds.OTP_EMAIL] }); if (resp.createdNew) { // Tenant created successfully } else { // Existing tenant's config was modified. } } ``` In the above code, you add a property called `requiredSecondaryFactors` for a tenant whose value is a `string[]`. You add `otp-email` as a factor ID above which means that all users who log into that tenant must complete `otp-email` as a second factor. To remove the `requiredSecondaryFactors` configuration for a tenant, you can pass a `null` value for the `requiredSecondaryFactors` key in the tenant configuration. If you add more than one item in this array, it means that the user must complete any one of factors mentioned in the array. If you want to have a different behavior for the tenant, you can achieve that by overriding the `getMFARequirementsForAuth` function as shown below: :::note At the moment this feature is not supported through the Go SDK. ::: ```python from supertokens_python.recipe.multitenancy.asyncio import create_or_update_tenant from supertokens_python.recipe.multitenancy.interfaces import TenantConfigCreateOrUpdate from supertokens_python.recipe.multifactorauth.types import FactorIds async def create_new_tenant(): resp = await create_or_update_tenant( "customer1", TenantConfigCreateOrUpdate( first_factors=[FactorIds.EMAILPASSWORD], required_secondary_factors=[FactorIds.OTP_EMAIL], ) ) if resp.created_new: # Tenant created successfully pass else: # Existing tenant's config was modified pass ``` ```python from supertokens_python.recipe.multitenancy.syncio import create_or_update_tenant from supertokens_python.recipe.multitenancy.interfaces import TenantConfigCreateOrUpdate from supertokens_python.recipe.multifactorauth.types import FactorIds def create_new_tenant(): resp = create_or_update_tenant( "customer1", TenantConfigCreateOrUpdate( first_factors=[FactorIds.EMAILPASSWORD], required_secondary_factors=[FactorIds.OTP_EMAIL], ) ) if resp.created_new: # Tenant created successfully pass else: # Existing tenant's config was modified pass ``` ```bash curl --location --request PUT 'http://localhost:3567/recipe/multitenancy/tenant/v2' \ --header 'api-key: YOUR_API_KEY' \ --header 'Content-Type: application/json' \ --data-raw '{ "tenantId": "customer1", "firstFactors": ["emailpassword"], "requiredSecondaryFactors": ["otp-email"] }' ``` In the above code, you add a property called `requiredSecondaryFactors` for a tenant whose value is a `string[]`. You add `otp-email` as a factor ID above which means that all users who log into that tenant must complete `otp-email` as a second factor. To remove the `requiredSecondaryFactors` configuration for a tenant, you can turn off all the toggles. If you add more than one item in this array, it means that the user must complete any one of factors mentioned in the array. If you want to have a different behavior for the tenant, you can achieve that by overriding the `getMFARequirementsForAuth` function as shown below: OTP - Email enabled 
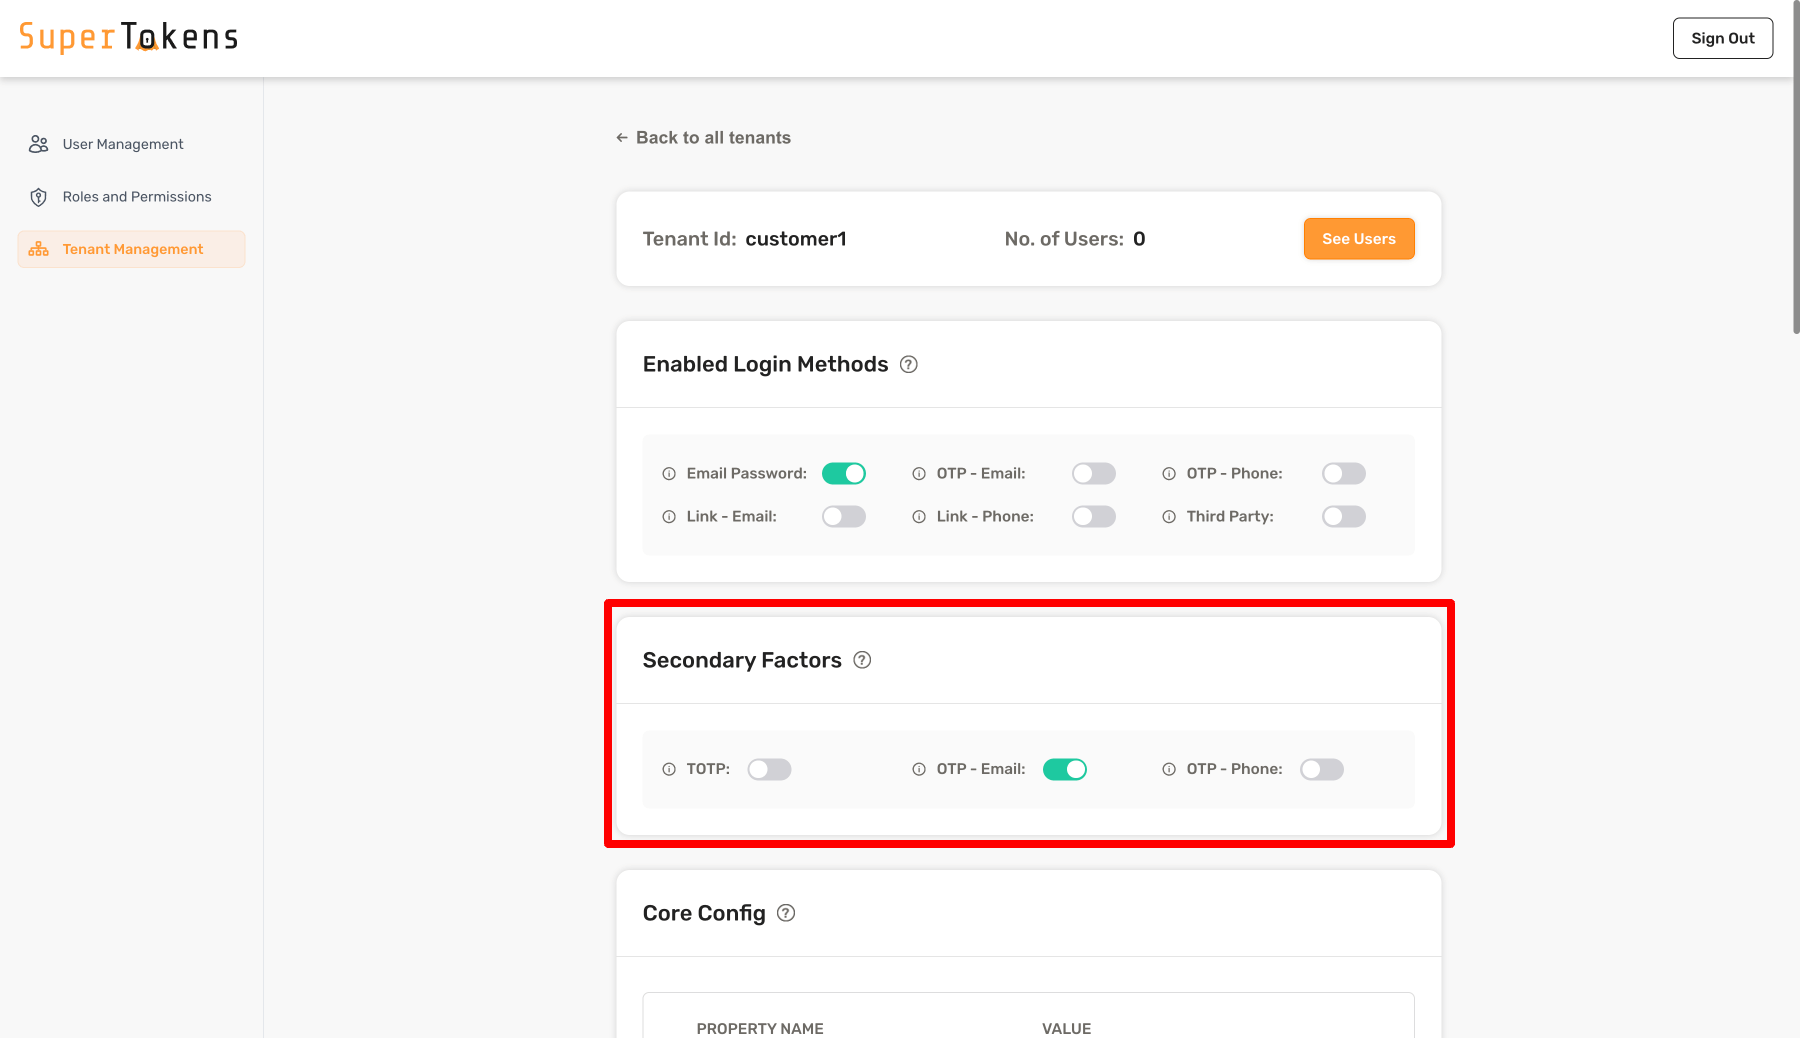
As shown above, you turn on `OTP - Email` in the **Secondary Factors** section which means that all users who log into that tenant must complete `otp-email` as a second factor. You can also turn off all factors to have no secondary factors required for the tenant. If you turn on more than one factor, it means that the user must complete any one of factors that are active. If you want to have a different behavior for the tenant, you can achieve that by overriding the `getMFARequirementsForAuth` function as shown below: ```ts supertokens.init({ supertokens: { connectionURI: "..." }, appInfo: { appName: "...", apiDomain: "...", websiteDomain: "..." }, recipeList: [ // ... MultiFactorAuth.init({ firstFactors: [ MultiFactorAuth.FactorIds.EMAILPASSWORD, MultiFactorAuth.FactorIds.THIRDPARTY ], override: { functions: (originalImplementation) => { return { ...originalImplementation, getMFARequirementsForAuth: async function (input) { // highlight-start return [{ allOfInAnyOrder: await input.requiredSecondaryFactorsForTenant }] // highlight-end } } } } }) ] }) ``` :::note At the moment this feature is not supported through the Go SDK. ::: ```python from supertokens_python import init, InputAppInfo, SupertokensConfig from supertokens_python.recipe import multifactorauth from supertokens_python.recipe.multifactorauth.types import FactorIds, OverrideConfig from supertokens_python.recipe.multifactorauth.interfaces import RecipeInterface from typing import Dict, Any, Callable, Awaitable, List from supertokens_python.types import User from supertokens_python.recipe.multifactorauth.types import MFARequirementList def override_functions(original_implementation: RecipeInterface): async def get_mfa_requirements_for_auth( tenant_id: str, access_token_payload: Dict[str, Any], completed_factors: Dict[str, int], user: Callable[[], Awaitable[User]], factors_set_up_for_user: Callable[[], Awaitable[List[str]]], required_secondary_factors_for_user: Callable[[], Awaitable[List[str]]], required_secondary_factors_for_tenant: Callable[[], Awaitable[List[str]]], user_context: Dict[str, Any], ) -> MFARequirementList: # highlight-start return [{"allOfInAnyOrder": await required_secondary_factors_for_tenant()}] # highlight-end original_implementation.get_mfa_requirements_for_auth = ( get_mfa_requirements_for_auth ) return original_implementation init( app_info=InputAppInfo( app_name="...", api_domain="...", website_domain="...", ), supertokens_config=SupertokensConfig( connection_uri="...", ), framework="...", # type: ignore recipe_list=[ multifactorauth.init( first_factors=[FactorIds.EMAILPASSWORD, FactorIds.THIRDPARTY], override=OverrideConfig(functions=override_functions), ), ], ) ``` Notice that the input to the function contains the `requiredSecondaryFactorsForTenant` array. This would be the same list that you passed to the tenant configuration when creating / modifying the tenant as shown in the previous steps. #### 1.4 Remove the second factor requirement {{optional}} Instead of configuring a factor for all users in your app, or for all users within a tenant, you may want to implement a flow in which users do MFA only if they have enabled it for themselves. Here, users may also want to choose what factors they would like to enable for themselves. This flow allows users to configure their MFA preferences in the settings page in your app's frontend. A pre-built UI for this is not yet provided, but in this section, we explain the setup on the backend. You want to start by creating an API that does [session verification](/docs/additional-verification/session-verification/protect-api-routes), and then enable the desired factor for the user. For example, if the user wants to enable TOTP, then you would call the following function in your API: ```ts async function enableMFAForUser(userId: string) { await MultiFactorAuth.addToRequiredSecondaryFactorsForUser(userId, MultiFactorAuth.FactorIds.TOTP) } ``` :::note At the moment this feature is not supported through the Go SDK. ::: ```python from supertokens_python.recipe.multifactorauth.asyncio import add_to_required_secondary_factors_for_user from supertokens_python.recipe.multifactorauth.types import FactorIds async def enable_mfa_for_user(user_id: str): await add_to_required_secondary_factors_for_user( user_id, FactorIds.TOTP ) ``` ```python from supertokens_python.recipe.multifactorauth.syncio import add_to_required_secondary_factors_for_user from supertokens_python.recipe.multifactorauth.types import FactorIds def enable_mfa_for_user(user_id: str): add_to_required_secondary_factors_for_user( user_id, FactorIds.TOTP ) ``` The effect of the above function call is that in the default implementation of `getMFARequirementsForAuth`, the factors specifically enabled for the input user are considered. By default, if you add multiple factors for a user ID, then it would require them to complete any one of those secondary factors during login. If you want to change the default behavior from "any one of" to something else (like "all of"), you can do this by overriding the `getMFARequirementsForAuth` function: ```ts supertokens.init({ supertokens: { connectionURI: "..." }, appInfo: { appName: "...", apiDomain: "...", websiteDomain: "..." }, recipeList: [ // ... MultiFactorAuth.init({ firstFactors: [ MultiFactorAuth.FactorIds.EMAILPASSWORD, MultiFactorAuth.FactorIds.THIRDPARTY ], override: { functions: (originalImplementation) => { return { ...originalImplementation, // highlight-start getMFARequirementsForAuth: async function (input) { return [{ allOfInAnyOrder: await input.requiredSecondaryFactorsForUser }] } // highlight-end } } } }) ] }) ``` :::note At the moment this feature is not supported through the Go SDK. ::: ```python from supertokens_python import init, InputAppInfo, SupertokensConfig from supertokens_python.recipe import multifactorauth from supertokens_python.recipe.multifactorauth.types import FactorIds, OverrideConfig from supertokens_python.recipe.multifactorauth.interfaces import RecipeInterface from typing import Dict, Any, Callable, Awaitable, List from supertokens_python.types import User from supertokens_python.recipe.multifactorauth.types import MFARequirementList def override_functions(original_implementation: RecipeInterface): async def get_mfa_requirements_for_auth( tenant_id: str, access_token_payload: Dict[str, Any], completed_factors: Dict[str, int], user: Callable[[], Awaitable[User]], factors_set_up_for_user: Callable[[], Awaitable[List[str]]], required_secondary_factors_for_user: Callable[[], Awaitable[List[str]]], required_secondary_factors_for_tenant: Callable[[], Awaitable[List[str]]], user_context: Dict[str, Any], ) -> MFARequirementList: # highlight-start return [{"allOfInAnyOrder": await required_secondary_factors_for_user()}] # highlight-end original_implementation.get_mfa_requirements_for_auth = ( get_mfa_requirements_for_auth ) return original_implementation init( app_info=InputAppInfo( app_name="...", api_domain="...", website_domain="...", ), supertokens_config=SupertokensConfig( connection_uri="...", ), framework="...", # type: ignore recipe_list=[ multifactorauth.init( first_factors=[FactorIds.EMAILPASSWORD, FactorIds.THIRDPARTY], override=OverrideConfig(functions=override_functions), ), ], ) ``` Once you call the `addToRequiredSecondaryFactorsForUser` function for a user, SuperTokens stores this preference in the user metadata JSON of the user. For example, if you add `"totp"` as a required secondary factor for a user, this preference is stored in the metadata JSON as: ```json { "_supertokens": { "requiredSecondaryFactors": ["totp"] } } ``` You can view this JSON on the [user details page of the user management dashboard](/docs/post-authentication/dashboard/user-management) and modify it manually if you like. To know the factors that a user has enabled, you can use the following function: ```ts async function isTotpEnabledForUser(userId: string) { let factors = await MultiFactorAuth.getRequiredSecondaryFactorsForUser(userId) return factors.includes(MultiFactorAuth.FactorIds.TOTP) } ``` :::note At the moment this feature is not supported through the Go SDK. ::: ```python from supertokens_python.recipe.multifactorauth.asyncio import get_required_secondary_factors_for_user from supertokens_python.recipe.multifactorauth.types import FactorIds async def is_totp_enabled_for_user(user_id: str): factors = await get_required_secondary_factors_for_user( user_id ) return FactorIds.TOTP in factors ``` ```python from supertokens_python.recipe.multifactorauth.syncio import get_required_secondary_factors_for_user from supertokens_python.recipe.multifactorauth.types import FactorIds def is_totp_enabled_for_user(user_id: str): factors = get_required_secondary_factors_for_user( user_id ) return FactorIds.TOTP in factors ``` Using the above function, you can build your settings page on the frontend which displays the existing enabled factors for the user. Allow users to enable or disable factors as they like. Once you have enabled a factor for a user, you take them to that factor setup screen if they have not previously already setup the factor. To know if a factor is setup, you can call the following function (on the backend): ```ts async function isTotpSetupForUser(userId: string) { let factors = await MultiFactorAuth.getFactorsSetupForUser(userId) return factors.includes(MultiFactorAuth.FactorIds.TOTP) } ``` :::note At the moment this feature is not supported through the Go SDK. ::: ```python from supertokens_python.recipe.multifactorauth.asyncio import get_factors_setup_for_user from supertokens_python.recipe.multifactorauth.types import FactorIds async def is_totp_enabled_for_user(user_id: str): factors = await get_factors_setup_for_user( user_id ) return FactorIds.TOTP in factors ``` ```python from supertokens_python.recipe.multifactorauth.syncio import get_factors_setup_for_user from supertokens_python.recipe.multifactorauth.types import FactorIds def is_totp_enabled_for_user(user_id: str): factors = get_factors_setup_for_user( user_id ) return FactorIds.TOTP in factors ``` Or you can call the [`MFAInfo` endpoint](/docs/additional-verification/mfa/initial-setup#the-mfa-info-endpoint) from the frontend which returns information indicating which factors have already been setup for the user and which not. A factor is considered setup if the user has gone through that factor's flow at least once. For example, if the user has created and verified a TOTP device, only then does the `getFactorsSetupForUser` function return `totp` as part of the array. Likewise, if the user has completed `otp-email` or `link-email` once, only then do these factors become a part of the returned array. Let's take two examples: - The first time the user enables TOTP, then the result of `getFactorsSetupForUser` does not contain `"totp"`. You should redirect the user to the TOTP setup screen. Once they add and verify a device, then `getFactorsSetupForUser` returns `["totp"]` even if they later disable TOTP from the settings page and re-enable it. - Let's say that the first factor for a user is `emailpassword`, and the second factor is `otp-email`. Once they sign up, SuperTokens already knows the email for the user, when they are doing the `otp-email` step, then they are not asked to enter their email again (that is, an OTP is directly sent to them). However, until they actually complete the OTP flow, `getFactorsSetupForUser` does not return `["otp-email"]` as part of the output. :::caution In the edge case that a factor is active for a user, but they sign out before setting it up, then when they login next, SuperTokens still asks them to complete the factor at that time. If SuperTokens doesn't have the required information (like no TOTP device for TOTP auth), then users need to set up a device at that point in time. If you would like to change how this works and only want users to set up their factor via the settings page, and not during sign in, you can do this by overriding the `getMFARequirementsForAuth` function, which takes as an input the list of factors that are setup for the current user. ::: The subsequent sections in this doc walk through frontend setup, and also specific examples of common MFA flows. ### 2. Set up the frontend The pre-built UI provides support for the following MFA methods: - TOTP - Email / phone OTP If you want other types of MFA (like magic links, or password), please consider checking out the custom UI second. We start by initialising the MFA recipe on the frontend and providing the list of first factors as shown below: ```tsx supertokens.init({ appInfo: { appName: "...", apiDomain: "...", websiteDomain: "...", }, recipeList: [ EmailPassword.init( /* ... */), Passwordless.init({ contactMethod: "EMAIL_OR_PHONE", }), // highlight-start MultiFactorAuth.init({ firstFactors: [ MultiFactorAuth.FactorIds.EMAILPASSWORD, MultiFactorAuth.FactorIds.THIRDPARTY ] }) // highlight-end ] }) ``` You need to make changes to the auth route configuration, as well as to the `supertokens-web-js` SDK configuration at the root of your application: This change is in your auth route configuration. ```tsx // this goes in the auth route config of your frontend app (once the pre-built UI script has been loaded) supertokensUIInit({ appInfo: { appName: "...", apiDomain: "...", websiteDomain: "...", }, recipeList: [ supertokensUIEmailPassword.init( /* ... */), supertokensUIPasswordless.init({ contactMethod: "EMAIL_OR_PHONE", }), // highlight-start supertokensUIMultiFactorAuth.init({ firstFactors: [ supertokensUIMultiFactorAuth.FactorIds.EMAILPASSWORD, supertokensUIMultiFactorAuth.FactorIds.THIRDPARTY ] }) // highlight-end ] }) ``` This change goes in the `supertokens-web-js` SDK configuration at the root of your application: ```tsx SuperTokens.init({ appInfo: { apiDomain: "...", apiBasePath: "...", appName: "...", }, recipeList: [ Session.init(), MultiFactorAuth.init() ], }); ``` In the above snippet, `thirdparty` and email password are configured as first factors. The second factor is determined [on the backend](/docs/additional-verification/mfa/initial-setup#1-set-up-the-backend), based on the boolean value of [`v` in the MFA claim in the session](/docs/additional-verification/mfa/important-concepts#factors). If the `v` is `false` in the session, it means that there are still factors pending before the user has completed login. In this case, the frontend SDK calls the `MFAInfo` endpoint (see more about this later) on the backend which returns the list of factors (`string[]`) that the user must complete next. For example: - If the next array is `["otp-email"]`, then the user sees the enter OTP screen for the email associated with the first factor login. - If the `n` array has multiple items, the user sees a [factor chooser screen](https://master--6571be2867f75556541fde98.chromatic.com/?path=/story/mfa-chooser--multiple-factors) using which they can decide which factor they want to continue with. - If the `next` is empty, it means that: - A misconfiguration exists on the backend. This would show an access denied screen to the user. OR; - Another claim needs to satisfy first (like email verification), before the next MFA challenge can display. This can happen if you configure the `backend`'s `checkAllowedToSetupFactorElseThrowInvalidClaimError` function to not allow a factor setup until the email has been verified. If you notice, in the above code snippet, `Passwordless.init` is also included, and this handles cases where the second factor is `otp-email` or `otp-sms`. For TOTP, a different recipe is used as shown later in this guide. For a multi-factor setup, the first factors are selected based on [the configuration of the tenant](./backend-setup#multi-tenant-setup). Each tenant has a `firstFactors` array configuration which determines the login options shown for that tenant. For MFA, the login options are determined by the [`requiredSecondaryFactors` configuration on the tenant](./backend-setup#multi-tenant-setup-1), or based on the customisations for `getMFARequirementsForAuth` on the backend. To tell the frontend to dynamically load the factors based on the tenant, four things need to supply: - The current `tenantId` - Enable dynamic login methods - Add `MultiFactorAuth.init` to the recipe list without any configured `firstFactors` - Init all the recipes that can be possibly used by any tenant as the first or second factor. ```tsx supertokens.init({ appInfo: { appName: "...", apiDomain: "...", websiteDomain: "...", }, // highlight-next-line usesDynamicLoginMethods: true, recipeList: [ Multitenancy.init({ override: { functions: (oI) => { return { ...oI, // highlight-start getTenantId: (input) => { // Implement the following based on the UX flow you want for // tenant discovery return "TODO.." } // highlight-end } } } }), EmailPassword.init( /* ... */), Passwordless.init({ contactMethod: "EMAIL_OR_PHONE", }), // highlight-start MultiFactorAuth.init() // highlight-end ] }) ``` You need to make changes to the auth route configuration, as well as to the `supertokens-web-js` SDK configuration at the root of your application: This change is in your auth route configuration. ```tsx // this goes in the auth route config of your frontend app (once the pre-built UI script has been loaded) supertokensUIInit({ appInfo: { appName: "...", apiDomain: "...", websiteDomain: "...", }, // highlight-next-line usesDynamicLoginMethods: true, recipeList: [ supertokensUIMultitenancy.init({ override: { functions: (oI) => { return { ...oI, // highlight-start getTenantId: (input) => { // Implement the following based on the UX flow you want for // tenant discovery return "TODO.." } // highlight-end } } } }), supertokensUIEmailPassword.init( /* ... */), supertokensUIPasswordless.init({ contactMethod: "EMAIL_OR_PHONE", }), // highlight-start supertokensUIMultiFactorAuth.init() // highlight-end ] }) ``` This change goes in the `supertokens-web-js` SDK configuration at the root of your application: ```tsx SuperTokens.init({ appInfo: { apiDomain: "...", apiBasePath: "...", appName: "...", }, recipeList: [ Session.init(), MultiFactorAuth.init() ], }); ``` - In the above code snippet, `ThirdPartyEmailPassword` and `Passwordless` are included as the auth methods. This works for a variety of use cases like: - The first factor for any tenant can be third party or email password login, and the second factor can be passwordless login (`otp-email` or `otp-sms`). - The first factor for any tenant can be email password, with, or without a second factor (like `otp-email`).. - The first factor for any tenant can be third party, with, or without a second factor (like `otp-email`).. - The first factor for any tenant can be passwordless login (with magic link), with or without a second factor (like `otp-email`). - You can even change `passwordles.init` to using `thirdpartypasswordless.init` if you want to have the first factor for any tenant to be `thirdparty` or passwordless login, with or without a second factor (like `otp-email`). - The `MultiFactorAuth` is configured without any configured `firstFactors` because the frontend is set to dynamically load the first factors based on the tenant. Therefore, `usesDynamicLoginMethods: true` is included in the `SuperTokens.init` call. - The `Multitenancy` is configured as well, and a skeleton for `getTenantId` is provided. You need to implement this function based on the UX flow desired for tenant discovery. For example, [here is a common UX flow in which the tenant ID is determined based on the current sub domain](/docs/authentication/enterprise/subdomain-login). :::important - If you do initialize the `firstFactors` array for `MultiFactorAuth.init()` on the frontend, it is not considered when `usesDynamicLoginMethods: true` is included. - If the tenant doesn't have the `firstFactors` array set, then the list of first factors that appear is determined by the [login methods that are enabled in that tenant's configuration](/docs/multi-tenancy/new-tenant). ::: The second factor for a tenant is selected based on the [`secondaryFactors` configuration for the tenant](./backend-setup#multi-tenant-setup-1), or based on any custom implementation for the `getMFARequirementsForAuth` function. If the current user has specific MFA methods enabled for them, those are also shown as options as well. Overall, the list of secondary factors is used to build the `next` array returned from the `MFAInfo` endpoint (see more about this later). For example: - If the next array is `["otp-email"]`, then the user sees the enter OTP screen for the email associated with the first factor login. - If the `n` array has multiple items, the user sees a [factor chooser screen](https://master--6571be2867f75556541fde98.chromatic.com/?path=/story/mfa-chooser--multiple-factors) using which they can decide which factor they want to continue with. - If the `next` is empty, it means that: - A misconfiguration exists on the backend. This would show an access denied screen to the user. OR; - Another claim needs to satisfy first (like email verification), before the next MFA challenge can display. This can happen if you configure the `backend`'s `checkAllowedToSetupFactorElseThrowInvalidClaimError` function to not allow a factor setup until the email has been verified. In the subsequent sections, specific MFA setup examples are given for your reference. #### Usage with email verification If you are also requiring email verification, the user must verify the email first, and then all the MFA challenges. For example, if the user has email password as the first factor, and then TOTP as a second factor, SuperTokens prompts the user to do email password login, followed by email verification, followed by TOTP. To switch the order such that email verification happens after the secondary factors of MFA, follow the next code snippet. ```tsx supertokens.init({ appInfo: { appName: "...", apiDomain: "...", websiteDomain: "...", }, recipeList: [ // other recipes... EmailVerification.init({ mode: "REQUIRED", }), Session.init({ override: { functions: (originalImplementation) => { return { ...originalImplementation, // highlight-start getGlobalClaimValidators: (input) => { let emailVerificationClaimValidator = input.claimValidatorsAddedByOtherRecipes.find(v => v.id === EmailVerification.EmailVerificationClaim.id)!; let filteredValidators = input.claimValidatorsAddedByOtherRecipes.filter(v => v.id !== EmailVerification.EmailVerificationClaim.id); return [...filteredValidators, emailVerificationClaimValidator]; } // highlight-end } } } }) ] }) ``` In the snippet above, the `getGlobalClaimValidators` function in the Session recipe is overridden to add the email verification validator at the end of the returned validators array. This ensures that post the first factor sign up, the first validator that fails is the MFA one which redirects the user to complete the MFA factors. ```tsx // this goes in the auth route config of your frontend app (once the pre-built UI script has been loaded) supertokensUIInit({ appInfo: { appName: "...", apiDomain: "...", websiteDomain: "...", }, recipeList: [ // other recipes... supertokensUIEmailVerification.init({ mode: "REQUIRED", }), supertokensUISession.init({ override: { functions: (originalImplementation) => { return { ...originalImplementation, // highlight-start getGlobalClaimValidators: (input) => { let emailVerificationClaimValidator = input.claimValidatorsAddedByOtherRecipes.find(v => v.id === supertokensUIEmailVerification.EmailVerificationClaim.id)!; let filteredValidators = input.claimValidatorsAddedByOtherRecipes.filter(v => v.id !== supertokensUIEmailVerification.EmailVerificationClaim.id); return [...filteredValidators, emailVerificationClaimValidator]; } // highlight-end } } } }) ] }) ``` In the snippet above, the `getGlobalClaimValidators` function in the Session recipe is overridden to add the email verification validator at the end of the returned validators array. This ensures that post the first factor sign up, the first validator that fails is the MFA one which redirects the user to complete the MFA factors. #### Handle misconfigurations There can be situations of misconfigurations. For example you may have enabled `otp-email` for a user as a secondary factor, but did not add `Passwordless` (or `ThirdPartyPasswordless`) in the `recipeList` on the frontend. In such (and similar) situations, the pre-built UI on the frontend throws an error which is sent to the error boundary of your app. The way to solve these errors is to recheck the `recipeList` on the frontend, and make sure that it has all the recipes initialized that are necessary for any factor configured on the backend. #### The access denied screen Sometimes, users may end up seeing [an access denied screen](https://master--6571be2867f75556541fde98.chromatic.com/?path=/story/totp-mfa--device-setup-access-denied-reload) during the login flow. This appears if there is a 500 (backend sends a 500 status code) error during the MFA flow for API calls that are automatically initiated (without user action). For example: - When the user wants to setup a new `TOTP` device, the pre-built UI calls the `createDevice` function from the `totp` recipe on page load, and if that fails, users see the access denied screen asking them to retry. - When the user needs to complete an OTP email factor, and if the API call to send an email (which starts on page load) fails, then users see the access denied screen asking them to retry. You can override this component in the following way: ```tsx function App() { return ( { return (
Access denied! {props.error === undefined ? null : props.error}
); }, }}> {/* Rest of the JSX */}
); } export default App; ```
```tsx function App() { if(canHandleRoute([/*...*/])){ return ( { return (
Access denied! {props.error === undefined ? null : props.error}
); }, }}> {getRoutingComponent([/*...*/])}
) } return ( {/* Rest of the JSX */} ); } export default App; ```
:::caution You cannot override the pre-built UI in non react apps yet. :::
After the first factor sign in is over, to know the next auth challenge, the frontend should rely on the session's access token payload MFA claim's `n` array. For example, the access token payload may have the following content: ```json { "st-mfa": { "c": { "emailpassword": 1702877939, }, "v": false } } ``` This means that the user has completed the email password login, and that there are still MFA login challenge(s) remaining (`v` is `false`). #### 1.1 Initialize the MFA recipe ```tsx SuperTokens.init({ appInfo: { apiDomain: "...", apiBasePath: "...", appName: "...", }, recipeList: [ // other recipes... // highlight-next-line MultiFactorAuth.init() ], }); ``` ```tsx supertokens.init({ appInfo: { apiDomain: "...", apiBasePath: "...", appName: "...", }, recipeList: [ // other recipes... // highlight-next-line supertokensMultiFactorAuth.init() ], }); ``` :::success This step is not applicable for mobile apps. Please continue reading. ::: #### 1.2 Add the MFA flow The overall lifecycle of a factor post sign in is as follows: ## Asking for the first factor This is the same as setting up a recipe per the other recipe guides. Please follow those. ## Checking the `v` boolean value in the MFA claim After the first factor is complete, the frontend needs to check if there are any pending MFA challenges. This can be done by reading the `v` claim from the session as shown below: ```tsx async function isAllMFACompleted() { if (await Session.doesSessionExist()) { let mfaClaim = await Session.getClaimValue({ claim: MultiFactorAuth.MultiFactorAuthClaim }); if (mfaClaim === undefined) { // this can happen during migration where the session is an older one // that was created before MFA was introduced on the backend return true; } else { return mfaClaim.v } } else { throw new Error("Illegal function call: For first factor setup, you do not need to call this function") } } ``` ```tsx async function isAllMFACompleted() { if (await supertokensSession.doesSessionExist()) { let mfaClaim = await supertokensSession.getClaimValue({ claim: supertokensMultiFactorAuth.MultiFactorAuthClaim }); if (mfaClaim === undefined) { // this can happen during migration where the session is an older one // that was created before MFA was introduced on the backend return true; } else { return mfaClaim.v } } else { throw new Error("Illegal function call: For first factor setup, you do not need to call this function") } } ``` ```tsx async function isAllMFACompleted() { if (await SuperTokens.doesSessionExist()) { // highlight-start let isMFACompleted: boolean = (await SuperTokens.getAccessTokenPayloadSecurely())["st-mfa"].v; return isMFACompleted // highlight-end } } ``` ```kotlin val isMFACompleted: Boolean = (accessTokenPayload.get("st-mfa") as JSONObject).get("v") as Boolean; return isMFACompleted; } } ``` ```swift let mfaObject: [String: Any] = accessTokenPayload["st-mfa"] as? [String: Any], // Determine if MFA has been completed let isMFACompleted: Bool = mfaObject["v"] as? Bool { // Return the MFA completion status return isMFACompleted } // Return false if any of the unwrapping fails, indicating MFA completion status cannot be confirmed return false } } ``` ```dart Future isAllMFACompleted() async { var accessTokenPayload = await SuperTokens.getAccessTokenPayloadSecurely(); if (accessTokenPayload.containsKey("st-mfa")) { Map mfaObject = accessTokenPayload["st-mfa"]; if (mfaObject.containsKey("v")) { bool isMFACompleted = mfaObject["v"]; return isMFACompleted; } } return false; // Return false if "st-mfa" is not present or "v" is not found } ``` ## Checking the `next` array Once it is verified that MFA is still pending, the list of factors the user must do next needs to be retrieved. This can be done by calling the [MFA Info endpoint](#mfa-info-endpoint) which returns a list of next (`string[]`) factors: - If there are multiple values in this array, then the frontend needs to show these options to the user and ask them to pick one of them. - If there is only one item, then the UI can directly ask the user to complete that factor. - If this array is empty, then: - A misconfiguration exists on the backend. This would show an access denied screen to the user. OR; - Another claim needs to satisfy first (like email verification), before the next MFA challenge can display. This can happen if you configure the `backend`'s `checkAllowedToSetupFactorElseThrowInvalidClaimError` function to not allow a factor setup until the email has been verified. ## Checking for factor setup Once the user has picked a specific factor (or if `next` contains only one item), you need to check if that factor has already been setup for that user. A factor is setup already if: - For `totp`: The user has already added a `totp` device and verified it. - For `otp-email`: The user has a passwordless `loginMethod` that has an email associated with it. - For `link-email`: The user has a passwordless `loginMethod` that has an email associated with it. Note that this is not a valid secondary factor, but is a valid first factor. - For `otp-sms`: The user has a passwordless `loginMethod` that has a phone number associated with it. - For `link-phone`: The user has a passwordless `loginMethod` that has a phone number associated with it. Note that this is not a valid secondary factor, but is a value first factor. - For `emailpassword`: The user has an email password `loginMethod`. - For `thirdparty`: The user has a third party `loginMethod`. If the user has the factor already setup, you can skip the setup step and directly ask them for the challenge: - For `totp`: Ask them to enter the OTP. - For `otp-email`: Send them an email with the OTP, and ask them to enter the OTP. - For `otp-sms`: Send them an SMS with the OTP, and ask them to enter the OTP. - For `emailpassword`: Ask them to enter their password. - For `thirdparty`: Ask them to login using the third party provider. In case the user does not have the factor setup, you need to ask them to set it up first: - For `totp`: Ask them to scan the QR code and enter the TOTP to verify the device. - For `otp-email`: Ask them to enter their email and send them an email with the OTP. Once they enter the OTP, a passwordless user is created and associated with their user object. Note that if you already have the user's email from another login method (see later), you do not need to ask them to enter their email again. In that way, it would be similar to as if the factor is already setup, but technically, it is not. - For `otp-sms`: Ask them to enter their phone number and send them an SMS with the OTP. Once they enter the OTP, a passwordless user is created and associated with their user object. Note that if you already have the user's phone number from another login method (see later), you do not need to ask them to enter their phone number again. In that way, it would be similar to as if the factor is already setup, but technically, it is not. - For `emailpassword`: Ask them to enter their email and password. Once they enter the password, an email password user is created and associated with their user object. Note that if you already have the user's email from another login method (see later), you do not need to ask them to enter their email again. In that way, it would be similar to as if the factor is already setup, but technically, it is not. Here you would be calling the sign up API, vs in the other case (where the factor is already setup), you would be calling the sign in API. - For `thirdparty`: Ask them to login using the third party provider. Once they login, a third party user is created and associated with their user object. In the later guides of this recipe, the use cases are described. If you want to know the status of any factor, you can get that by calling the [MFA Info endpoint](#mfa-info-endpoint). ## References ### The MFA info endpoint This is an important endpoint which can be utilized to: - Know which factors are pending for the user (referred to as the the `next` array in the documentation). - Update the `v` and `c` values in the MFA claim. - Get a list of all factors that are already setup for the session user. - For each factor, get a list of emails / phone numbers that can be utilized for that factor. Our pre-built UI uses this API automatically, but you can also always call this API manually if you are building a custom UI: ```tsx async function fetchMFAInfo() { if (await Session.doesSessionExist()) { try { let mfaInfo = await MultifactorAuth.resyncSessionAndFetchMFAInfo() let factorEmails = mfaInfo.emails; let factorPhoneNumbers = mfaInfo.phoneNumbers; let emailsForOTPEmail = factorEmails["otp-email"]; let phoneNumbersForOTPSms = factorEmails["otp-sms"]; let isTotpSetup = mfaInfo.factors.alreadySetup.includes("totp"); let isOTPEmailSetup = mfaInfo.factors.alreadySetup.includes("otp-email"); let isOTPSmsSetup = mfaInfo.factors.alreadySetup.includes("otp-sms"); let next = mfaInfo.factors.next; let factorsAllowedToBeSetup = mfaInfo.factors.allowedToSetup; } catch (err: any) { if (err.isSuperTokensGeneralError === true) { // this may be a custom error message sent from the API by you. window.alert(err.message); } else { window.alert("Oops! Something went wrong."); } } } else { throw new Error("Illegal function call: For first factor setup, you do not need to call this function") } } ``` ```tsx async function fetchMFAInfo() { if (await supertokensSession.doesSessionExist()) { try { let mfaInfo = await supertokensMultiFactorAuth.resyncSessionAndFetchMFAInfo() let factorEmails = mfaInfo.emails; let factorPhoneNumbers = mfaInfo.phoneNumbers; let emailsForOTPEmail = factorEmails["otp-email"]; let phoneNumbersForOTPSms = factorEmails["otp-sms"]; let isTotpSetup = mfaInfo.factors.alreadySetup.includes("totp"); let isOTPEmailSetup = mfaInfo.factors.alreadySetup.includes("otp-email"); let isOTPSmsSetup = mfaInfo.factors.alreadySetup.includes("otp-sms"); let next = mfaInfo.factors.next; let factorsAllowedToBeSetup = mfaInfo.factors.allowedToSetup; } catch (err: any) { if (err.isSuperTokensGeneralError === true) { // this may be a custom error message sent from the API by you. window.alert(err.message); } else { window.alert("Oops! Something went wrong."); } } } else { throw new Error("Illegal function call: For first factor setup, you do not need to call this function") } } ``` - In the above code snippet, the list of factors which the user must complete next (in the `next` array) is retrieved along with all the relevant information to know what state each factor is in to decide if the user should be prompted to setup the factor (for example create a new TOTP device), or solve the auth challenge instead (for example, showing the enter TOTP screen). - The function is called `resyncSessionAndFetchMFAInfo` because it does two things: - fetches the MFA info that you can consume to know the `next` array and what state each factor is in. - resynchronizes the value of the `v` and `c` in the session's MFA claim. Call the following API when you want to know the status of any factor. Notice that the API call requires the session's access token as an input (this should be included by the frontend SDK automatically): ```bash curl --location --request PUT '/mfa/info' \ --header 'Authorization: Bearer ...' ``` - The structure of the raw JSON response is as follows: ```json { "status": "OK", "factors": { "alreadySetup": ["totp", "otp-email", "..."], "allowedToSetup": ["otp-sms", "otp-email", "..."], "next": ["otp-sms", "..."] }, "emails": { "otp-email": ["user1@example.com", "user2@example.com"], "link-email": ["user1@example.com", "user2@example.com"], }, "phoneNumbers": { "otp-sms": ["+1234567890", "+1098765432"], "link-phone": ["+1234567890", "+1098765432"], }, } ``` - `factors.alreadySetup` is an array that contains all factors that have been setup by the user. If the current factor is a part of this array, it means that you can directly take the user to the factor challenge screen. If your factor depends on an email or phone number (like in the case of `otp-sms` or `otp-email`), then you can find the email to send the code to in the `emails` or `phoneNumbers` object in the response with the key as the current factor ID. - `factors.allowedToSetup` is an array that contains all factors that the user can setup at this point. This is not that useful during the sign in process, but may be useful post sign in if you want to know what are the factors that the user can setup at any point in time. - `emails` is an object in which the key are all the factor IDs supported by SuperTokens (and any custom factor ID added by you). The values against each of the keys is a list of emails that can be utilized to complete the factor. The first email (index 0) in the list is the preferred email to use for the factor. The order is determined based on the first factor chosen by the user, and if the factor was already setup or not. If the array is empty, it means that there is no email associated with the user for that factor. This can happen only if the factor was not already setup. In this case, you should take the user to a screen to ask them to first enter an email, and then to the challenge screen. The flow is further explained in the common flows guide later on. - `phoneNumbers` is similar to the `emails` object, except that it contains phone numbers for factors that are dependent on phone numbers. - The `factors.next` array determines the list of factors which the user must completed next. For example: - If the next array is `["otp-email"]`, then the user sees the enter OTP screen for the email associated with the first factor login. - If the `n` array has multiple items: - For the pre-built UI, the user sees a [factor chooser screen](https://master--6571be2867f75556541fde98.chromatic.com/?path=/story/mfa-chooser--multiple-factors) using which they can decide which factor they want to continue with. - For custom UI, you would need to make this screen on your own. - If the `next` is empty, it means that: - A misconfiguration exists on the backend. This would show an access denied screen to the user. OR; - Another claim needs to satisfy first (like email verification), before the next MFA challenge can display. This can happen if you configure the `checkAllowedToSetupFactorElseThrowInvalidClaimError` function, on the backend, to not allow a factor setup until the email is verified. ### Handle support cases Some situations exist in which users may be locked out of their accounts and would need you to do certain steps to unlock their accounts. These cases are: ## `ERR_CODE_009` - This can happen when the second factor is `emailpassword`: - API Path is `/signin POST`. - Output JSON: ```json { "status": "SIGN_IN_NOT_ALLOWED", "reason": "Cannot sign up due to security reasons. Please contact support. (ERR_CODE_009)" } ``` - This can happen if the email password account you are trying to do MFA with is not verified. ## `ERR_CODE_010` - This can happen when the second factor is `emailpassword`: - API Path is `/signin POST`. - Output JSON: ```json { "status": "SIGN_IN_NOT_ALLOWED", "reason": "Cannot sign up due to security reasons. Please contact support. (ERR_CODE_010)" } ``` - This can happen if the email password account you are trying to do MFA with is already linked to another primary user that is not equal to the session user. ## `ERR_CODE_011` - This can happen when the second factor is `emailpassword`: - API Path is `/signin POST`. - Output JSON: ```json { "status": "SIGN_IN_NOT_ALLOWED", "reason": "Cannot sign up due to security reasons. Please contact support. (ERR_CODE_011)" } ``` - This can happen if the email password account you are trying to do MFA cannot link to the session user because there already exists another primary user with the same email. ## `ERR_CODE_012` - This can happen when the second factor is `emailpassword`: - API Path is `/signin POST`. - Output JSON: ```json { "status": "SIGN_IN_NOT_ALLOWED", "reason": "Cannot sign up due to security reasons. Please contact support. (ERR_CODE_012)" } ``` - To link the email password user with the session user, it must be confirmed that the session user is a primary user. However, that can fail if there exists another primary user with the same email as the session user, and in this case, this error is sent to the frontend. ## `ERR_CODE_013` - This can happen when the second factor is `emailpassword`: - API Path is `/signup POST`. - Output JSON: ```json { "status": "SIGN_UP_NOT_ALLOWED", "reason": "Cannot sign up due to security reasons. Please contact support. (ERR_CODE_013)" } ``` - An example scenario of when in the following scenario: - A user signs up with their phone number and OTP - Post sign up, they are prompted to add their email and a password for the account. In this case, since the entered email is not verified, this error will display. - To resolve this, it is advised to change the flow to first ask the user to go through the email OTP flow post the first factor sign up, and then add a password to the account. This way, the email will be verified. ## `ERR_CODE_014` - This can happen when the second factor is `emailpassword`: - API Path is `/signup POST`. - Output JSON: ```json { "status": "SIGN_UP_NOT_ALLOWED", "reason": "Cannot sign up due to security reasons. Please contact support. (ERR_CODE_014)" } ``` - An example scenario of when in the following scenario: - Let's say that the app is set up to not have automatic account linking during the first factor. - A user creates an email password account with email `e1`, verifies it, and links social login account to it with email `e2`. - The user logs out, and then creates a social login account with email `e1`. Then, they are prompted to add a password to this account. Since an email password account with `e1` already exists, SuperTokens will try and link that to this new account, but fail, since the email password account with `e1` is already a primary user. - To resolve this, it is advised to manually link the `e1` social login account with the `e1` email password account. Or you can enable automatic account linking for first factor and this way, the above scenario will not happen. ## `ERR_CODE_015` - This can happen when the second factor is `emailpassword`: - API Path is `/signup POST`. - Output JSON: ```json { "status": "SIGN_UP_NOT_ALLOWED", "reason": "Cannot sign up due to security reasons. Please contact support. (ERR_CODE_015)" } ``` - An example scenario of when in the following scenario: - A user creates a social login account with email `e1` which becomes a primary user. - The user logs out, and creates another social login account with email `e2`, which also becomes a primary user. - The user is prompted to add a password for the new account with an option to also specify an email with it (this is strange, but theoretically possible). They now enter the email `e1` for the email password account. - This will cause this type of error since the linking of the new social login and email account will fail since there already exists another primary user with the same (`e1`) email. - To resolve this, it is advised not allowing users to specify an email when asking them to add a password for their account. ## `ERR_CODE_016` - This can happen when the second factor is `emailpassword`: - API Path is `/signup POST`. - Output JSON: ```json { "status": "SIGN_UP_NOT_ALLOWED", "reason": "Cannot sign up due to security reasons. Please contact support. (ERR_CODE_016)" } ``` - An example scenario of when in the following scenario: - Let's say that the app is set up to not have automatic account linking during the first factor. - A user signs up with a social login account using Google with email `e1`, and they add another social account, with Facebook, with the same email. - The user logs out and creates another social login account with email `e1` (say `GitHub`), and then tries and adds a password to this account with email `e1`. Here, SuperTokens will try and make the `GitHub` login a primary user, but fail, since the email `e1` is already a primary user (with Google login). - To resolve this, it is advised to manually link the `e1` `GitHub` social login account with the `e1` Google social login account. Or you can enable automatic account linking for first factor and this way, the above scenario will not happen. ## `ERR_CODE_017` - This can happen when the second factor relies on the passwordless recipe. - API Path is `/signinup/code/consume POST`. - Output JSON: ```json { "status": "SIGN_IN_UP_NOT_ALLOWED", "reason": "Cannot sign in / up due to security reasons. Please contact support. (ERR_CODE_017)" } ``` - This can happen when the passwordless account is trying to link to the account of the first factor, but it can't because the passwordless account is already linked with another primary user. ## `ERR_CODE_018` - This can happen when the second factor relies on the passwordless recipe. - API Path is `/signinup/code/consume POST`. - Output JSON: ```json { "status": "SIGN_IN_UP_NOT_ALLOWED", "reason": "Cannot sign in / up due to security reasons. Please contact support. (ERR_CODE_018)" } ``` - This can happen when the passwordless account is trying to link to the account of the first factor, but it can't because there exists another primary user with the same email as the passwordless account. ## `ERR_CODE_019` - This can happen when the second factor relies on the passwordless recipe. - API Path is `/signinup/code POST` or `/signinup/code/consume POST`. - Output JSON: ```json { "status": "SIGN_IN_UP_NOT_ALLOWED", "reason": "Cannot sign in / up due to security reasons. Please contact support. (ERR_CODE_019)" } ``` - This can happen when the passwordless account is trying to link to the account of the first factor, but, the first factor account cannot become a primary user because there exists another account with the same email as the first factor user account which is already primary. If you are using otp-email MFA factor as a form of email verification, you should also have `emailverification` recipe initialised in `REQUIRED` mode on the backend (no need to add it on the frontend since users won't see that UI). This is for security reasons wherein during the sign up process, when asking for the otp-email challenge, the email the OTP is sent to is determined on the frontend (automatically). In this case, the following scenario is possible: - User signs up with email `A` - An email OTP challenge is displayed to the user, and an OTP to email `A` is sent automatically. - The user manually calls the OTP create code API with email `B` and their session token, and verifies the OTP via a call to the consume code API. - The user refreshes the page and the otp-email challenge is complete. Of course, this is not the desired flow when you want to use otp-email as a form of email verification. To prevent this, you should have the `emailverification` recipe initialised in `REQUIRED` mode on the backend. This ensures that the email verification claim validator only passes if the email that's verified is the one from the first factor (email `A`). The above case is only possible during sign up, and not sign in. ::: ### Security considerations SuperTokens enforces that a user has completed all the required factors by keeping track of and checking them in the user's access token payload. - If a user is required to complete a MFA challenge, for example TOTP, if they already have a verified TOTP device, they cannot setup any other factor before completing this factor challenge, and if they do not yet have a verified TOTP device, then the only action they are allowed to take is to create a new TOTP device. This ensures that a user cannot bypass the MFA challenges of the current or future step. - When a user creates a new TOTP device, it cannot be utilized unless they first verify it by entering the initial TOTP code. - If the email of the 2nd factor login method is not confirmed, by default, it is not allowed to be setup or used as a 2nd factor, unless the session user has a login method that has the same email which is verified. - A fixed number of times (5 times by default) a user can enter an invalid TOTP code, after which they have to wait for 15 minutes before trying again. This timeout and the max attempts count can be modified in the core configuration. - During sign up (not sign in), for email / SMS OTP challenge, the email / SMS that the OTP is sent to is determined by the frontend. This is intentional because it allows you to create a flow in which the email the OTP is sent to may not be the same as the login method of the first factor. However, from a security point of view, it allows a malicious actor to send an OTP to a different email / phone number than the first factor's phone or email. This is not an issue if you are using email OTP as a method for email verification because the email verification recipe checks that the email of the first factor is verified, and in the case of the malicious user, the email of the first factor won't be verified because they entered a different email for otp-email challenge. ---